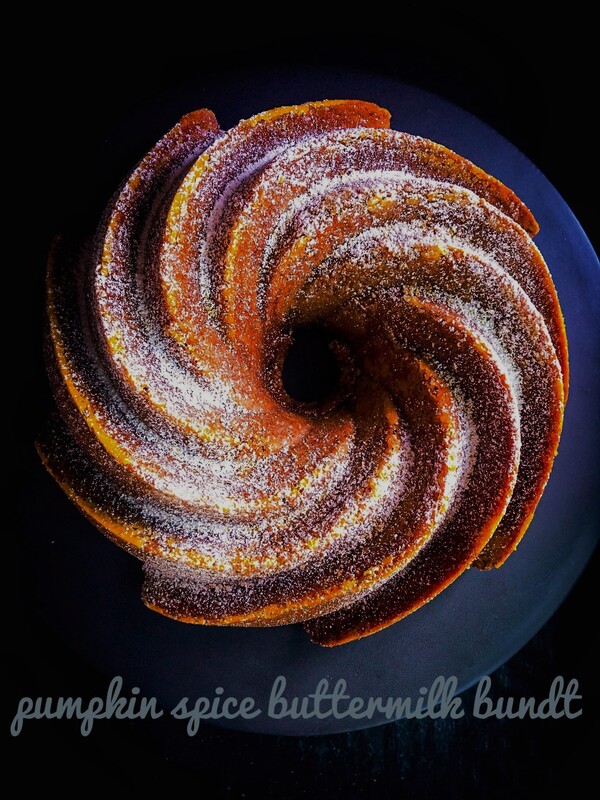
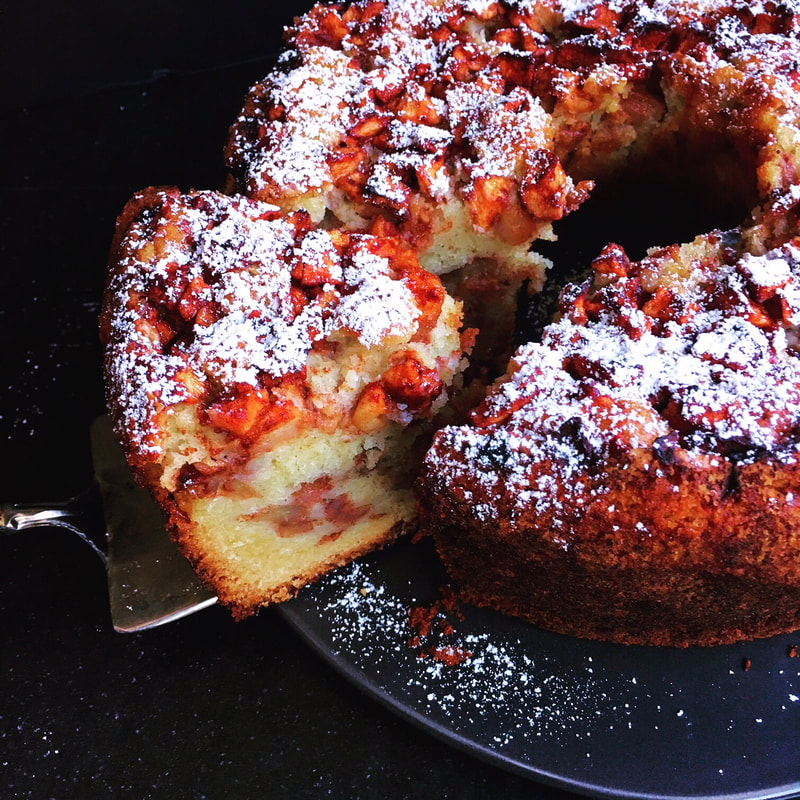
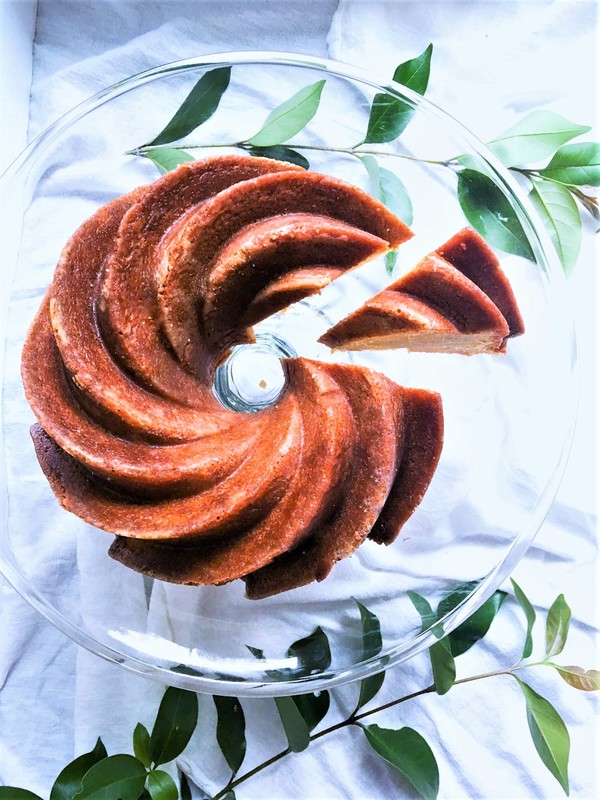
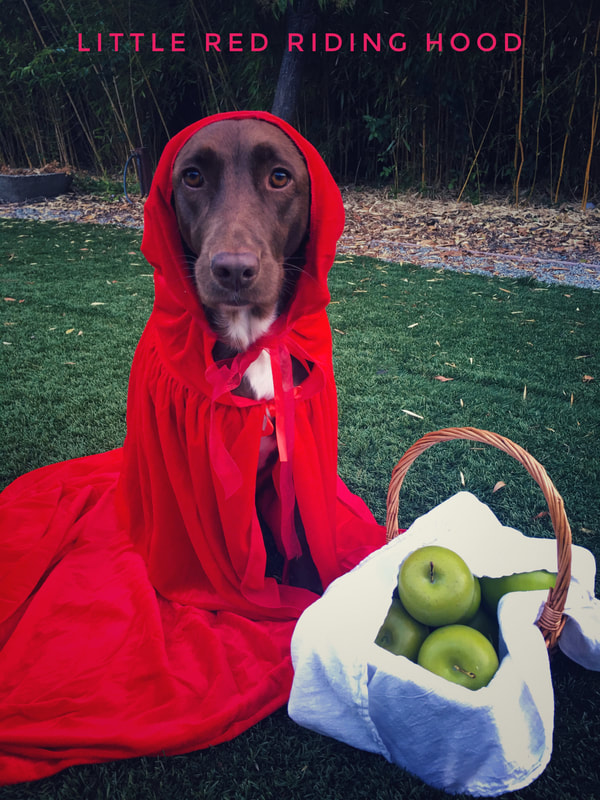
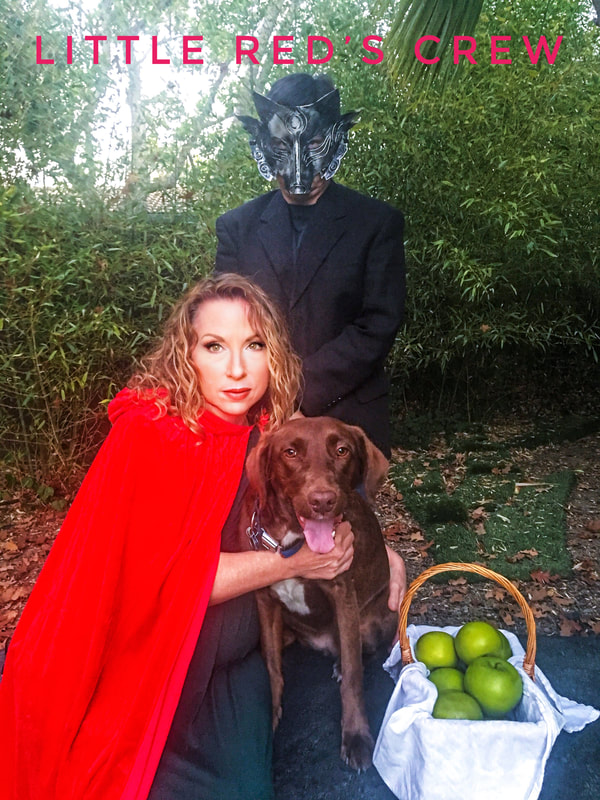
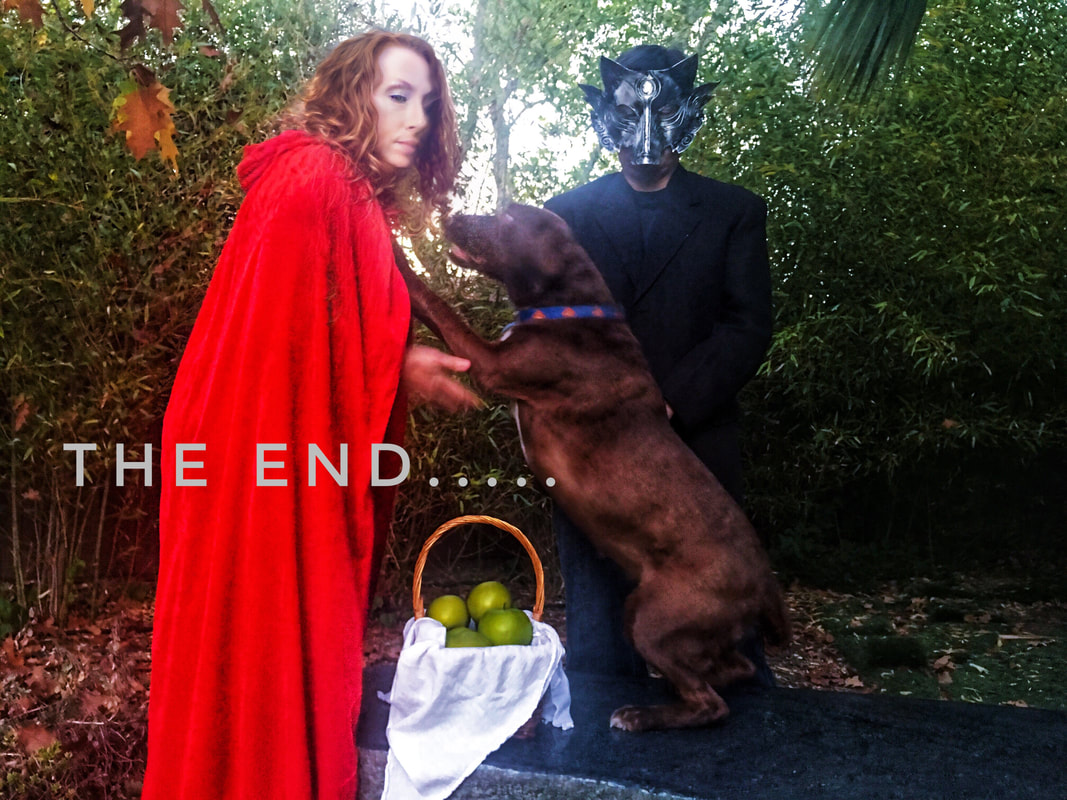
 [Ed. note: Once again, since it's Halloween, our four-pawed special-guest blogger returns.] Okay. Hello. Marlowe here. Mom and Dad say it okay to write because I has a did last Halloween (www.moveablefeast.me/blog/mini-butterscotch-apples) and then also as well again repeated here (www.moveablefeast.me/blog/sauteed-white-beans-with-kale). Dad better give me raise of more treats or I bite him. [Ed. note: We'll talk.] Mom say Halloween one of her favorites times of year, which I no understand because weird little people ring doorbell all night and everybody tell me to stop barking. But I guess okay since little people very nice to me and give me lots of pets and scritches. Howevers nobody let me have any of small packages that they put in their bags, maybe I need to talk to union repersentartive. Since it Halloween, Mom and Dad dress me up. You may remember I was UPS driver last year. This year I something called Little Red Riding Hood, and also a lumberjack. Mom like Riding Hood since good story, Dad like lumberjack because he keeps singing some silly song and I no know what a Monty Python is. Also not want speculate what Dad do in spare time. [Ed. note: More treats, yes! I think we can work something out.] Mom says to tell you this cake like "little bite of autumn on your plate," which strange since though I a dog even I know you no can put a season on dinnerware. Duh. Oh, she also say this no need frosting and what the fresh hell who are you Mom?  Besides weird little people ringing doorbell, Mom and Dad like to put on even weirder movies like Hocus Pocus, The Blair Witch Project, Shaun Of The Dead, and The Shining. Me no like when that guy puts face through the door. Mom and Dad say wish you all Happy Halloween, and Dad say please click ads on right-hand side because that give me more minty treats that good for teeth. Thank you for reading and hope you like bundt cake! PS: Last year Mom also went crazy with pumpkin motif and this quote-unquote epic pumpkin bread (www.moveablefeast.me/blog/epic-pumpkin-bread). PPS: We no just stuffing ourselves with pumpkin stuff and candy, also try be healthy with this butternut squash chickpea stew, which Dad should have more of because he taking shape of school bus I always afraid of (www.moveablefeast.me/blog/butternut-squash-chickpea-moroccan-stew). Me also not know what up with "Amok Amok Amok."  I wish I were a kitteh, just like my dear Papa! Adapted from: Cozy Cakes Cottage Number of servings: 10-12 Ingredients
Directions
5 Comments
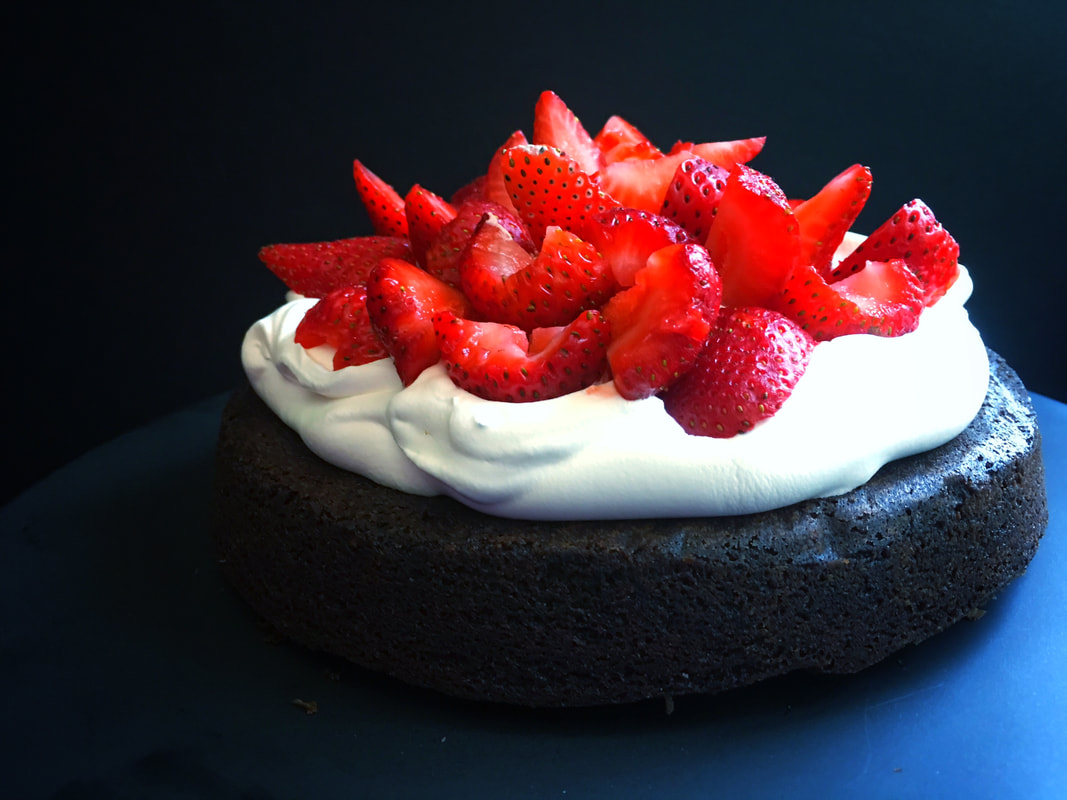
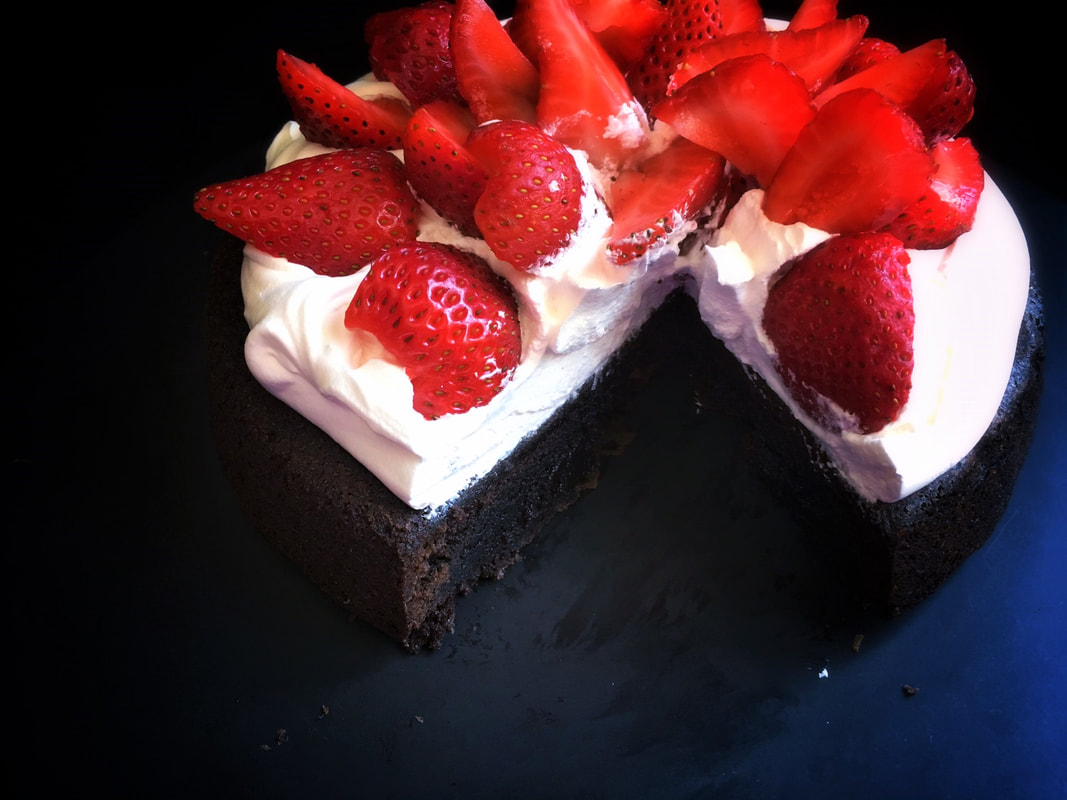
Set out to make a cake made with olive oil to see what it would taste like. One bowl. No eggs. No dairy. Vegan. [Ed. note: Vegan? Chocolate cake? Is this allowed?] Why yes! Yes it is. In fact, because of the olive oil it's so incredibly moist, with a deep dark-chocolate flavor, it made me swoon. [Ed. note: Taking notes.]
This has been called a Wacky cake or Depression Cake (en.wikipedia.org/wiki/Depression_cake), as during those years milk, sugar, butter and eggs were either expensive or scarce. Now my love of cake-making with oil instead of butter runs deep. I have baked many a cake with grapeseed or canola oils (both flavorless), but this was my first foray into using olive oil. The result is a far more moist dessert that keeps exceptionally well. Deb of Smitten Kitchen says, "On day four in the fridge, ours was as moist as day one, basically a miracle." Using olive oil, for some strange reason, just never seemed right. I think of olive oil as being savory, but I was wrong. It truly works here. NOTES:
Adapted from: Smitten Kitchen Number of Servings; 8-12 Ingredients Cake
Directions Cake
'Tis the season for good food and great company. My wonderful cousin and younger sister, traveling from Oregon, paid the BF and I a visit, and we showed them a few of our favorite local spots. Even though I had to work for clients while they were here, we managed to squeeze in much fun.
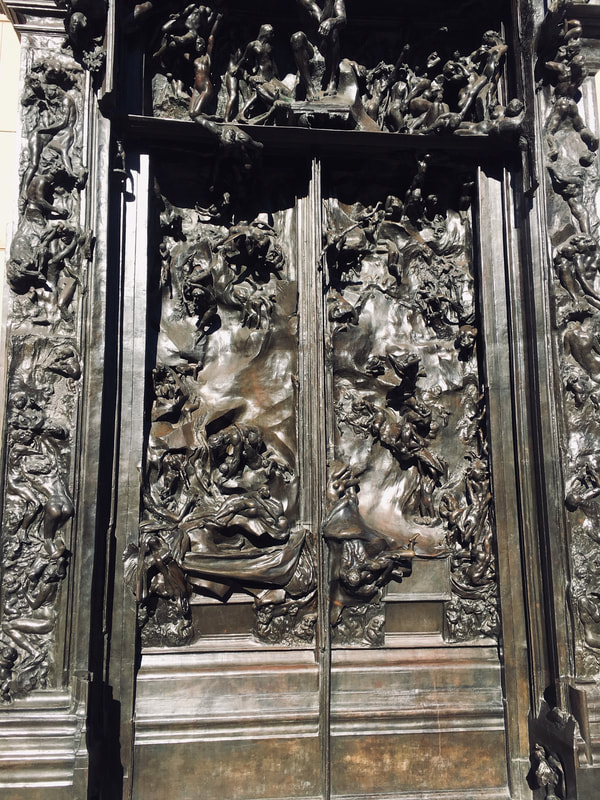
One day, we visited the Cantor Museum and Rodin Exhibit on the Stanford University campus. On another, we walked up and down Palo Alto's University Avenue and had dinner at a delicious Menlo Park Turkish restaurant. The last day, we took our choco-lab Marlowe and walked around Bol Park, aka "Donkey Park" (Perry was the model for "Donkey," voiced by Eddie Murphy, in the film Shrek), and ate lunch at Thai Bistro on California Avenue. In the evening we made gingerbread cake topped with eggnog whipped cream along with spiralized celeriac latkes [Ed. note: I don't think we ate it in that order?], and watched a superb documentary called Shanghai Ghetto. When they left, while cousin and sister went up the long escalator at a local Bart station, Marlowe let out the most woeful cries as they slowly disappeared from view. [Ed. note: We'll forward the therapy bills.] 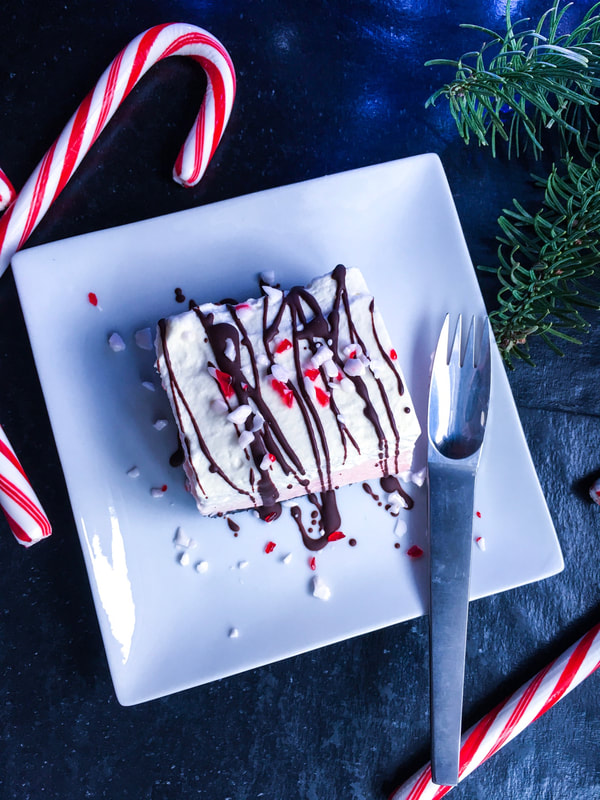
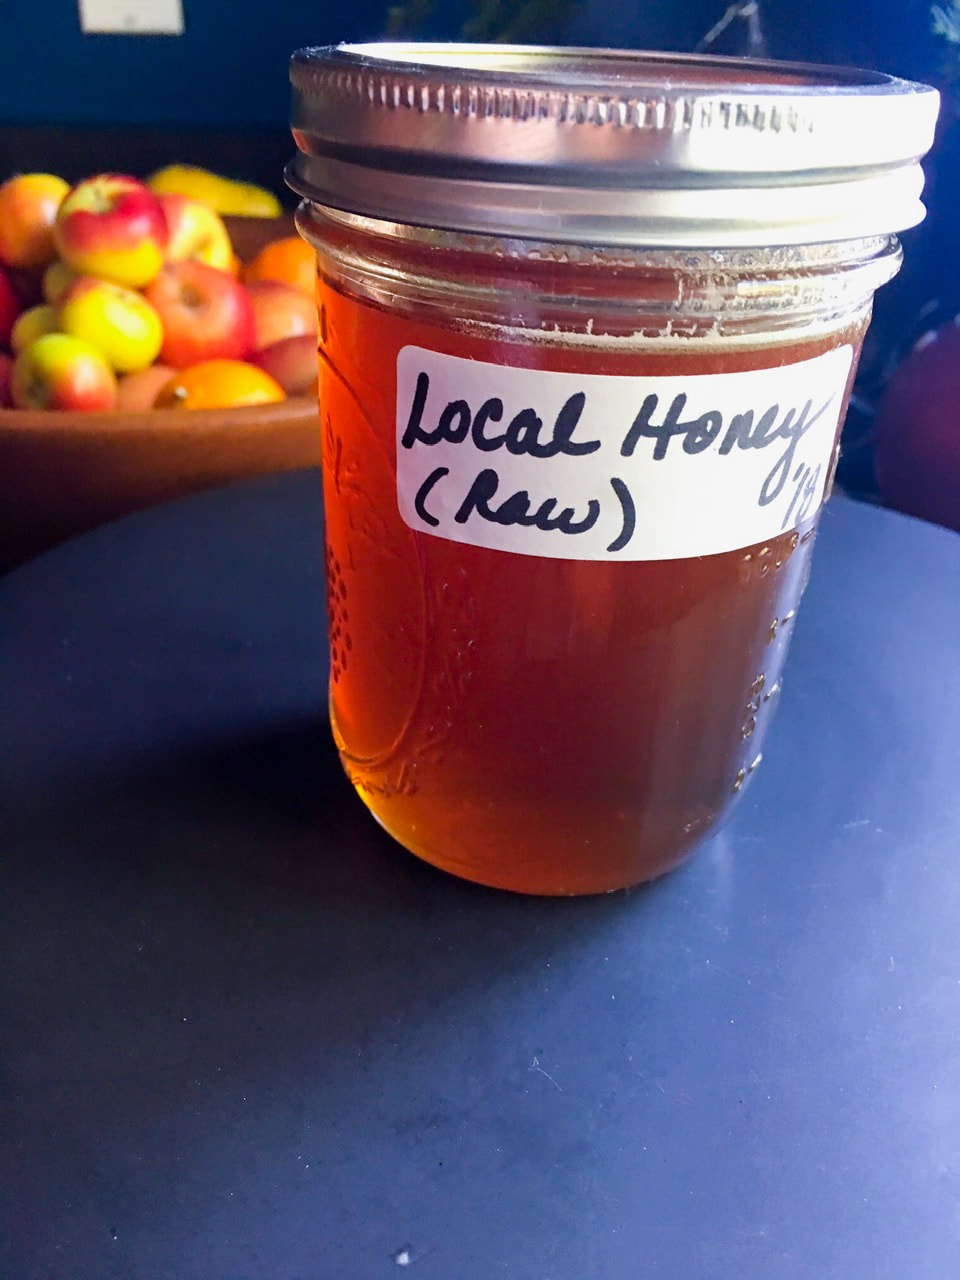
My cousin is an expert beekeeper and gifted us with the most amazing raw honey, which we can't stop dipping into. She also gave us homemade lemongrass soap and lip balm, as well as some sinfully good Burnside Distillery small-batch bourbon, which kept everybody warm! [Ed. note: Can confirm.]
My sister is very knowledgeable and talented with rocks, stones and gems. She gave us beautiful hand-engraved stones that say "Shalom" and "DZ," which now rest proudly on the kitchen window sill that I work in front of every day. More significantly, she also gave me custody of our mom's engagement ring (we trade off every year), which was was so brilliantly polished and shiny it practically glittered. She is also adept in the landscaping arts, and got to work in the backyard well before unpacking. (She makes up for my black thumb.) Marlowe is always a happier camper when she has a "pack," and as usual the did the nighttime "rounds," visiting the visitors as they slept. Life is good when these girls are with us. 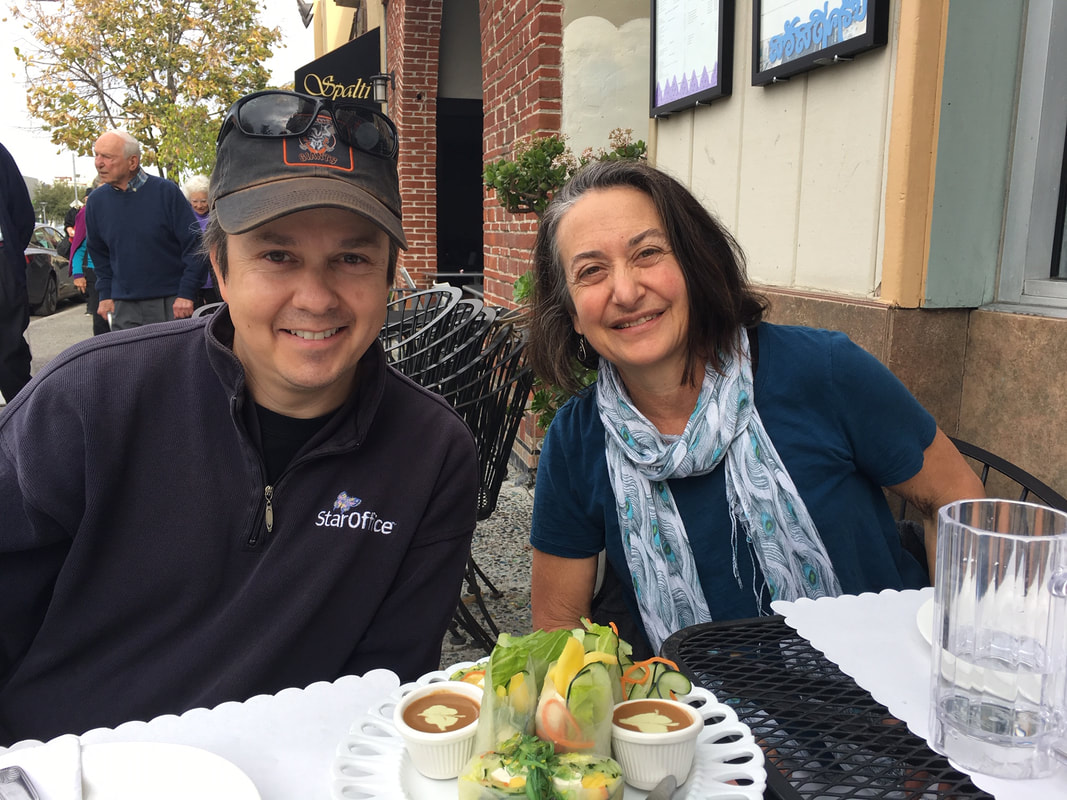

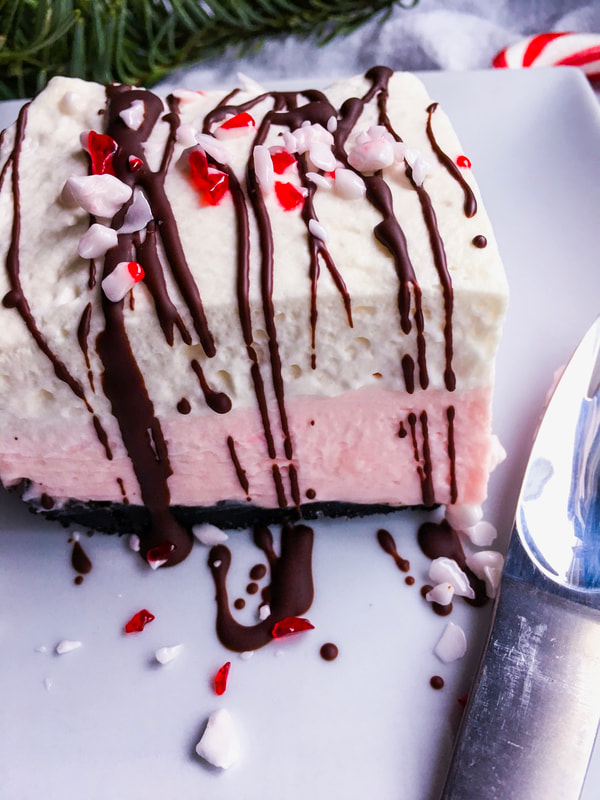
And it wouldn't be a family gathering without dessert, so for December: peppermint! It just says winter to me.
This cheesecake is almost too easy. No baking, no sugar, low carb and comes together in about 15 minutes. With a crust that tastes like Oreo cookies, it was the most popular dessert of the visit, even though we had plenty of other desserts with real sugar. There's only a slight change to the original recipe (upped the whipping cream from 2 tablespoons to 4), as I like a fluffier mousse-like cheesecake. Also added a pinch of salt to the crust. Should also note that I used my favorite brand of sugar substitute called Swerve, but you can use whatever you like.
Adapted from: All Day I Dream About Food
Number of servings: 16 Ingredients Crust
Directions Crust
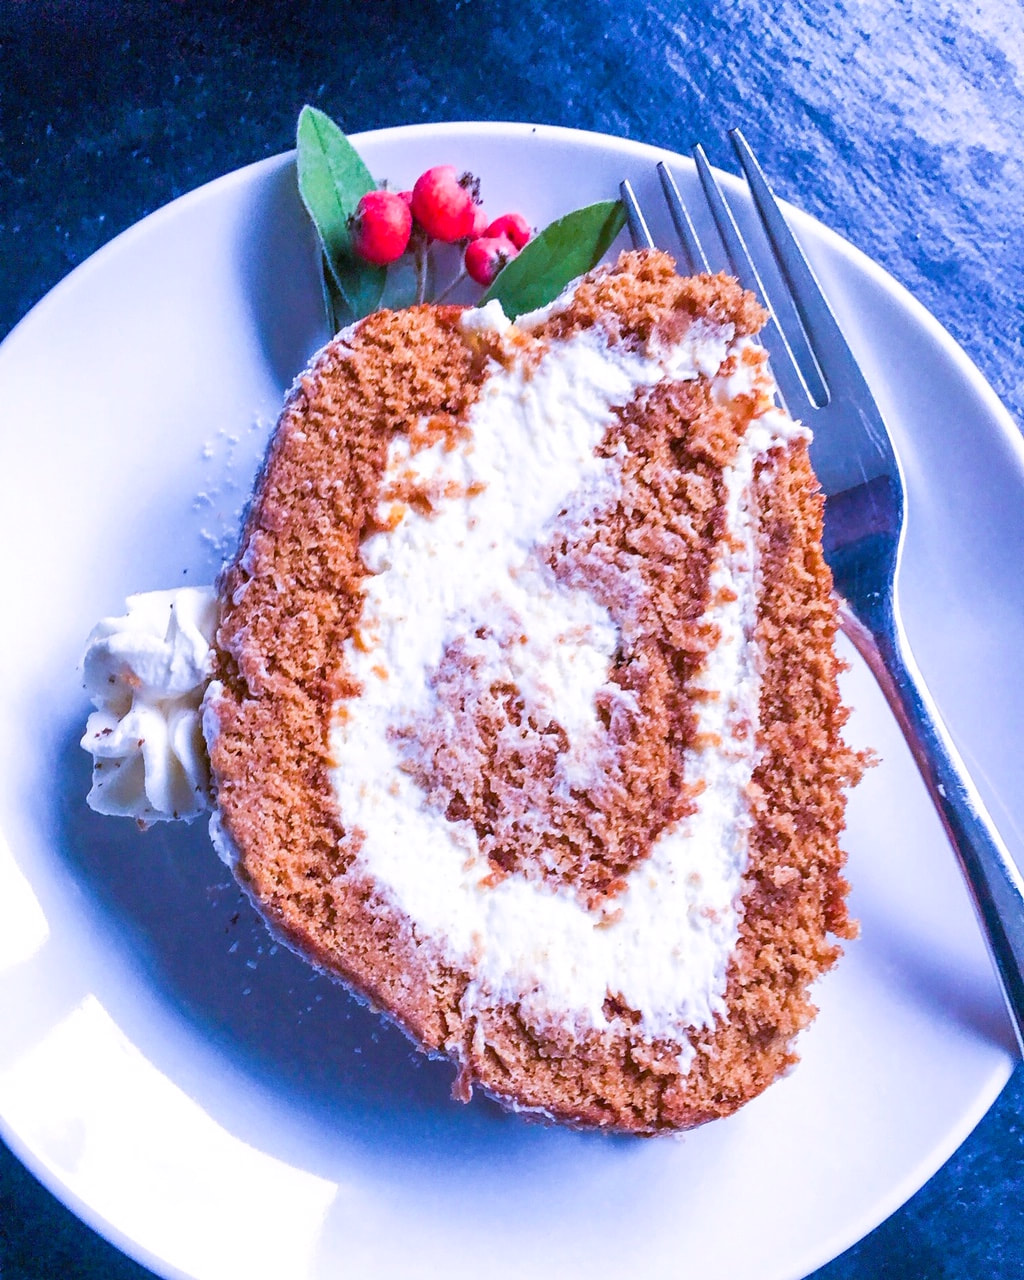
The Holiday season is here, with Hanukkah coming up next week and Christmas soon following. Here we're breaking out a theme most revelers get behind: gingerbread. This looks like a gigantic Hostess Ho Ho [Ed. note: DID SOMEONE SAY HOSTESS HO HO], and may initially appear imposing, but it's actually very light and fluffy, with a beautiful hint of gingerbread spice.
Now it has come to my attention from certain people [Ed. note: umm <whistling>] that some of you might want to make this more of an "adult" dessert and put a dash of bourbon or rum into the eggnog filling. Honestly, I would advise against putting more liquid into the filling; the main reason I added mascarpone cheese was to make the filling more stable. Adding more liquid could make this a bit of a messier proposition. Of course, if you want to have a drink (like a bourbon or hot toddy) with the cake, by all means do. [Ed. note: Don't call this a "log" for cheap comedic effect don't call this a "log" for cheap comedic effect don't call this a "log"...] Happy Holidays! More confections to come! 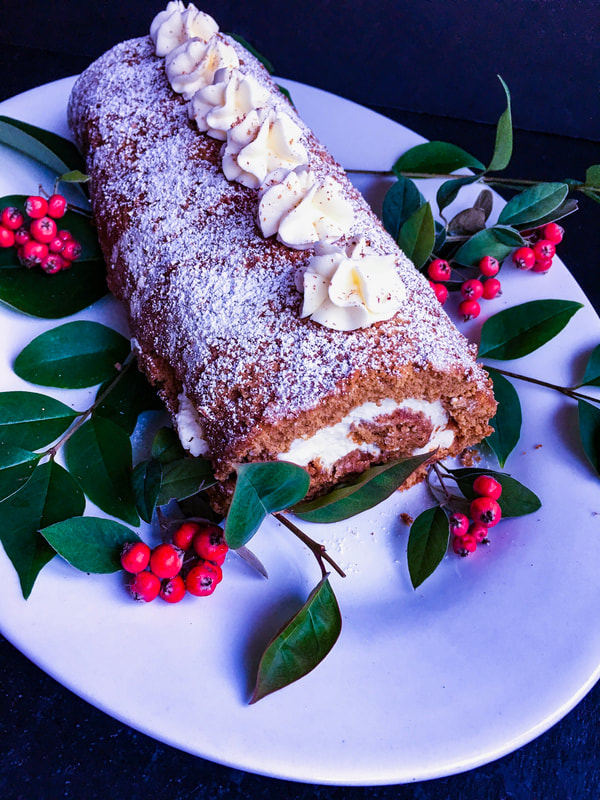
Adapted from: Crazy for Crust
Number of servings: 8-10 Ingredients Cake
Directions
So. We missed a week. Let me explain.
If there is one thing that can throw a serious monkey wrench into a personal-chef business, it's a broken refrigerator. Three weeks of no working fridge in the house, so to the rescue come three friends and their three fridges. (You know who you are and I love you dearly.) The BF and I are driving all over town to these different locations, then out to fulfill all the client orders. Extra time, extra hassle, and then of course problems with new-fridge delivery and oy... Then, a bonus: jury duty. [Ed. note: #@%$#^&*] I was called to attend, but luckily was dismissed on the second day. A side note: in 1993 I served for four weeks during procedures that were deciding whether or not a serial killer was competent enough to stand trial. We determined that he was. So, with all apologies, am late in getting into the Rosh Hashanah spirit. Even though it started on Sunday and ends today, Tuesday, it's not too late to make this lovely apple cake. This will work throughout the rest of fall and winter, and really, the last three weeks have had a "better late than never" kind of mantra. Many years ago I made this for my Momala, and it was an instant favorite (and she is a woman who knows her coffee cakes). The BF enjoyed it for his birthday last year, and of course it was brought out again for this Rosh Hashanah. It doesn't skimp on the apples, the entire house smells like apples, cinnamon, and fall. The BF and I want to wish all our Jewish family and friends a healthy and happy Shana Tova! 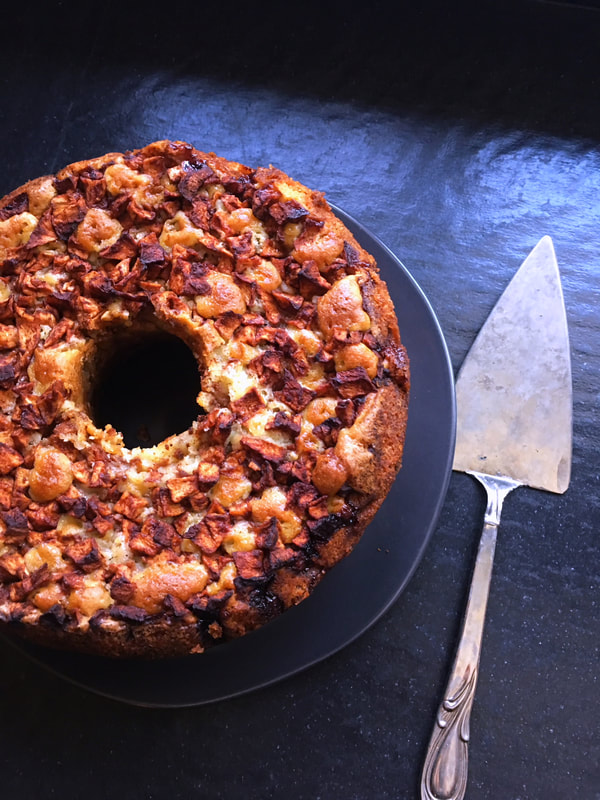
Adapted from: Smitten Kitchen
Number of servings: 12-16 Ingredients For the apples
Directions
DO AHEAD: This cake is awesome on the first day but absolutely glorious and pudding-like on the days that follow, so feel free to get an early start on it. I keep it at room temperature covered with foil. * NOTE: The apples love to hide uncooked pockets of batter, especially near the top. Make sure your testing skewer or toothpick goes not just all the way down to the bottom, but does a shallow dip below the top layer of apples, and make sure it comes out batter-free. Should your cake be browning too fast, before the center is baked through, cover it with foil for all but the last few minutes, while in the oven. 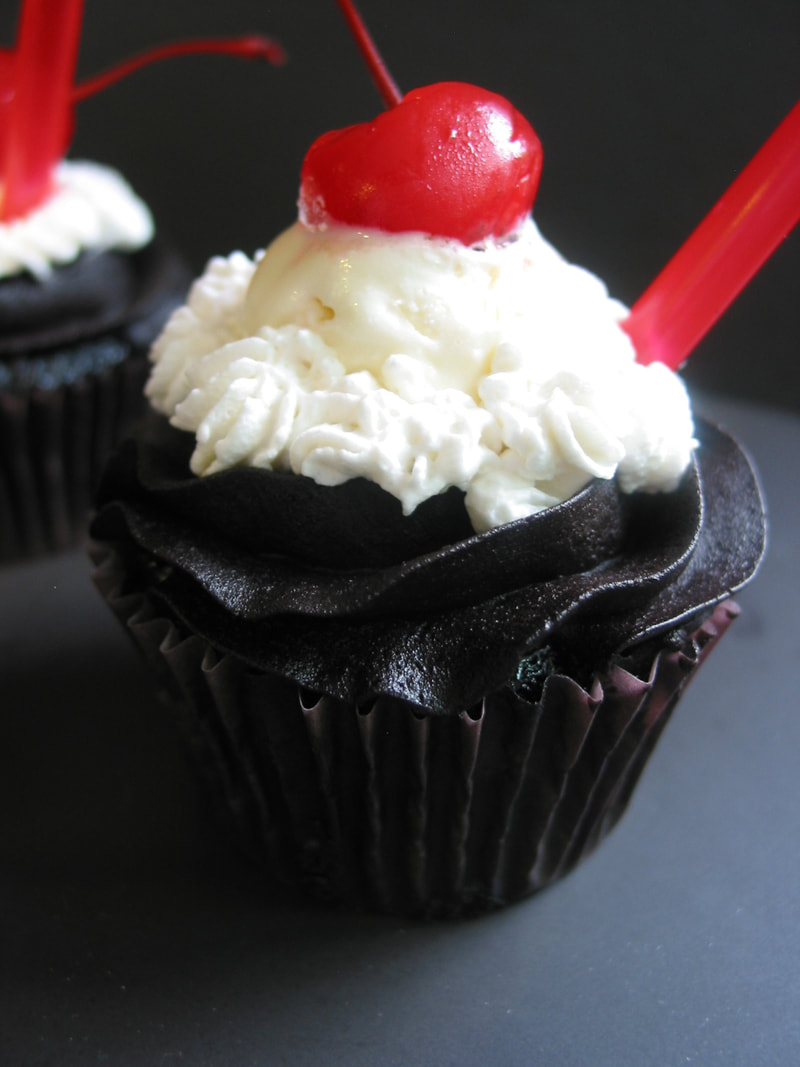
"Life is short. Take the trip. Buy the shoes. Eat the cake."
- Unknown Today is mamala's birthday, and as with my BF-mom's birthday, we gather here today to celebrate their collective sweet tooth. Mamala passionately loved root beer floats and "black cows" (made with Coke instead of root beer), quintessential summer treats. Are they as nostalgic for you as they are for me? If so, what was your first memory of them? (Feel free to comment below!) Even though I was lucky enough to grow up with an A&W in my hometown (it's still there), growing up we didn't frequent it too often. Mamala made her own floats at home, and oh how I loved watching her make them. One scoop of vanilla ice cream in a frosted glass. Root beer poured just so. The carbonation would foam up instantly, but never overflowed. She had the touch. I also remember she used a long, slender soda spoon to give it a slight stir. I made it home for almost all of her birthdays, but one year it wasn't possible and the BF and I Fed Exed these root beer float cupcakes (frosting in a separate container, ice cream not included) to my sister and mom. They were delighted, and a little surprised, to discover what was in the box. 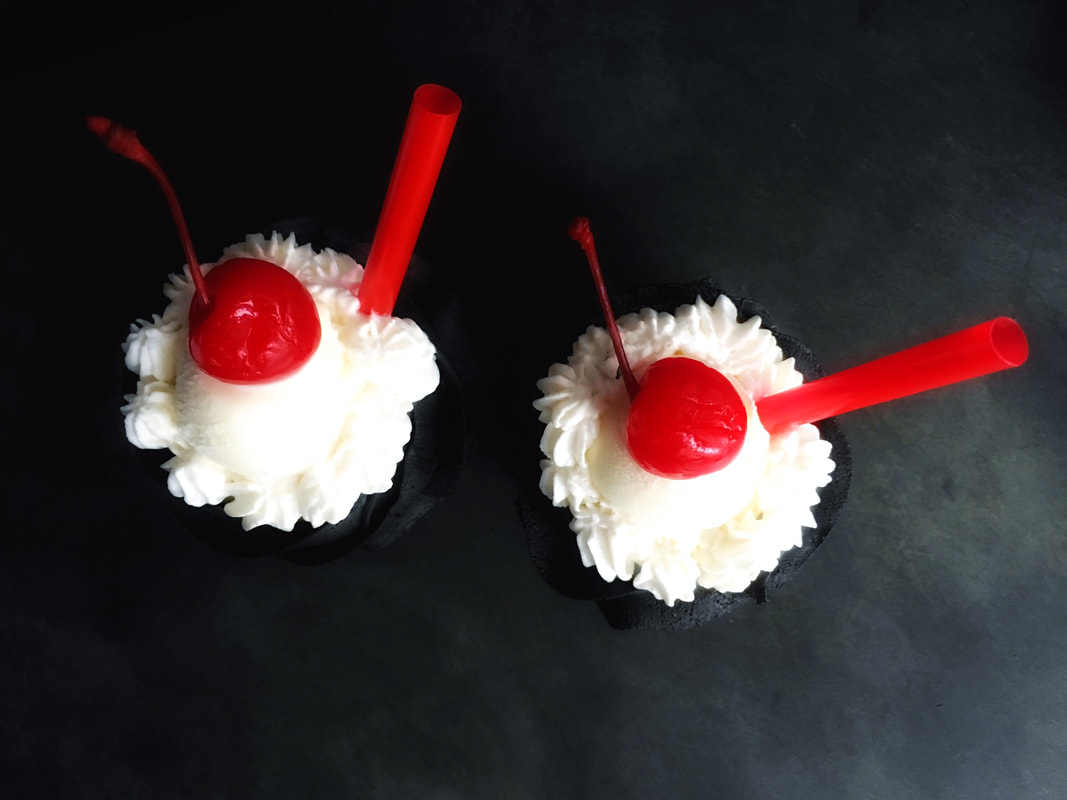
My first attempt at this was as a full-sized bundt cake, as was originally written in one of my favorite cookbooks, Baked: New Frontiers in Baking, by Matt Lewis and Renato Polafito. When I spied the cupcake version on the Smitten Kitchen blog, knew I had to make it for mamala. I added the root beer fudge frosting.
If you don't have time to make individual cupcakes, make it into a bundt, frost it and serve ice cream on the side. Either way, you won't be sorry. 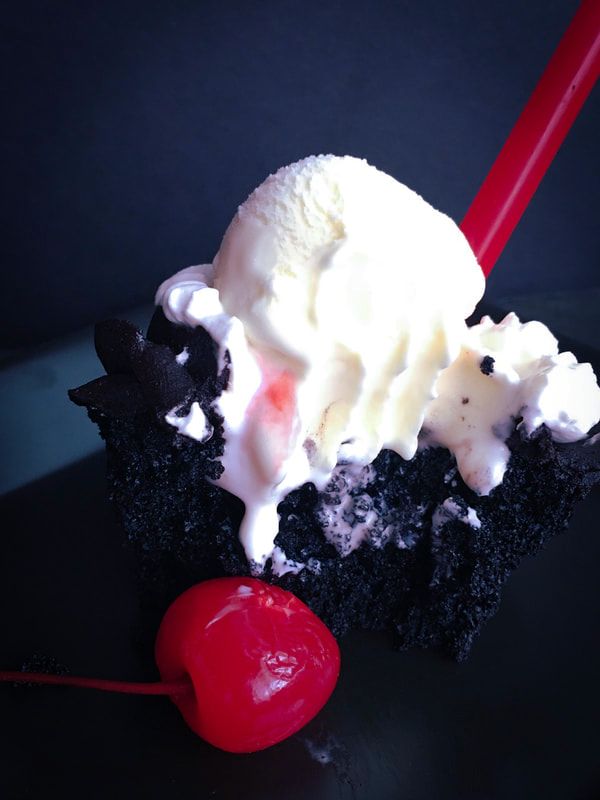
Adapted from: Matt Lewis and Renato Polafito, Baked: New Frontiers in Baking and Smitten Kitchen (cupcakes)
Number of servings: 22 cupcakes or one (10-inch) bundt cake Ingredients Cupcakes
Directions Cupcakes
NOTES:
PS: One year ago... www.moveablefeast.me/blog/lush-chocolate-cake-with-chocolate-malt-frosting 
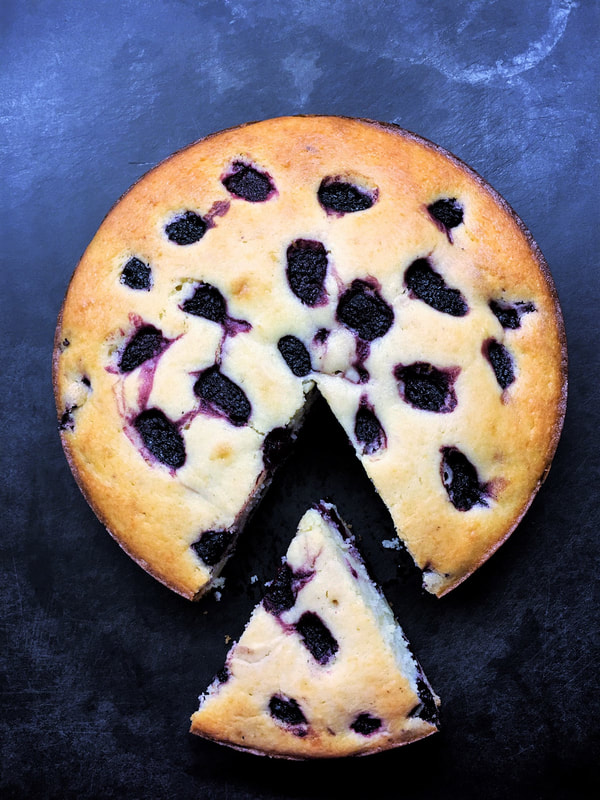
Marionberries have a short season. July to be precise. The plump, Oregon-borne morsels are the cabernet of blackberries, with a tart-yet-sweet flavor that's somewhere between raspberries and blackberries.
NPR states, "The marionberry, a cross between Chehalem and Olallie blackberries, was bred at Oregon State University as part of a berry-developing partnership with the U.S. Department of Agriculture that dates back to the early 1900s. It's named for Marion County in the Willamette Valley, where most of the field trials took place." [Ed. note: To be clear, this has nothing to do with the late-D.C.-Mayor Marion S. Barry, who in 1990 was caught in an FBI sting smoking crack. Man, this blog suddenly got dark, didn't it? All apologies, we now return you to your regular programming.] The original recipe calls for raspberries, but I chose marionberries as an homage to my home state. Feel free to use raspberries, blackberries or even boysenberries. I have been lucky enough to find fresh marionberries, but have used frozen too and it's delicious. An incredibly moist, unassuming everyday cake that is perfect for breakfast, tea or a light dessert. Works well with ice cream or softly whipped cream, but it needs no accoutrement Well, maybe a cup of coffee! 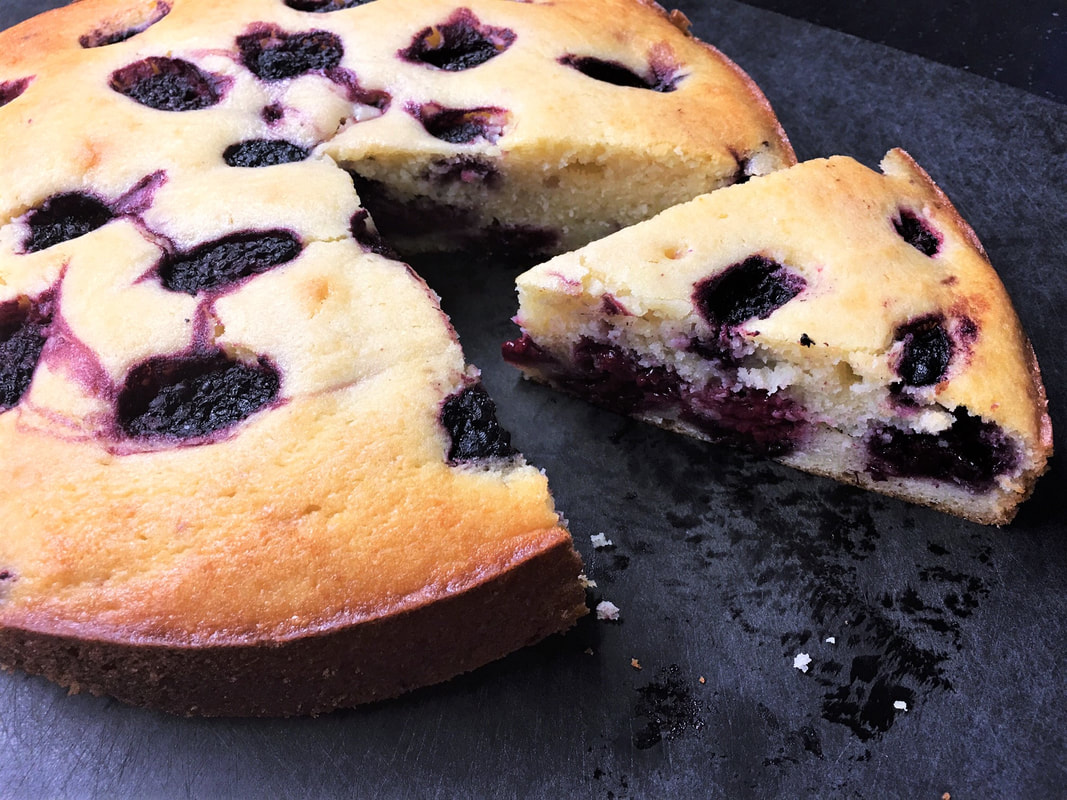
Adapted from: Bon Appetit, March 2015 and Orangette
Number of servings: 8 Ingredients
Directions
"Chocolate doesn't ask silly questions, chocolate understands."
-author unknown You don't see too many chocolate desserts in the summer. Usually it's all about summer fruit pies, tarts, crostatas, cobblers, crisps, ice cream, sorbets. Nothing against them, all delicious, but my soul still craves chocolate. So this is an attempt at the best of both worlds. Even the BF loves it and he's not exactly fond of mixing fruit with cake. [Ed. note: As The Offspring once eloquently opined, gotta keep 'em separated. (I'm just kidding, this is really good.)] The best part of this dessert is that it's the best hack of the summer. I make every single meal for my clients and family from scratch. Every day. But once in awhile, especially in the summer heat, it's nice to make things a little easier for the BF and me. Here you can be versatile, feel free to use your favorite boxed brownie mix (Duncan Hines Dark Chocolate Fudge Brownies "Extra Thick and Fudgy" was used here) or a time-tested from-scratch recipe. You can make homemade whipped cream or Cool Whip, I won't tell. Like another berry better than strawberries? Go for it. For years, I had prepared this dessert with homemade brownies and fresh whipped cream. Then one night a friend came over for an impromptu dinner. I was short on time, knew the guest couldn't eat dairy, and hates coconut milk. So out came the boxed brownie mix (no butter) and Cool Whip (no cream), and it was awesome. She loved it. It also held up better in the warm weather than homemade and did not wilt or weep in the fridge. The BF and I had leftovers for a few days and there wasn't a single crumb left. Hope you enjoy this one over a very Happy Fourth of July! Not only is it our nation's birthday, but it's also our rescue lab Marlowe's fifth. [Ed. note: She doesn't look a day over four.] And as a final note, it is also a year since I started this blog, the one-year blogaversary, and I want to sincerely thank you for reading. Feel free to reach out to me here, or on Instagram, Facebook, or Twitter (links above). Cheers! Flashback to blog #1: www.moveablefeast.me/blog/crispy-salmon-with-strawberry-salsa 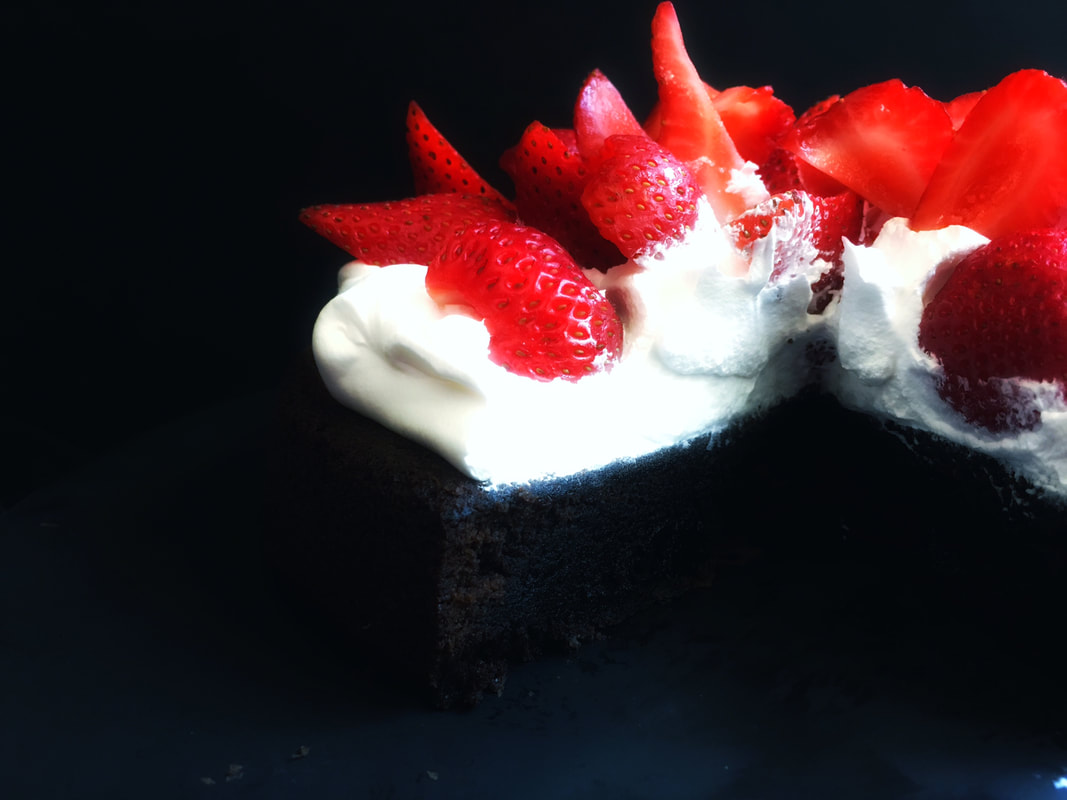
Number of Servings: 4-6
Ingredients
Directions

Born on the Fourth of July. Happy Fifth Birthday Marlowe!

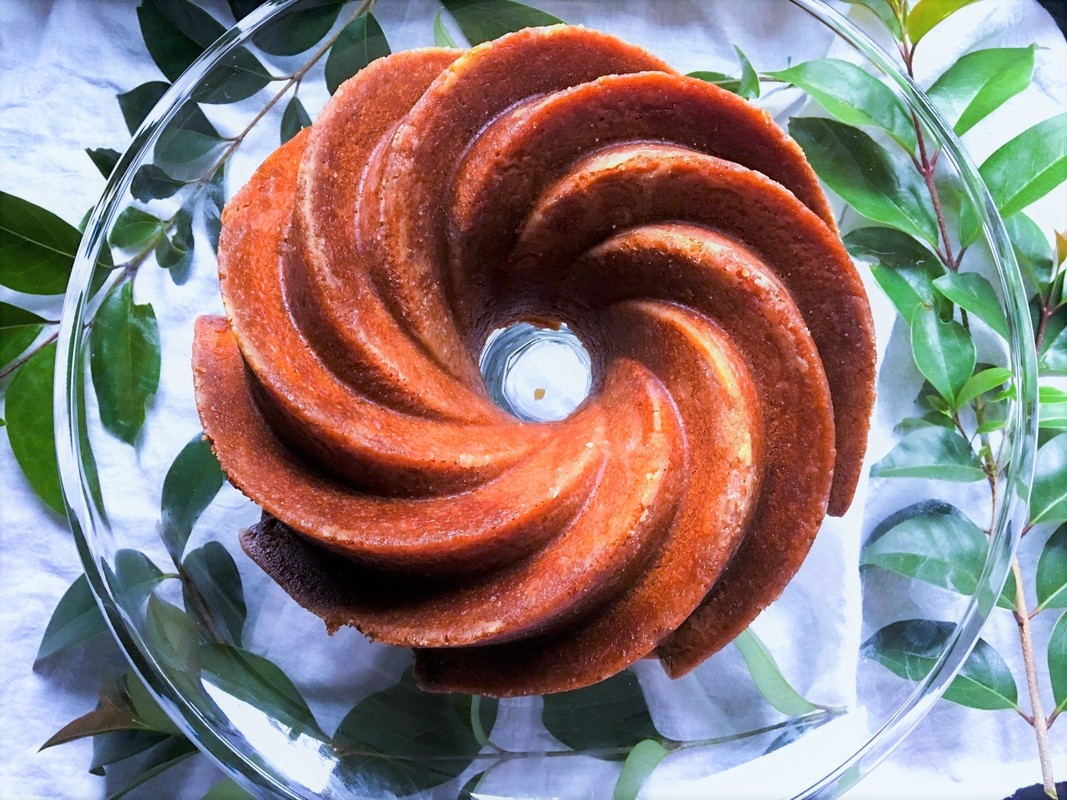
You might not think of rum in conjunction with the Kentucky Derby, but since it's such a booze-heavy event, my clients at last Saturday's party didn't seem to mind this Caribbean Rum-Soaked Bundt cake. Neither did the friends we hosted the previous Thursday, who we were thanking for a very comfortable (and stylish) ride to and from the airport. In fact, it was such a hit both times that I'm considering breaking out a third one for a client's upcoming Mother's Day luncheon. [Ed. note: The same cake thrice in one week? Is this allowed?]
While the BF likes many different types of liquors [Ed. note: As the late Robin Williams said, "I am not an alcoholic–I simply prefer living in a liquid medium"], rum is not my favorite, so I actually wasn't sure if I would take to this dessert. Oh, so wrong. There were no crumbs left on my plate, it was that good.
It's a boozy, evergreen (any season) cake that only uses one bowl, is super easy to transport, and if you follow the directions should not stick to the pan. BF chose the rum, and he chose one with lovely vanilla and caramel notes [Ed. note: Bacardi Select w/black label, but have fun with it], and it turned out super moist and fragrant. The flavor even seeps in more over time, so it was even better the following morning with coffee and tea. The recipe is adapted from King Arthur Flour and they explain, "Yes, there's a lot of rum in this cake, and it's definitely not for those avoiding alcohol. But the incredibly moist texture and rich flavor are deeply satisfying." They are not kidding. 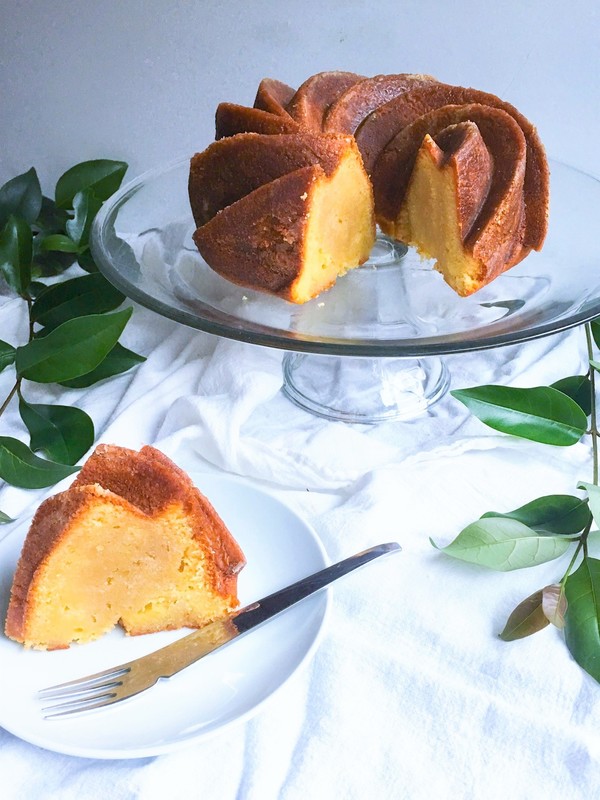
Adapted from: King Arthur Flour (www.kingarthurflour.com/)
Number of servings: 16 slices Ingredients Cake
Directions
NOTES:
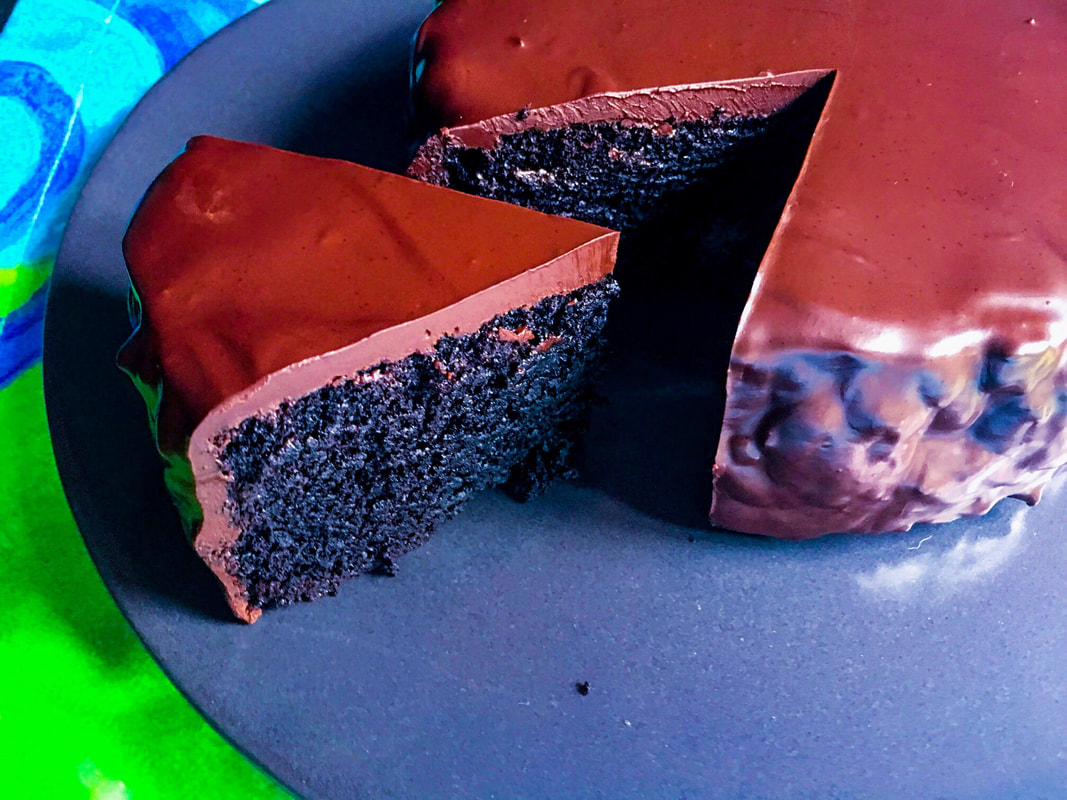
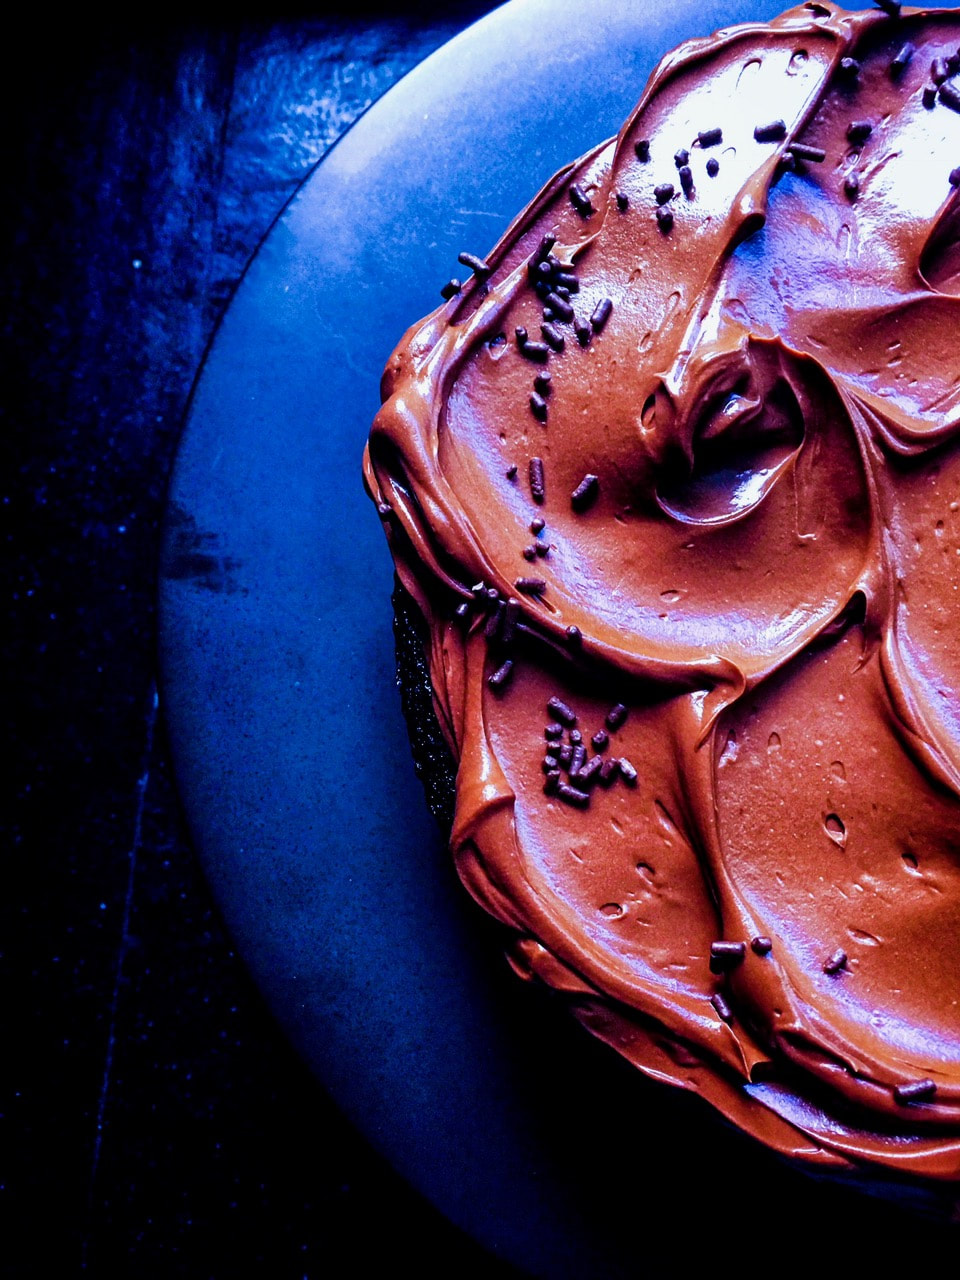
I baked my own birthday cake.
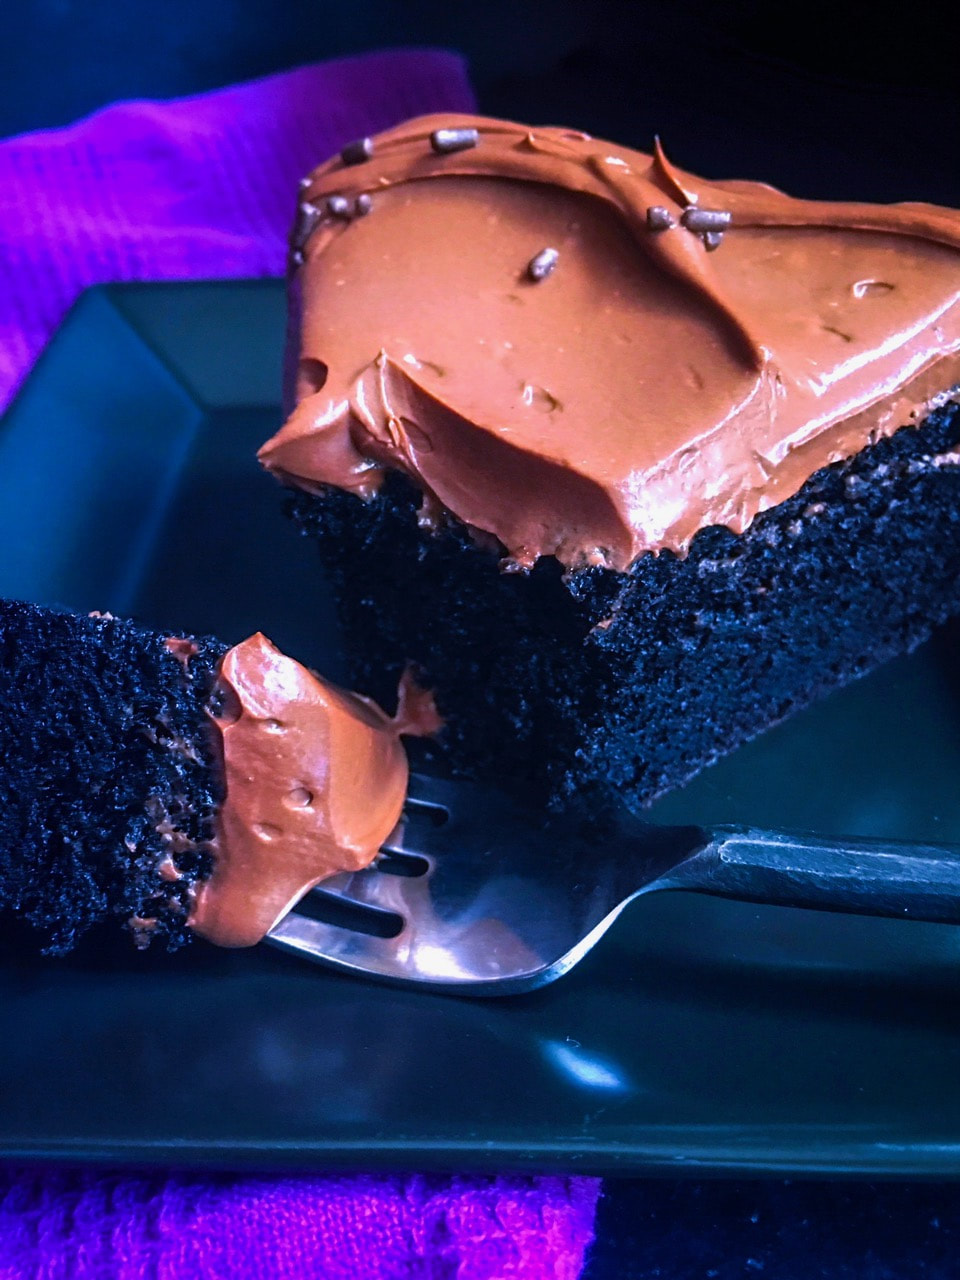
What? You don't do that? It's not that my BF didn't offer to buy me the best dessert in town. [Ed. Note: Save your letters! Jeez.] It's just that I was feeling exceptionally specific, and wanted it to taste deep, dark, intensely chocolatey and extra-extra moist. We don't partake in rich desserts very often, so when we do, it needs to be amazing or it's not worth it. Many times we've found ourselves drooling over beautiful confections, only to be nonplussed by the taste. [Ed. Note: Breathtakingly meh™.] The reason this cake is my go-to is that it has a creamy chocolate bite, and the sour cream frosting has an impressive tang that really sets it off. Also noteworthy, the frosting has neither butter nor whipped eggs (only a smidge of added sugar), making for easier preparation. The cake itself is adapted from Ina Garten (the recipe is cut in half), the frosting from Smitten Kitchen. Bit of a side note, but I had a perfect birthday yesterday. Our inital dinner plans in San Francisco were thwarted (there's a dog flu ripping through our area, so we couldn't find a proper sitter, and we don't take chances with our Marlowe), but we ended up having an even better day and evening sticking closer to home. The BF took me to the movies (Winchester, not our cup of tea) and then to a terrific local restaurant called Timber & Salt. The meal: an appetizer of crispy brussels sprouts with apple gastrique and whipped goat cheese, cheeseburger with horseradish mayo and bacon jam (oh yes), and a bavette steak over sauteed greens and maitake mushrooms in a red wine reduction sauce. Once home we chilled to the far superior movie A Futile And Stupid Gesture (about Doug Kenney and the rise and fall of National Lampoon), cracked open a bottle of prosecco we'd been saving, made a cocktail with Aperol (my favorite), and tucked into this cake. Folks, this is my absolute favorite cake. Excuse me while I have another slice. 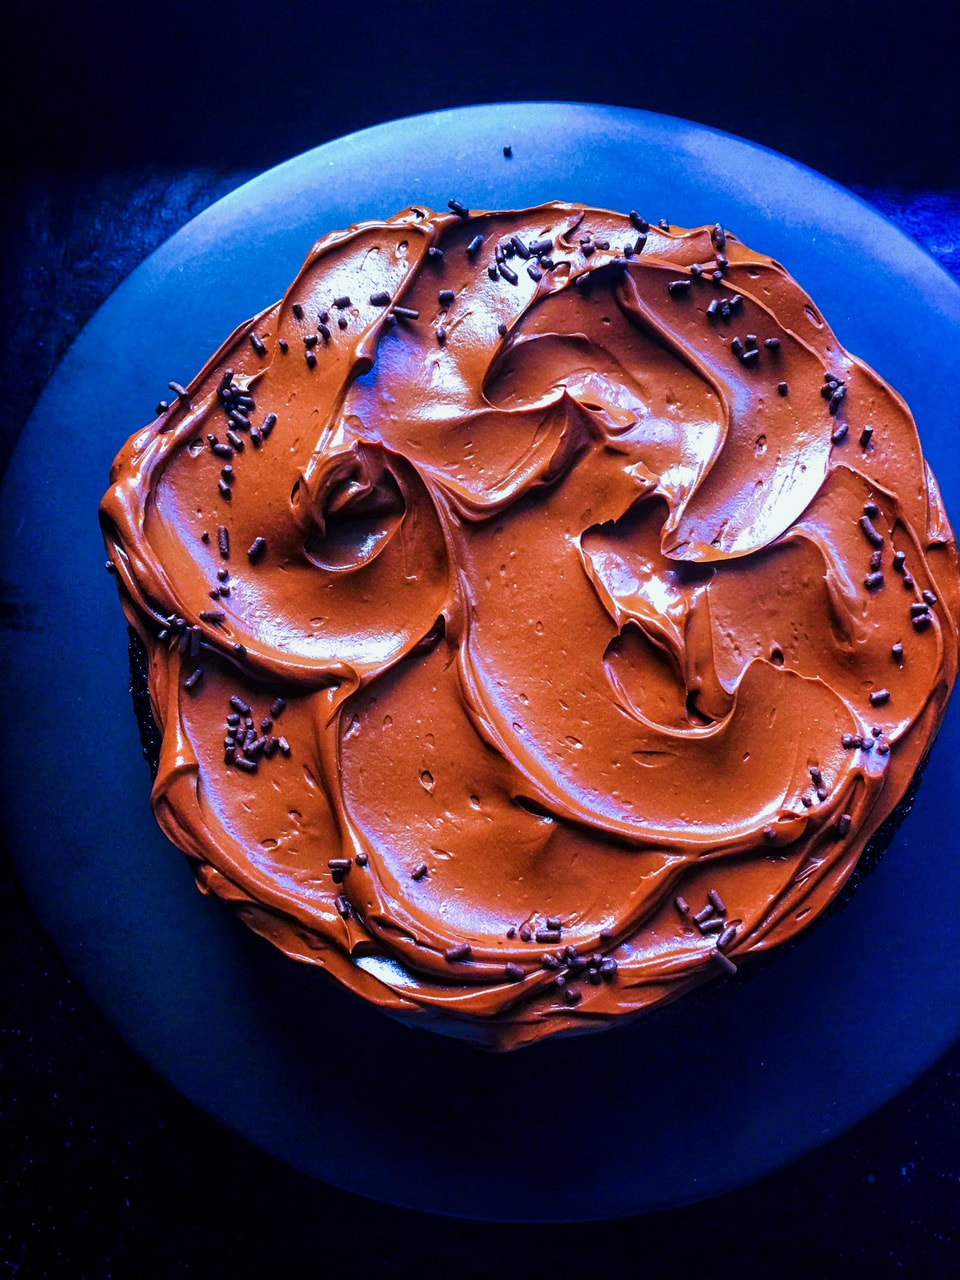
Adapted from: Ina Garten and Smitten Kitchen
Number of Servings: makes a one layer 8-inch cake (round or 8x8 square) Cake Ingredients
Directions
Chocolate Sour Cream Frosting NOTE: Be sure that your sour cream is at room temperature before you make the frosting. Ingredients
Directions
|
AuthorI'm Jacquie, personal chef & recipe developer in the beautiful Pacific Northwest. Lover of books, bourbon, chocolate and movies. Archives
May 2020
Categories
All
|


 RSS Feed
