Moveable Feast
  • home
  • services
  • bio
  • blog
  • contact
  • PHOTOS (summer)
  • photos (winter)
  • PRESS
  • faq

Feast Mode

a moveable feast blog

Soy Sauce Eggs

2/17/2020

2 Comments

 
Picture
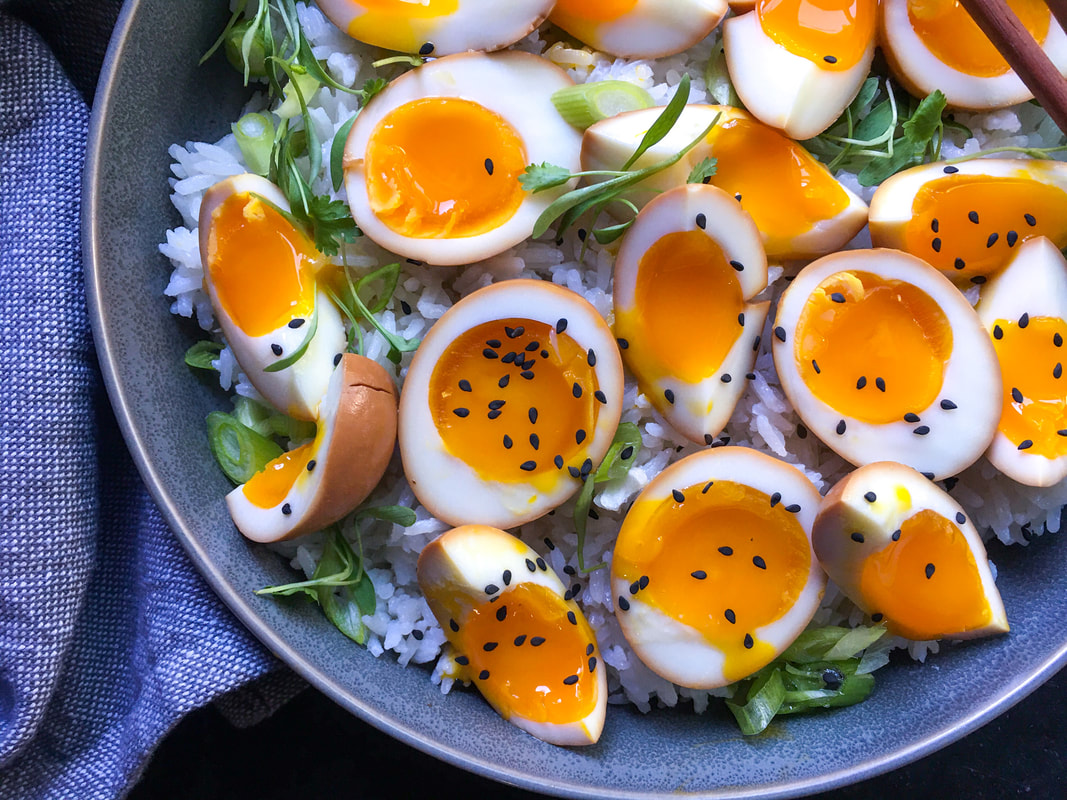
If you love eggs, and can handle an ice bath [Ed. note: Not literally], then there are a thousand different ways you can enjoy these beauties. They work on toast, on a salad, or on their own as a snack. You can also vary the marinade. One of my favorites is comprised of soy sauce, scallions, ginger, and chilies.

When I recently made this for the BF, he suggested adding some chicken to the dish, and then smartly decided against that. [Ed. note: There goes my quota.] I prepared the eggs on top of a bed of coconut rice, sprinkled with scallions, micro-cilantro and black sesame seeds. To quote the great Ina Garten, "How easy is that?"
Picture
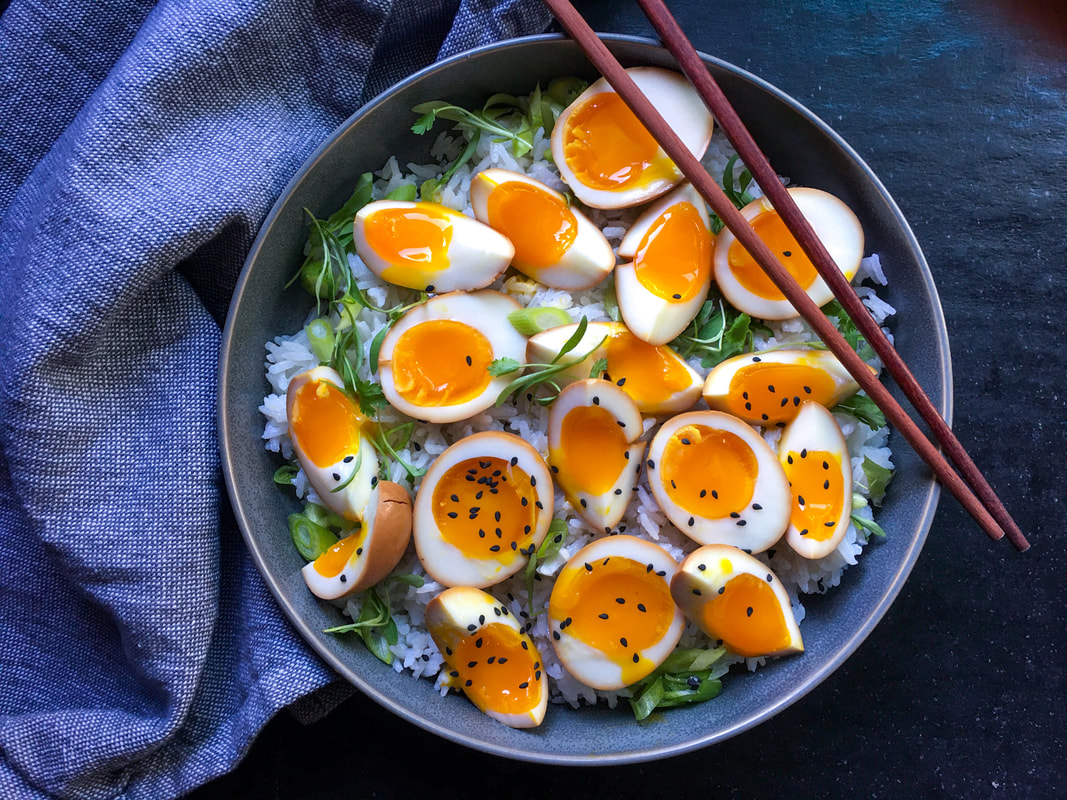
Inspired by: Well Seasoned Studio and Momofuku

Ingredients
  • 6 large eggs
  • 1 cup low-sodium soy sauce
  • 3 ½ tablespoons rice vinegar
  • 1 tablespoon sesame oil
  • 2 medium garlic cloves, thinly sliced
For serving
  • Rice (coconut rice was used here)
  • Avocado, scallions, pickled ginger, seaweed, micro-cilantro, toasted sesame seeds, black sesame seeds

Directions
  1. In a medium bowl, mix soy sauce, rice vinegar, sesame oil and garlic.
  2. Bring a large pot of water to a full boil. Set a timer for 7 minutes and immediately (with a large serving spoon, not your hands!) lower eggs into water.
  3. Meanwhile, make an ice bath (cold water + lots of ice) in a large mixing bowl. When there’s 15 seconds left on the timer, begin transferring eggs to ice bath. Let cool for 10-15 minutes,
  4. Gently crack egg on a hard surface loosening the shell on all sides. Peel egg (if you wish, you can peel the eggs in the water-this will help keep a perfect exterior).
  5. Transfer peeled eggs to soy mixture. Cover and refrigerate 6 hours, turning once halfway through.
  6. To serve, cut eggs in half or quarters. Serve over rice and any accompaniments you desire. 
  7. NOTE: You can save the soy sauce mix for another round of eggs, if you wish. Refrigerated in a tightly sealed container, the eggs will keep for about 4-5 days.

PS: [Ed. Note: Hello it's the BF here, and okay so this is weird. A year ago we got super healthy with this Asian-style kale salad, and I sniffed, guffawed and gave thanks to a true kaleaholic, then-San-Francisco-Giants outfielder Hunter Pence, who was on his way to Arlington to play for the Texas Rangers. WELL, he had a great season with them and here we are a year later and HE'S BACK and I repeat for emphasis: Yes. Yes. Yes.] (www.moveablefeast.me/blog/asian-style-kale-salad)
Picture
2 Comments

Red Kidney Bean Curry (Rajma)

1/3/2020

4 Comments

 
Picture
Happy New Year!

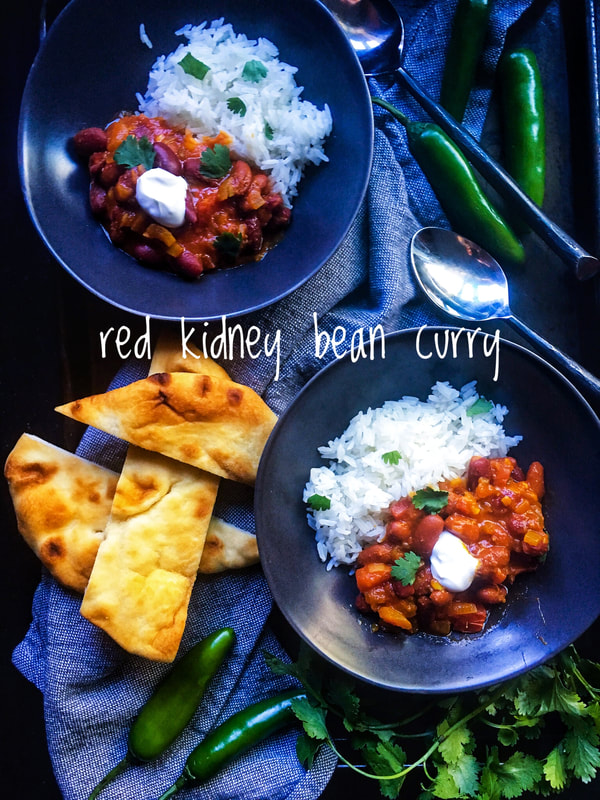
Have you heard of Veganuary? No? It's a 30-day challenge of eating plant-based foods. Won't be doing it straight for a month, but two-three times per week is great. [Ed. note: Through the NFL playoffs? Are you insane, woman?]
​
This red kidney bean curry (a.k.a. Rajma) is like a vegetarian chili, but with Indian spices. Adapted from Smitten Kitchen, this super-easy-to-make (20 minutes, start to finish), freezer-friendly and budget-conscious dish is fantastic served with rice, quinoa or naan bread. Great veggie sides include roasted yams, roasted cauliflower or sauteed greens like spinach, kale, or chard (if you're trying to be low carb).

Full disclosure, I was a little hesitant to offer this to the BF. Not because he doesn't like vegan meals, but because he's not a huge chili fan; he likes, but doesn't love beans. So I can't tell you how surprised I was that he loved this. I mean, really, really, truly inhale-a-bowl-and-ask-for-more loved this. [Ed. note: You tricked me! Curses!] #Winning

NOTES:
  • Several ingredient quantities were changed, as was a bit of the method. Very adaptable recipe. You can adjust to your preferences.
  • If you want less heat, leave out the serrano or jalapeno and cut back on the cayenne. You can always have minced chili that you can sprinkle on your own curry bowl.

Adapted from: Smitten Kitchen
Number of servings: 6

Ingredients
  • 2 tablespoons extra virgin olive oil 
  • 3 tablespoons minced fresh ginger (if you're adverse to ginger, use 2 tablespoons)
  • 1 medium onion, finely chopped
  • 1 plum tomato, de-seeded and diced
  • 3 cloves garlic, minced
  • 1 large serrano or jalapeno chili, minced (optional, if you can't take the heat)
  • 1 teaspoon salt
  • 1 teaspoon ground cumin
  • 1 teaspoon ground coriander
  • ¼​ teaspoon cumin seeds (if you don't have cumin seeds on hand--leave out)
  • ½ teaspoon ground turmeric
  • ¼ teaspoon cayenne (less if you want less heat)
  • 8 ounce can or 1 cup of tomato sauce  
  • 3 cups cooked red kidney beans or 2 15-ounce cans, drained and rinsed
  • 2 cups vegetable broth (original recipe calls for water, I like broth, either works)
  • ½ cup chopped fresh cilantro (or parsley, if you prefer)
Suggested Sides and Toppings
  • Rice, quinoa, naan bread
  • Roasted cauliflower or roasted yams
  • Sauteed greens (spinach, chard, kale)
  • Yogurt

Directions
  1. Heat oil in a deep sauce pan over medium heat for one minute. Add ginger, garlic, onion, green chile, and let sizzle for one minute. Add dry spices and cook over medium low heat for five minutes, or until onion is softened.
  2. Add the tomato sauce and cook for an additional five minutes, stirring frequently.
  3. Add red kidney beans, 2 cups vegetable broth or water, and diced tomato. Bring it to a boil, then reduce to medium heat and let cook uncovered for 10 minutes.
  4. Remove from heat. Garnish with cilantro.
  5. Serve over rice or with naan. A dollop of plain yogurt (if not keeping the dish vegan) on top is heavenly.​
Picture
Should Old Acquaintance be forgot, ang nefer took da treat...
4 Comments

Miso Marinated Chicken

10/16/2019

3 Comments

 
Picture
Most evenings, it's just the BF and I having dinner, so I typically halve recipes.

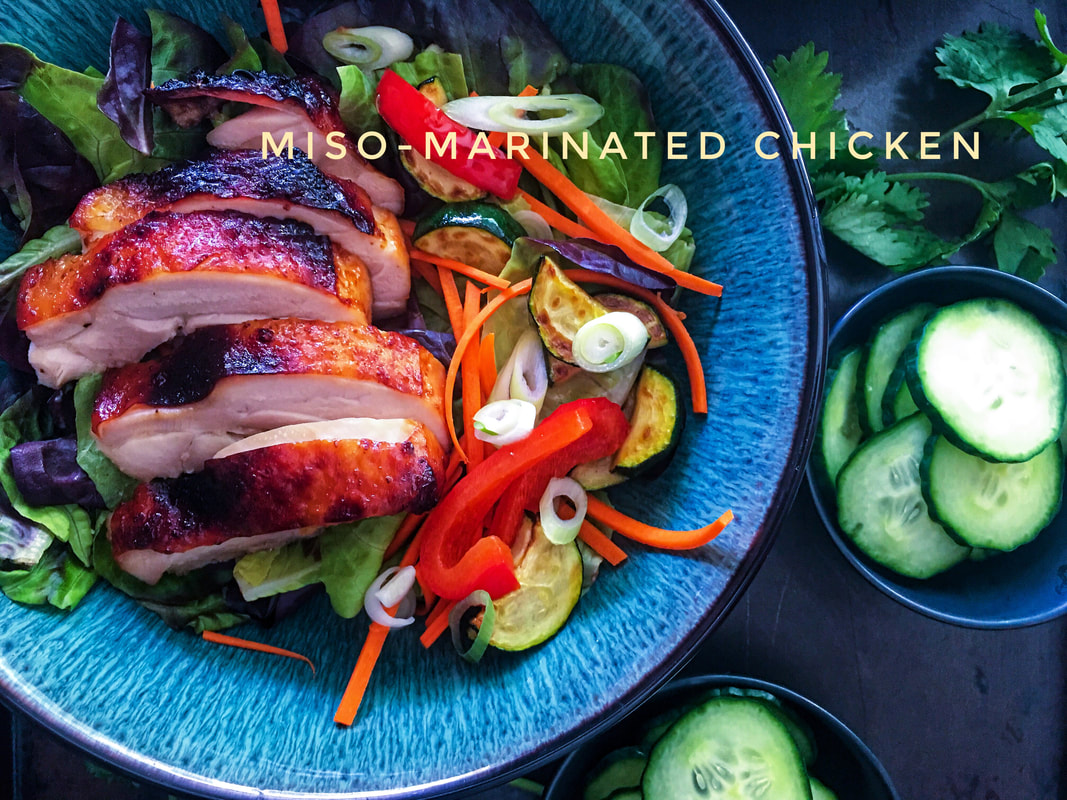
This is an exception.

The full portions are made here because, well, the leftovers are incredible. It also means that our Marlowe can enjoy some bits with her kibble. [Ed. note: CHIMKINNNN! Yes, I speak dog.] The finished product comes out juicy, flavorful, with a crispy skin.

NOTES:
  • Skin-on, boneless chicken thighs were used here.  
  • Don't own a grill, so mine are baked in the oven. Included directions for both below.

PS: Last year we were really in an Oktoberfest kinda mood when we broke out the sautéed cabbage with caraway (www.moveablefeast.me/blog/sauteed-cabbage-with-caraway). Even worked in the movie Strange Brew. [Ed. note: Take off!]

PPS: The BF spun off the planet when I made these salted espresso fudge brownies. [Ed. note: CAN I HAVE SOME MORE MAN I NEED SOME ELSINORE BEER TO COME DOWN FROM THE RRRRRRRRR] (www.moveablefeast.me/blog/salted-espresso-fudge-brownies).
Picture
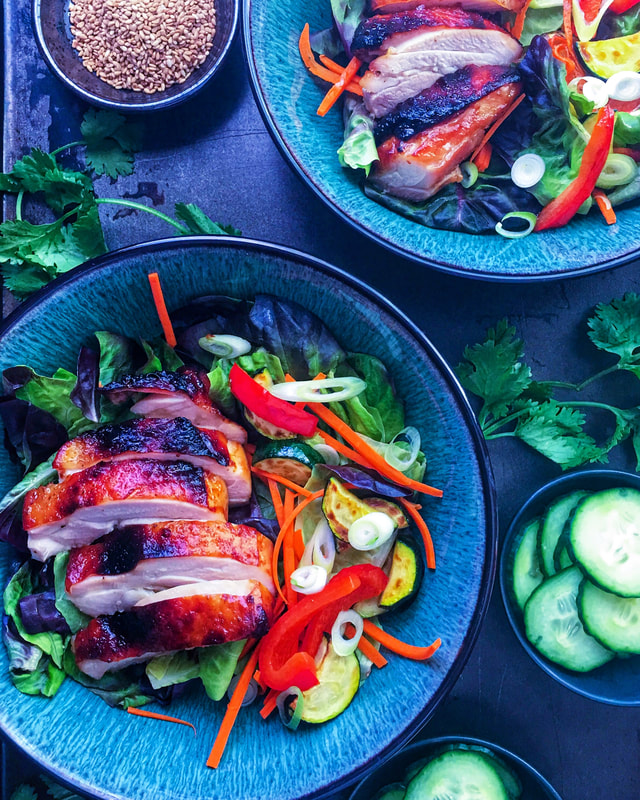
​Adapted from: Dennis the Prescott
Number of servings: 6–8

Ingredients
Miso Chicken
  • 10 skin-on, boneless chicken thighs
  • 1 cup white miso
  • 1 cup mirin
  • ½ cup sake
  • 2 tablespoons soy sauce
  • 2 tablespoons honey
  • 2 teaspoons toasted sesame oil

Pickles
  • 1 English cucumber, thinly sliced
  • ⅓ cup rice vinegar
  • 2 tablespoons sugar
  • 2 teaspoons kosher salt
  • 2 tablespoons sesame seeds

Serving Suggestions
  • Cooked Jasmine rice 
  • Steamed greens, i.e., baby bok choy 
  • Salad greens
  • Toasted sesame seeds, sliced green onions, and hot sauce, to serve
 
Directions
Marinade
  1. NOTE: make the marinade the night before. 
  2. Combine miso, mirin, sake, soy, honey, and sesame oil in a bowl and mix well.
  3. Place chicken in a freezer bag and pour in marinade. Chill overnight in fridge (at least 4 hours, but overnight is best). Get a little under the skin, if possible.
 
Pickles
  1. Combine cucumbers and salt in a bowl, toss, and let sit for 20 minutes. Rinse the salt off of the pickles, then place back in a bowl.
  2. Add rice vinegar, sugar, and sesame seeds, mix well, then cover and chill overnight.
 
Chicken
Oven Directions:
  1. Preheat to 450 °F. 
  2. Line baking sheet with foil and place a flat roasting/baking rack on the baking sheet. 
  3. Remove chicken from  marinade (discard marinade), place chicken on rack, skin-side down.
  4. Bake 10 minutes, then flip and continue baking 10 minutes, or until crispy on the outside and perfectly cooked through on the inside (reaching an internal temp of 165 °F using a meat thermometer). 
  5. If your skin is not crispy, stick it under the broiler and keep a careful eye on it.
  6. Place chicken on counter on let rest for 10-15 minutes. Slice into strips.
  7. Serve alongside your pickles, rice, veggies or salad. Whatever you like!

Grill Directions:
  1. Start your grill according to grill instructions. Set the temperature to 450 °F; allow to preheat, lid closed, for 10-15 minutes. 
  2. Remove the chicken from the marinade (discard marinade), then place chicken on grill, skin-side down. Grill, lid closed, for 10 minutes, then flip and continue grilling an additional 10 minutes, or until crispy on the outside and perfectly cooked through on the inside (reaching an internal temp of 165 °F using a meat thermometer). 
  3. ​Slice the chicken into thin strips, then serve alongside your pickles, some steamed rice, veggies, and extra fixings. Delicious! 
3 Comments

Baked Yam Wedges with Curry Dip

10/2/2019

7 Comments

 
Picture
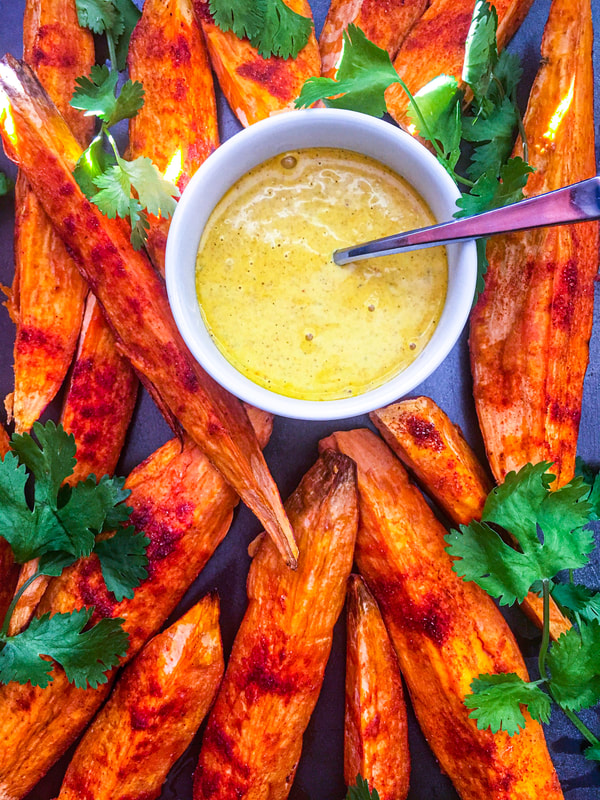
“It looked like the world was covered in a cobbler crust of brown sugar and cinnamon.”
-Sarah Addison Allen, First Frost


As much as the BF is a California Boy, the Oregon Girl in me loves autumn and the color orange. [Ed. note: Well too much orange reminds me of bad 1970s-era San Francisco Giants baseball.]

These golden babies are a marriage of crispy, sweet and slightly spicy flavors. Super healthy, and great for breakfast, lunch, dinner, or a late-night snack.

Enjoy!

PS: Last year our beloved chocolate rescue lab Marlowe made her blogging debut with these tasty mini-butterscotch apples (www.moveablefeast.me/blog/mini-butterscotch-apples).
Picture
Adapted from: Eat Delicious, By Dennis The Prescott 
Number of servings: 3-4 side servings

Ingredients
Sweet Potatoes
  • 2 pounds sweet potatoes (garnet yams used here), scrubbed and dried well
  • 2 tablespoons extra virgin olive oil
  • 1 teaspoon smoked paprika
  • ½ teaspoon ground coriander
  • ¼ teaspoon cayenne pepper
  • ½ teaspoon sea salt

Curry Mayo Dip
  • ¾ cup prepared mayo
  • 2 tablespoons fresh lime juice
  • 1 ½ teaspoons mild yellow curry powder
  • ¼ teaspoon ground turmeric
  • ¼ teaspoon cayenne pepper
  • Pinch of sea salt

Directions
  1. Preheat oven to 400 °F. Line a large baking sheet with parchment paper or foil.
  2. Halve potatoes lengthwise, then slice into thick cut wedges (about 8 total per potato).
  3. Transfer wedges to large bowl, add remainder of sweet potato ingredients, and mix well.
  4. Arrange the wedges in a single layer on prepared baking sheet. Bake 40-45 minutes, turning halfway through, until cooked through on the inside and crispy/slightly charred on the outside.
  5. Combine all the mayo dip ingredients in a small serving dish and mix well. Taste and adjust the seasonings, stir, and refrigerate until ready to serve.
7 Comments

Ultimate Crispy Quinoa Veggie Burgers

9/17/2019

6 Comments

 
Picture
Recently my siblings and I were passing online messages about my father. At one point, my older brother Mike said, "Dad's cooking broke down into two categories: it either tasted good, or it was healthy, but generally not both. Or more that his thinking was, if it's healthy, there's no reason to be concerned with it tasting good or not."

This was the 1970s and "health food" was not what is today. Besides my father's tendency towards "more is more" ("Dad, raw oats in the hamburger? Really?"), his Sunday specialty was, no lie, seaweed-soybean waffles. Good God, that was dreadful. [Ed. note: That sounds worse than disco in bell-bottoms.]
Picture
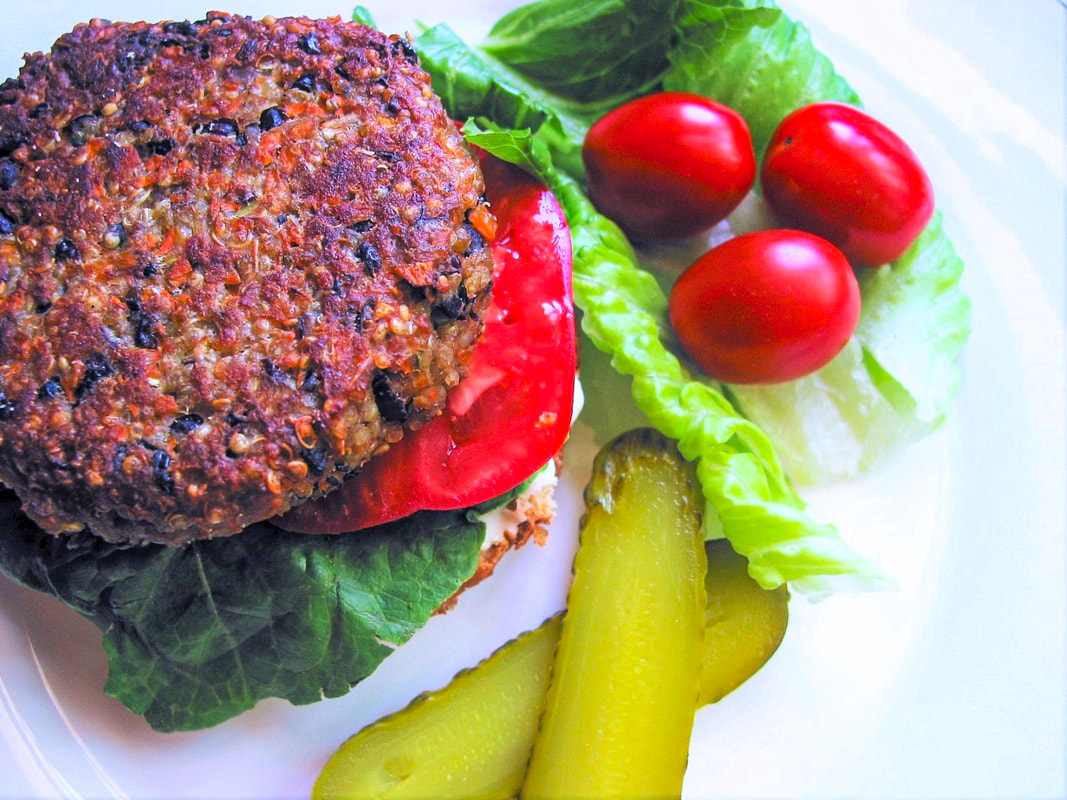
Truth told, he was ahead of his time, very disciplined about exercise and nutrition. During WWII, as a teenage Austrian refugee in Shanghai, he took up boxing and sparred with US Marines stationed there. Growing up with my siblings, we never witnessed him missing a workout, no matter the weather or how late he came home from work. He'd jog a couple miles, hit the punching bag, skip rope double-time while running in place, do countless push-ups. Something. Every single day.

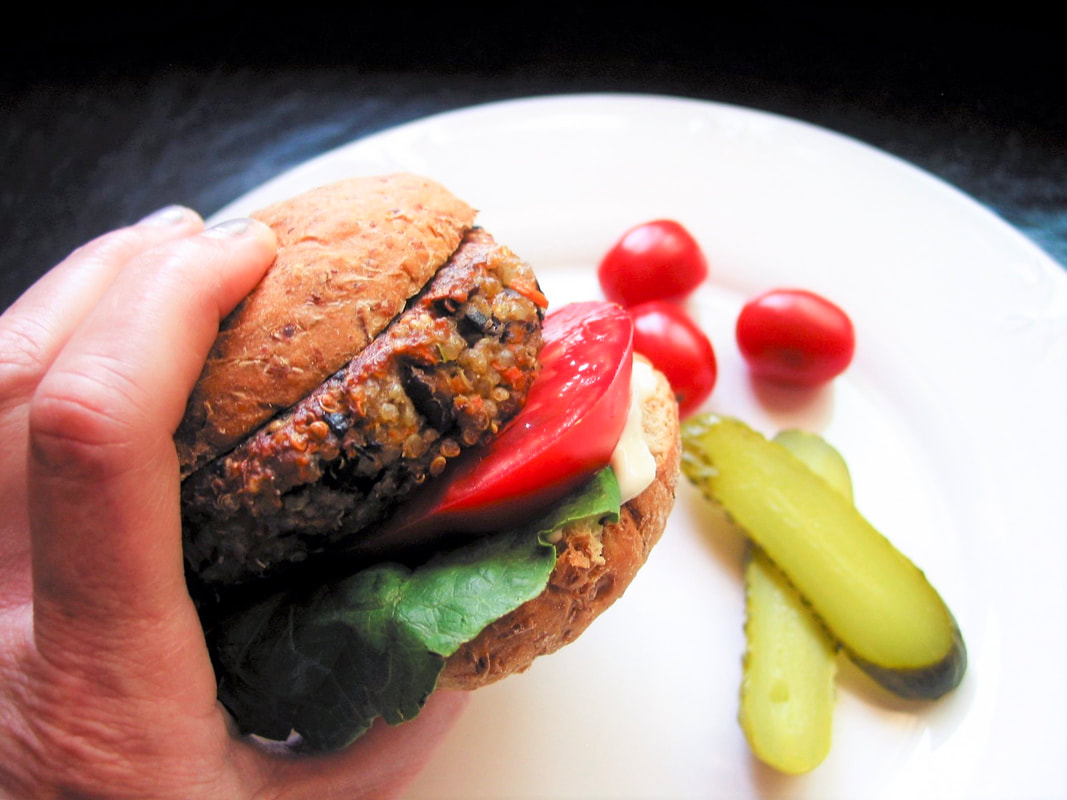
We ate 14-grain bread (which tasted like brick and mortar back then), when all I craved was that soft, white Wonder bread that was popular at the time. Now, this is not to say that we didn't have delicious food and sweets at home, just not on Sundays.

​Dad passed away on September 23, 1979. Forty years gone. If he could only see us now. See, Dad, we were listening! I'd like to think that he would have loved these veggie burgers.

These days, the BF and I eat healthy, but it has to taste good. [Ed. note: Oh hecks no, inject those soybean-seaweed waffles directly into my veins. :-/ ] And we both love a healthy veggie burger. Am not trying to make this taste like a beef burger, it's not a beef burger, but I will say that I've made hundreds of variations of veggie burgers and the BF and I absolutely adore this one from the talented women at Pollan Family Table.

PS: A year ago I lamented the scourge of jury dury and the terror of a broken refrigerator, survived both, and made Mom's apple cake (www.moveablefeast.me/blog/moms-apple-cake).
Picture
Adapted from: Pollan Family Table
Number of servings: 4

Ingredients
  • ¼ cup quinoa, rinsed and drained
  • ½ cup low-sodium vegetable broth
  • 1 cup organic canned black beans, rinsed and drained
  • 1 tablespoon finely chopped scallions
  • 1 serrano pepper (optional, I added it)
  • ½ cup peeled and finely chopped carrots
  • ¼ cup plain breadcrumbs (Panko used here)
  • 1 large clove garlic, minced
  • Kosher salt
  • Freshly ground black pepper
  • 1 large egg 
  • 2 tablespoons extra virgin olive oil
  • 4 multigrain hamburger buns
  • 1 ripe avocado, thinly sliced (optional)
  • Your favorite burger toppings for serving (tomatoes, lettuce, pickles, onion, etc.)

Directions
  1. Combine the quinoa and vegetable broth in a small saucepan and bring to a boil. Reduce to a simmer, cover and cook until all the liquid is absorbed, about 10 minutes. Remove from heat, set aside and let cool slightly.
  2. In a large mixing bowl, mash the beans with a potato masher, making sure to leave a few chunks. Add the scallions, carrots, breadcrumbs, garlic, ½ teaspoon of salt, and ⅛ teaspoon of pepper. Mix well. Add the cooked quinoa and the egg and combine all. Using your hands, form the mixture into four individual patties and place on a platter. Put in fridge for 10 minutes.
  3. Heat a large nonstick skillet over medium-high heat. Add the oil and heat until shimmering. Reduce heat to medium, place the patties in the pan, and cook until golden brown, about 5 minutes per side.
  4. Assemble the burgers and buns on a platter with your favorite toppings (I went heavy on avocado).
Picture
Dad's boxing gloves, 2019.
6 Comments

Roasted Harissa-Spiced Ratatouille

8/27/2019

2 Comments

 
Picture
Dinner guests who visit the house often have some form of dietary restriction: carb-, gluten-, grain-, or sugar-free, vegetarian, vegan, flextarian, only white-meat chicken-eater, allergies (shellfish, nuts, dairy), etc. You know what I'm talking about. I understand. Am a selective eater myself. [Ed. note: Run away run away run away do not comment I want to live...]

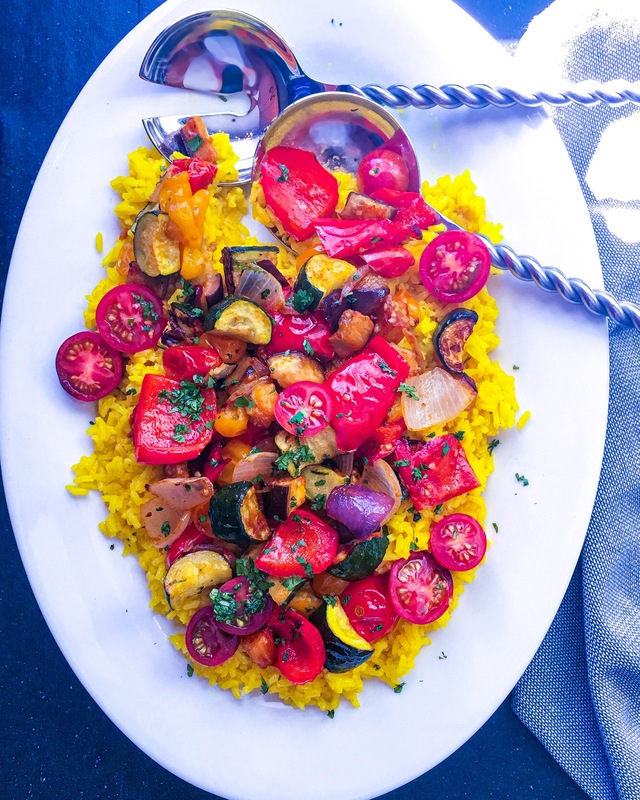
However, this summer has been about streamlining, making things as easy as possible. This dinner is the perfect solution. Have to give props to the BF, who suggested that kebabs would be a good accompaniment. [Ed. note: I can't help myself. I like good food, ok?]

This is especially effective for a dinner-party menu. Serve your favorite hummus for appetizers, follow up with two entrees: Roasted Harissa Spiced Ratatouille and Chicken Kebabs. The ratatouille will satiate the vegan guest and be a nice side dish for the carnivores. FYI, this dish is gluten free, grain free, Paleo and vegan.
Picture
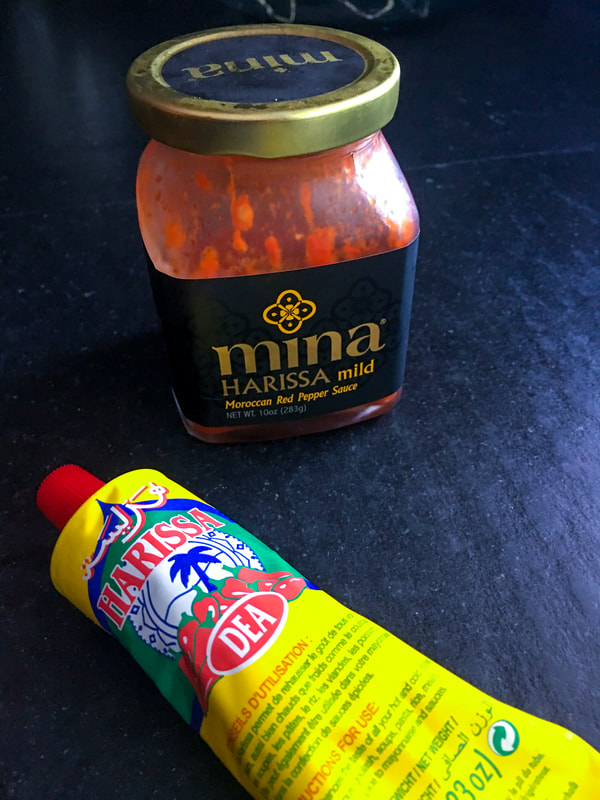
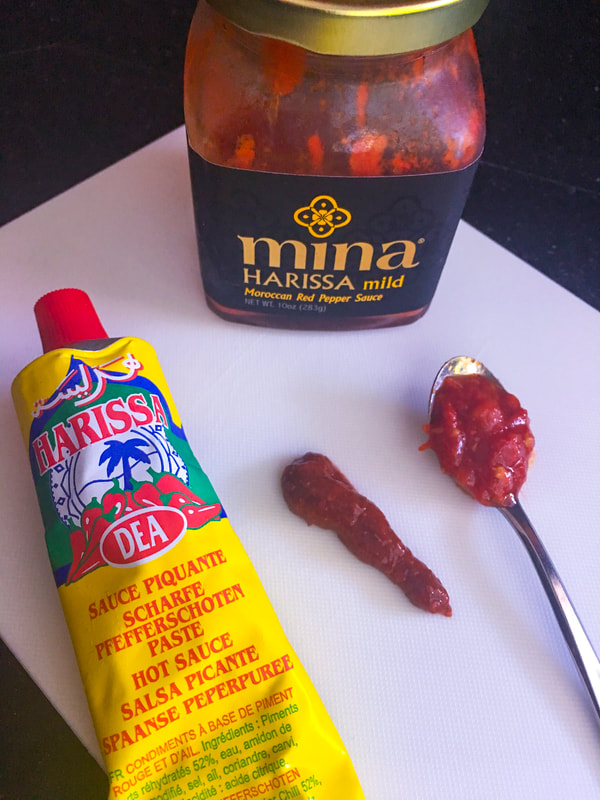
Have been on a harissa kick lately, adding it to shrimp skewers, lamb patties, and roasted Japanese eggplant. Harissa is a spicy aromatic North African chili paste made out of hot chili peppers (which are often smoked), roasted red bell peppers, tomatoes, garlic, olive oil and spices like cumin, coriander, caraway and mint. It comes in sauce form or paste, as you can see in photo below. I used a mild harissa sauce for this dish, but next time might opt for the paste, which is spicier and more concentrated. 
Picture
Picture
Adapted from: Gourmande in the Kitchen
Number of servings: 4-6

Ingredients
  • 2 medium zucchini, cut in half and again into thick slices (about 2 inches long)
  • 2 red peppers, seeded and cut into big chunks
  • 1 medium eggplant, cut into big chunks (Japanese eggplant used here, but use whatever you can get)
  • ½ red onion cut into chunks
  • 1 teaspoon fine sea salt
  • ⅛ teaspoon freshly ground black pepper
  • 2 tablespoons/30ml extra olive oil
  • 2 garlic cloves, thinly sliced
  • 1 ½ tablespoons harissa paste (harissa sauce used here)
  • ¼ teaspoon ground coriander
  • 1 pint cherry tomatoes. halved
  • 2 tablespoons parsley, roughly chopped
  • Rice, quinoa, couscous or cauliflower "rice" to serve

​Directions
  1. Preheat oven to 425 ºF.
  2. Place the zucchini, bell peppers, eggplant, garlic, salt, pepper, 1 ½ tablespoons of the olive oil, harissa, and coriander in a large bowl and toss to combine. Spread the vegetables on a baking sheet. Place tomatoes with remaining ½ tablespoon olive oil in a separate bowl and set aside.
  3. Roast vegetables for 15 minutes, remove from oven, add halved cherry tomatoes and return to oven for another 15 minutes.
  4. Remove from oven and serve vegetables over whatever starch you desire. Sprinkle with chopped parsley.
Picture
2 Comments

Green Avocado Sauce

7/10/2019

2 Comments

 
Picture
All apologies. It's been a while. There's a great excuse, though.

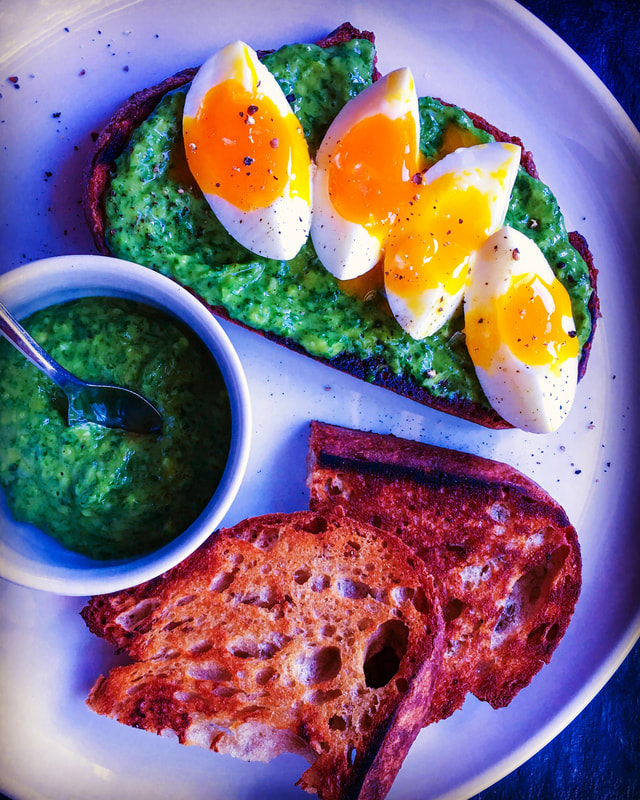
I traveled with my sister Julie to Bangkok, Thailand for two weeks to help my teacher/acting-coach big brother John move back to the States. Arduously busy, yes (this was not your typical move), and somewhat bittersweet for him, as he had lived and worked there for twenty years.

While there, my sister and I lived off the street food along the daily one-mile walk from our hotel to my brother's apartment. Breakfast consisted of a single, perfectly delectable marinated pork-strip skewer. A late lunch or dinner was a shared salad-in-a-bag, or fresh steamed corn, stripped off the cob to eat easily while walking. Such a beautiful country, I will certainly return someday with the BF. [Ed. note: I shall hold you to this.]

Back home, I have been craving any food that reminds me of the Thai street food: fresh, bright, flavorful and healthy. This herby green avocado sauce is super easy to prepare and literally works with anything. To wit, use it as:
  • a vegetable dip
  • sandwich spread
  • spread with grilled fish or shrimp
  • condiment for fried, soft boiled or poached eggs
  • drizzle for a wrap or burrito bowl
  • dressing for roasted vegetables or meat
  • of course, something heavenly to slather on toast

Adapted from: Alexandra's Kitchen
Number of servings: ¾ cup

Ingredients
  • 1 bunch (about 3 cups, 3 ounces) fresh parsley, cilantro, arugula or a mix, roughly chopped (I used mostly cilantro and a small amount of arugula)
  • 1 small bunch chives (about 1 ounce), roughly chopped
  • Juice of 1 lemon or lime (about 2 tablespoons), plus more to taste
  • 1 clove garlic, peeled
  • ¼ cup olive oil, plus more to taste
  • ¼ cup avocado
  • ¾ ​teaspoon sea salt
  • ½ teaspoon freshly cracked black pepper

Directions
  1. Add the greens (stems and all), chives, lemon juice, garlic, olive oil, avocado, salt, and pepper into a blender or food processor.
  2. Pulse until broken down — add water by the tablespoon as needed to thin and get the blade whirring. Scrape down and pulse again until the sauce is broken down and easy to dollop with a spoon. Taste.
  3. Adjust taste as needed with more lemon, olive oil, salt, and pepper. Adjust consistency with more water or olive oil by the tablespoon.
Picture
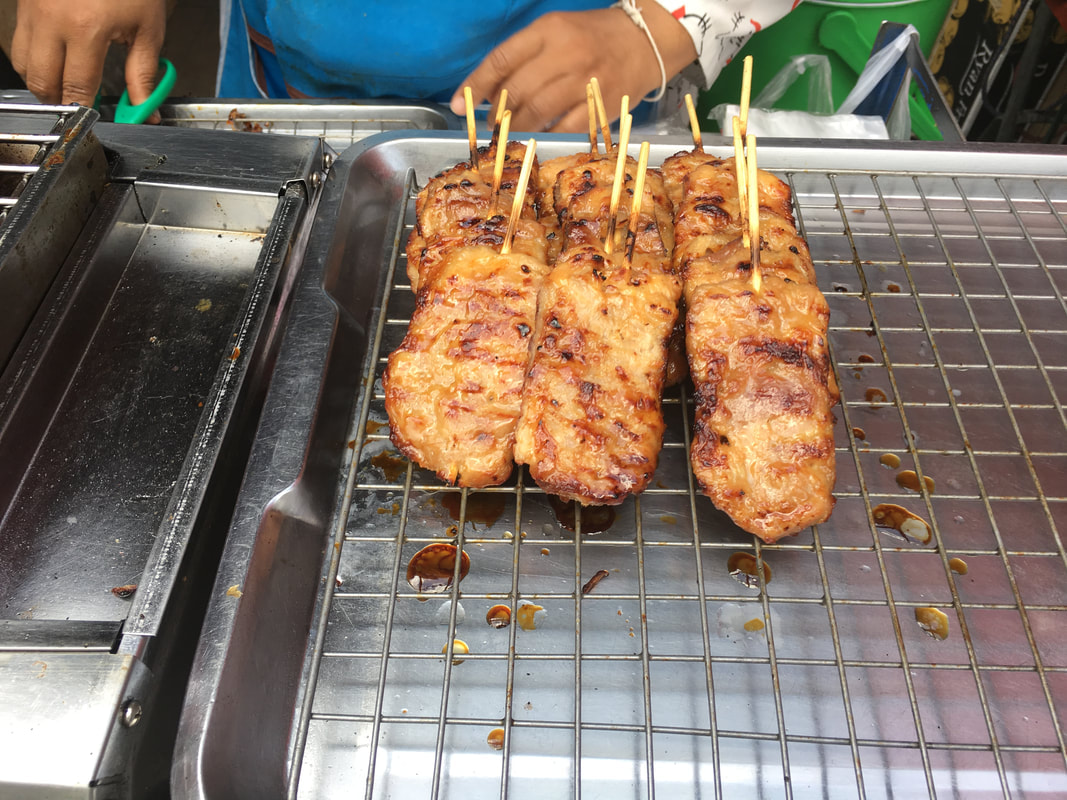
Grilled pork skewers. Breakfast of champions.
Picture
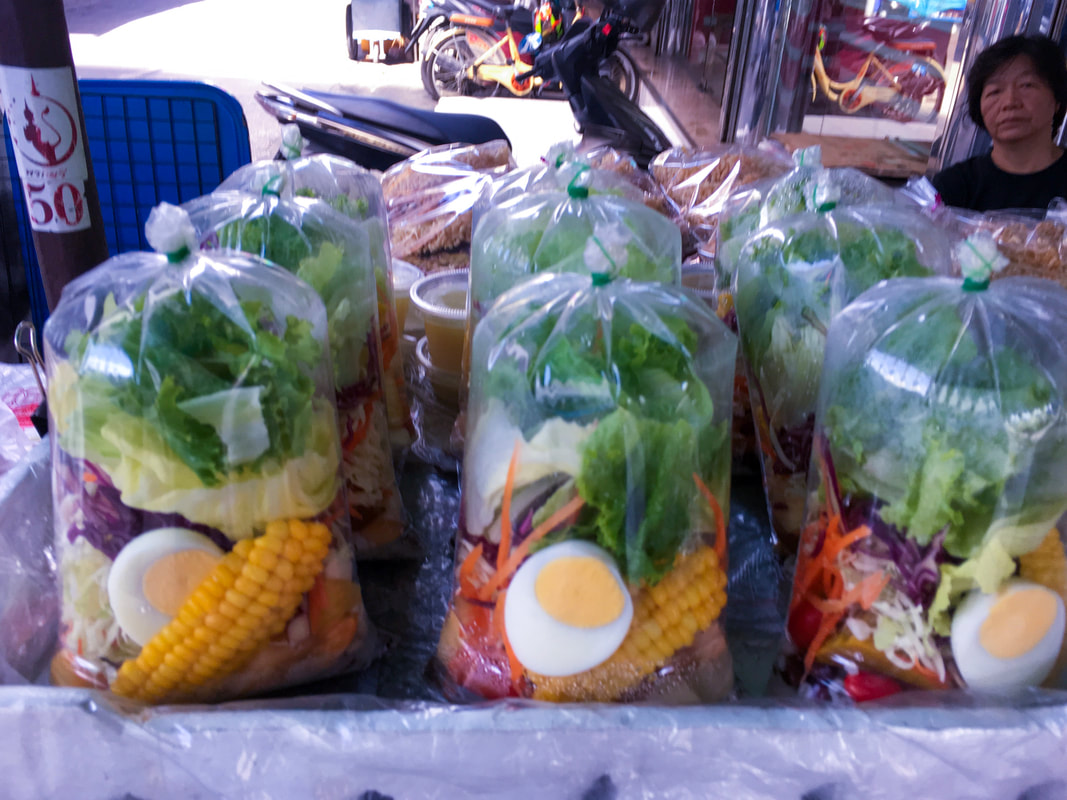
Fresh salad in a bag. Lunch...sometimes dinner.
Picture
Fresh guava slices on Silom Road (the best Lebanese food I've ever had was from the Silom district).
Picture
My Darling restaurant on Khao San Road.
Picture
Thai BBQ with my brother John and sisters, Julie, Tai, Pantene and Momay.
Picture
Missed these two! Thank you for holding down the fort!
2 Comments

Salmon with Sriracha-Lime Sauce

5/12/2019

2 Comments

 
Picture
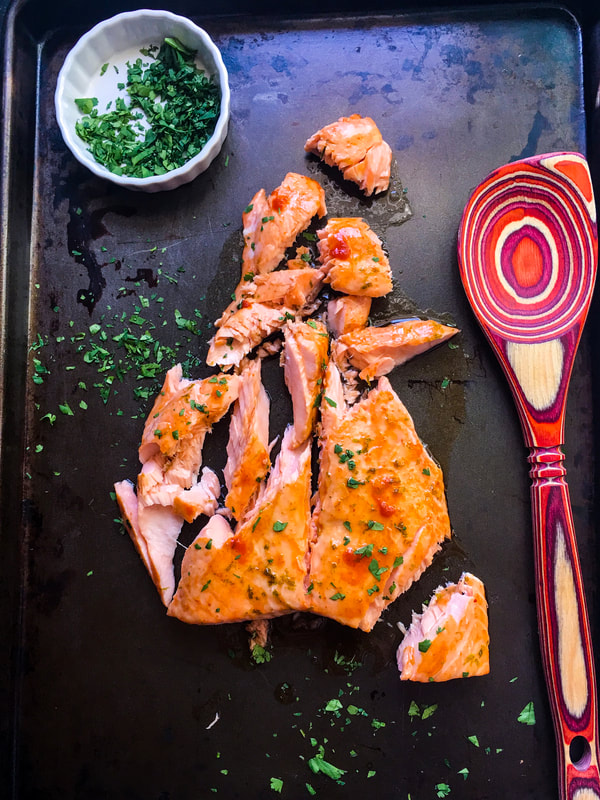
Does Mom like spice? From time to time, we like things spicy in our house [Ed. note: HEY NOW], and this healthy, delicious dish is so easy to make it screams "weeknight dinner." The slightly spicy-tart sauce is a perfect foil to the sweet salmon.

And really, if you're concerned about the spice level, don't be. The original recipe below is sumptuous as is, but since the BF and I sometimes like a little more heat [Ed. note: WHAT KIND OF BLOG IS THIS THEY'RE GONNA ADD A DISCLAIMER], we'll add more Sriracha next time.

This is so easy, you could make this for a Mother's Day brunch for 20, which in fact I am doing.

Happy Mother's Day!

PS: A year ago we gave Mom lots of cavities with these offerings:
  • www.moveablefeast.me/blog/caribbean-rum-bundt-cake
  • www.moveablefeast.me/blog/lemon-creme-brulee-with-chambord-soaked-raspberries

Adapted from: SELF, April 2013 (Gwyneth Paltrow and Julia Turshen); Epicurious (source containing original article)
Number of servings: 4

Ingredients
  • Zest and juice of ½ lime
  • 2 tablespoons maple syrup
  • 1 ½  teaspoons Sriracha (use full 2 teaspoons if you want more heat)
  • ½ teaspoon sea salt
  • 1 ¼ pound salmon fillet, skin removed
  • 2 tablespoons coarsely chopped cilantro
  • Optional toppings: pickled ginger

Directions
  1. Preheat oven to 425 °F.
  2. In a bowl, whisk lime zest, juice, maple syrup, Sriracha and salt.
  3. Place salmon in a baking dish lined with foil or parchment paper. Pour mixture over top.
  4. Roast until cooked through and flaky, 15 minutes. Sprinkle with cilantro and serve.
2 Comments

Buttermilk-Marinated Roast Chicken

4/26/2019

10 Comments

 
Picture
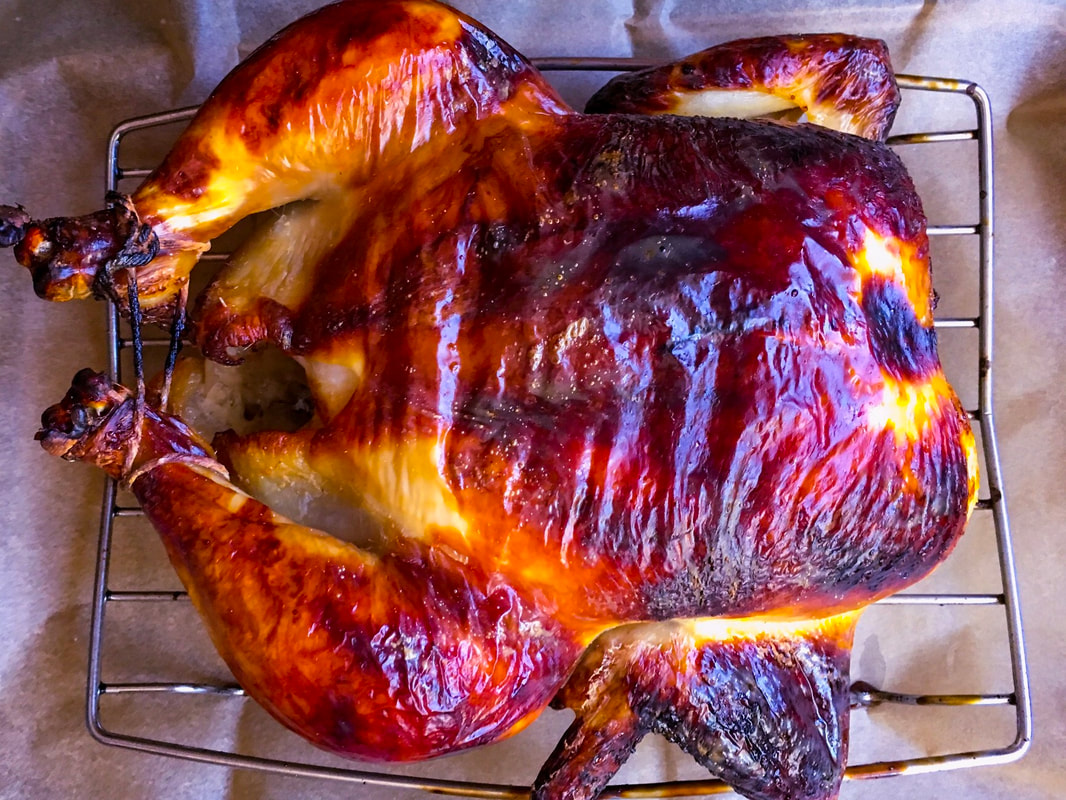
Sometimes the single picture is worth the thousand words. Just look at this reddish bronzed skin! The BF often tells me that he loves the simplest roasted chicken dishes, and this one couldn't be easier. Adapted from Samin Nosrat's Salt Fat Acid Heat, this recipe encompasses two whole ingredients. Three, if you count salt. Genius.

The buttermilk and salt work like a brine, tenderizing the meat to yield an unbelievably juicy chicken with crispy, gorgeously intense-colored skin. Be sure to leave 24 hours for marinating. I streamlined the recipe a bit, as well as decreased the amount of salt in the marinade.

One of the best things about roast chicken is that you can serve it with anything. Try it with these side dishes:
  • www.moveablefeast.me/blog/roasted-tri-color-fingerlings-chimichurri-sauce
  • www.moveablefeast.me/blog/spiced-roasted-carrots-with-avocado-yogurt
  • www.moveablefeast.me/blog/asian-style-kale-salad

Adapted from Samin Nosrat's Salt Fat Acid Heat blog and Netflix special of same name.
Number of servings: 4

Ingredients
  • 3 ½ to 4-pound whole chicken
  • 2 tablespoons kosher salt
  • About 2 cups buttermilk (full fat was used here)

Directions
  1. The day prior to cooking, sprinkle the chicken inside and out with 1 tablespoon of salt. 
  2. Stir 1 tablespoon of kosher salt into the buttermilk to dissolve. Place the chicken in a gallon-size resealable plastic bag and pour in buttermilk. 
  3. Seal it, squish the buttermilk all around the chicken, place on a rimmed plate, and refrigerate for 24 hours. If so inclined, rotate the bag over the next 24 hours so every part of the chicken gets marinated.
  4. Let chicken come to room temperature [Ed. note: ROOM TEMPERATURE should take about an hour, ackshually] before roasting. 
  5. Preheat the oven to 425 °F, with a rack set one rung below center.
  6. Remove chicken from the plastic bag and scrape off as much buttermilk as you can. Tightly tie together the legs of the chicken with a piece of butcher’s twine and tuck the wings under the bird. Place the chicken breast side UP in a 10-inch cast iron skillet or on a rack in a shallow roasting pan.
  7. Slide chicken into the oven, legs toward the back. Roast for 50-60 minutes until brown all over and the legs don't resist when you jiggle them. Also, you can cut into the thigh, and if juices run clear, it's done.
  8. If chicken gets too brown before it's done, tent a piece of foil over the top. 
  9. When chicken is done, remove it to a platter and let it rest for 10 minutes before carving and serving.
10 Comments

Shrimp & Sausage Gumbo with Collard & Mustard Greens

3/8/2019

0 Comments

 
Picture
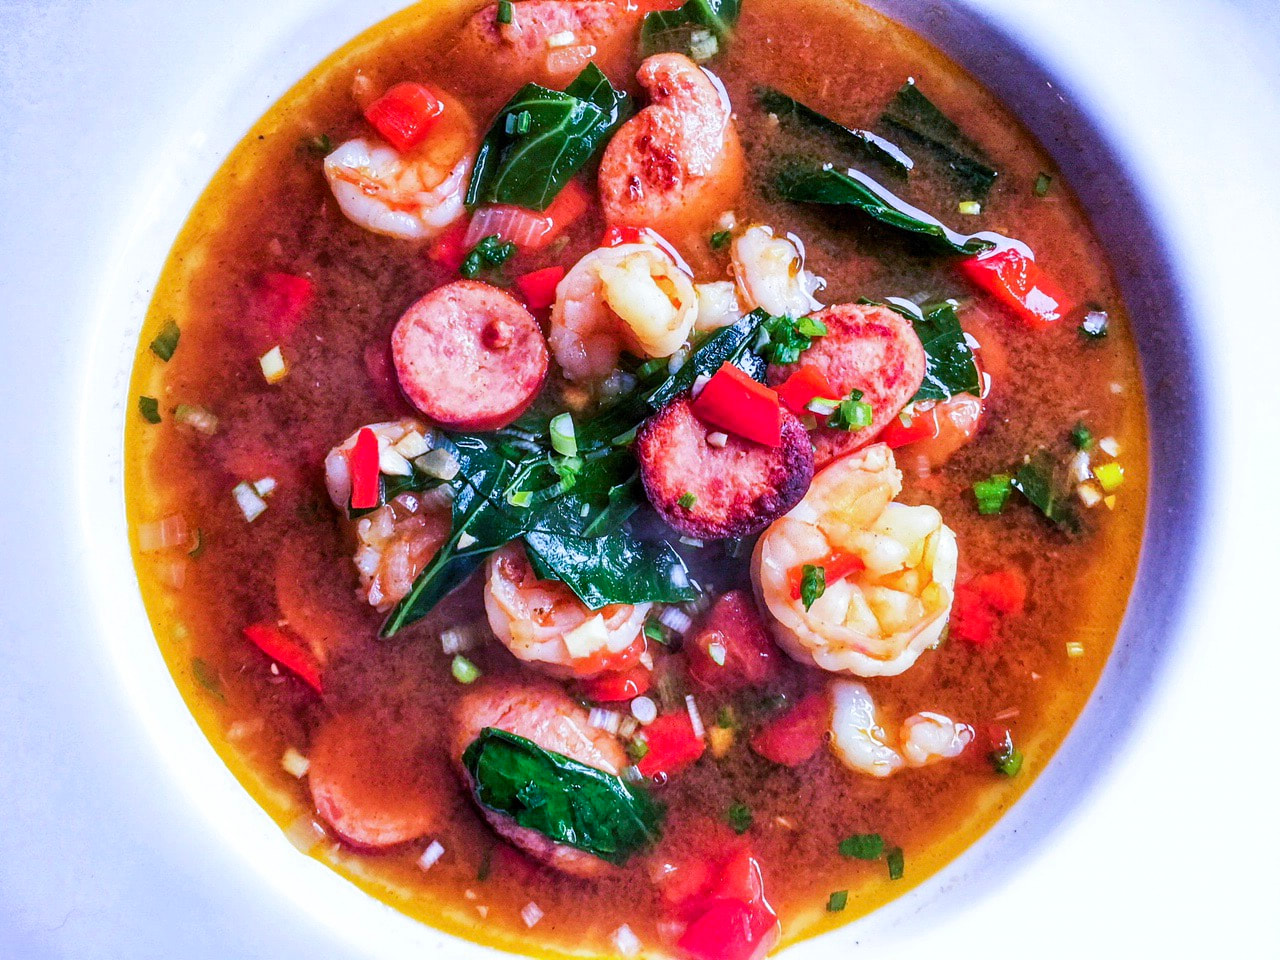
Just because Mardi Gras may have passed, doesn't mean it's not too late to serve this light, brothy, hearty and incredibly flavorful gumbo. (In our household, Mardi Gras-month is always a time for celebrating everything New Orleans.) Adapted from a recipe the great Emeril Lagasse published in a dog-eared copy of the September, 1994 issue of Bon Appetit.

New Orleans is, hands down, an all-time favorite city for me and the BF. Incredible food, history, architecture and music [Ed. note: Tipitina's, represent!] everywhere you step. We never, ever tire of that city, and are lucky to have visited at all different times of the year. We also can't leave until we've had a bowl of gumbo...somewhere. A few of my favorite places to enjoy the staple are Dooky Chase Restaurant, Galatoire's and Nola's.

Come to think of it, it's been many years since the BF and I have been. Perhaps we need to head back soon? [Ed. note: Do not tease!]

NOTES:
  • This is not a thick roux-based gumbo. In fact, it contains no flour at all. It's lighter and brothy, which is why I love it so much.
  • This recipe makes a ton of gumbo. Personally, I half the recipe for the two of us and it produces a perfect four servings, enough for dinner for two nights. Alternatively, you can make the full amount and freeze half, or host a dinner party. This is a great to do as you can make it in advance (sans shrimp and greens). 
  • Watch the salt!
  • Allergic to shrimp? Leave it out. ​
Picture
A small sampling of my vast voodoo doll collection.
Picture
Until next year, Laissez les bon temps rouler!

Adapted from: Bon Appetit, September 1994
Number of servings: 8

Ingredients
Stage I
  • ​3 quarts water
  • 4 8-ounce bottles clam juice
  • 1 ¼ pounds uncooked large shrimp, peeled, de-veined, shells reserved
Stage II
  • 2 tablespoons olive oil
  • 1 ½ andouille sausage or other fully cooked smoked sausage (such as pork or turkey kielbasa), sliced into ¼-inch thick rounds
  • ¾ cup chopped onion
  • 2 red bell peppers, chopped 
  • 2 tablespoons garlic, minced
  • 1 can diced tomatoes
  • 1 tablespoon dried or fresh thyme
  • 1 teaspoon (or more) hot pepper sauce
Stage III
  • 1 bunch collard greens, stemmed, coarsely shopped (about 4 cups)
  • 1 bunch mustard greens, stemmed, coarsely chopped (about 4 cups)
  • 3 tablespoons filé powder (a powder made from ground sassafras leaves)
For Serving
  • Cooked rice (optional)
  • Chopped green onions

Directions
  1. Boil water, clam juice and reserved shrimp shells in large saucepan 15 minutes. Strain stock and reserve.
  2. Heat oil in heavy large Dutch oven over high heat. Add sausage and sauté 1 minute. Add onion, bell pepper and garlic and sauté for 2 minutes. Add tomatoes, thyme, hot pepper sauce and reserved stock. Bring to boil. Reduce heat; simmer 15 minutes. (NOTE: can be prepared a day ahead. Cover and refrigerate. Bring to simmer before continuing.)
  3. Add all greens to soup; simmer until wilted but still bright green, about 2 minutes. Add shrimp; simmer until just tender, about 2 minutes longer. Turn off heat. Mix in filé powder. Season to taste with salt, pepper and hot pepper sauce. (NOTE: watch the salt.)
  4. Mound large spoonful of cooked rice in center of each large shallow soup bowl. Ladle gumbo over. Garnish with green onions and serve.

PS: A year ago chocolate and peanut butter squared off and clashed in a titanic battle for the ages (www.moveablefeast.me/blog/chocolate-peanut-butter-tart), then there was an attempt to make up for that dessert bomb with some roasted shrimp and asparagus with shallot lemon vinaigrette (www.moveablefeast.me/blog/shrimp-asparagus-with-shallot-lemon-vinaigrette).

PPS: "Iko Iko" is one of my favorite songs, takes me right back to New Orleans.
0 Comments

    Author

    I'm Jacquie, personal chef & recipe developer in the beautiful Pacific Northwest. ​Living life with my wildly funny boyfriend and dog Marlowe. Lover of books, bourbon, chocolate and movies.​

    Archives

    May 2020
    February 2020
    January 2020
    November 2019
    October 2019
    September 2019
    August 2019
    July 2019
    May 2019
    April 2019
    March 2019
    February 2019
    January 2019
    December 2018
    November 2018
    October 2018
    September 2018
    August 2018
    July 2018
    June 2018
    May 2018
    April 2018
    March 2018
    February 2018
    January 2018
    December 2017
    November 2017
    October 2017
    September 2017
    August 2017
    July 2017

    Categories

    All
    Ahi
    Apple
    Apple Pie
    Avocado
    Bars
    BBQ
    Beans
    Beef
    Beets
    Black Bean
    Blackberry
    Blueberries
    Borscht
    Bread
    Brownies
    Brussels Sprouts
    Bundt
    Butter
    Butternut Squash
    Butterscotch
    Cabbage
    Cake
    Caramel
    Carrot
    Challah
    Champagne
    Cheesecake
    Chicken
    Chili
    Chinese
    Chinese New Year
    Chocolate
    Christmas
    Cinco De Mayo
    Citrus
    Cocktail
    Coconut Rice
    Comfort Food
    Cookies
    Corn
    Cranberries
    Crostata
    Crumble
    Cupcakes
    Curry
    Dessert
    Easter
    Egg
    Egg Nog
    Eggplant
    Fish
    Ginger
    Gingerbread
    Gluten Free
    Grain Free
    Green Sauce
    Gumbo
    Halibut
    Halloween
    Hannukah
    Healthy
    Holiday
    Holidays
    Ice Cream
    Indian
    Kale
    Key Lime
    Kohlrabi
    Kosher
    Lamb
    Latkes
    Lemon
    Lentil
    Low Carb
    Mac & Cheese
    Malt
    Mango
    Mango Salsa
    Mardi Gras
    Martini
    Memorial Day
    Mexican
    Miso Chicken
    Moroccan
    Mushrooms
    Naan
    Nectarine
    Noodles
    Olive Oil
    Parsnips
    Passover
    Pasta
    Pavlova
    Peanut Butter
    Penne
    Peppermint
    Pesto
    Pie
    Pizza
    Plums
    Pluot
    Pork
    Potatoes
    Pots De Creme
    Pudding
    Pumpkin
    Pumpkin Cake
    Quinoa
    Rajma
    Raspberries
    Ratatouille
    Risotto
    Root Beer
    Salad
    Salmon
    Salmon Bowl
    Salsa
    Sauce
    Scallops
    Shortbread
    Short Ribs
    Shrimp
    Side Dish
    Soup
    Soy Sauce Eggs
    Spicy
    Spiralized
    Steak
    Strawberries
    Sugar Free
    Summer
    Sweet
    Sweet Potatoes
    Tacos
    Tart
    Thanksgiving
    Tomatoes
    Turkey
    Valentine's Day
    Vegan
    Veganuary
    Vegetable
    Vegetarian
    Veggie Burger
    Whole30
    Whoopie Pies
    Yams
    Yellow Bell Pepper
    Yu Choy

    RSS Feed

Powered by Create your own unique website with customizable templates.
  • home
  • services
  • bio
  • blog
  • contact
  • PHOTOS (summer)
  • photos (winter)
  • PRESS
  • faq