
I probably drive the BF crazy [Ed. note: like no one else, and for some reason I can't help myself], but I start asking him to choose his birthday cake-dessert about a month before his birthday. Usually give a choice of some great found recipe that includes either apples, caramel, butterscotch or lemon. Love hunting for the perfect recipe, with the goal of getting his eyes to bug out.
These apple pie bars are a client favorite, and whenever I make them the BF ends up in the kitchen, plaintively staring and asking if there are "extras." [Ed. note: "Oh those were for the clients?"] Needless to say the dessert has become one of his favorites, so I decided to make it for his birthday in lieu of a traditional cake. This was a very special birthday, by the way. [Ed. note: #LOLOLD] One of the great things about this dessert is the shortbread dough is used for both the bottom crust and crumble on top. (Meaning there's no pie crust to roll out.) As the brilliant Ina Garten likes to say, "How easy is that?" To really send it over the top, drizzle the bars with gooey caramel (optional, but recommended). Perfectly okay to eat with your hands, or dish/bowl them up with a scoop of vanilla ice cream. 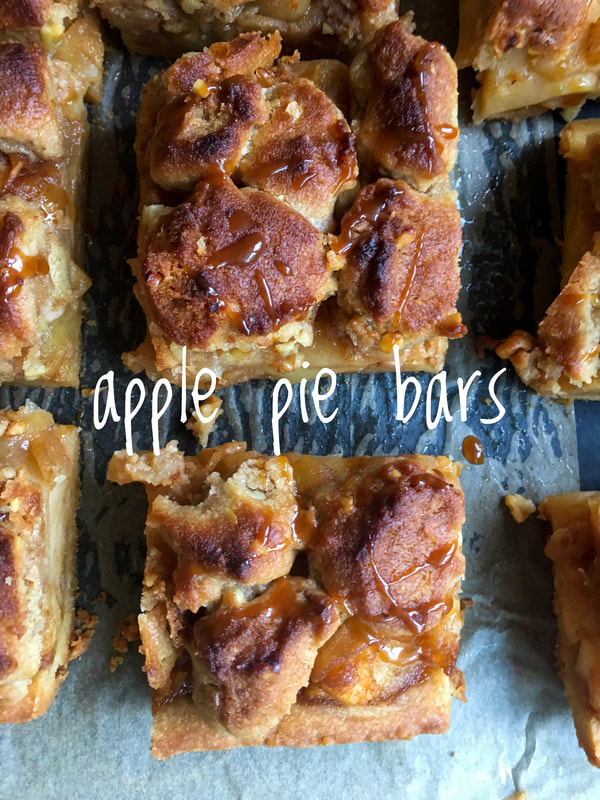
In addition to offering an alternative to your everyday pedestrian cookie, these bars have another perk: they travel well. Simply wrap up the baking pan and cut the bars when you get to your destination. As for optimal portion size, Garten advises, "I cut the bars in fairly large 3 x 3-inch squares if I'm serving them on a plate with a scoop of vanilla ice cream on the side. If I'm serving them on a platter of small petits fours to pick up with your fingers, I'll cut them in smaller bite-size pieces."
NOTES:
PS: Speaking of Thanksgiving, a year ago we were thinking ahead with this whipped cranberry butter (www.moveablefeast.me/blog/whipped-cranberry-butter). Also, Adam Sandler sings! PPS: Another client-approved holiday-time dessert, your friends and family won't know this yummy mini pumpkin cheesecake is sugar-free and low-carb. That is, unless you tell them. So don't. (www.moveablefeast.me/blog/mini-pumpkin-cheesecake-sugar-free-and-low-carb) 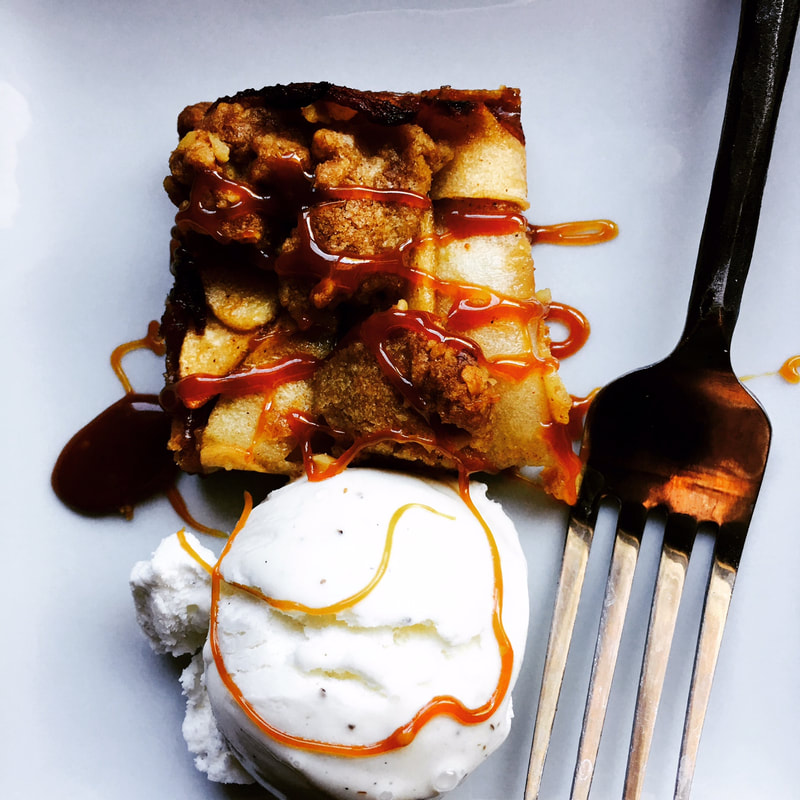
Adapted from: Ina Garten, Cooking For Jeffrey
Number of Servings: Makes one 9 x 13-inch pan Ingredients Crust
Directions Crust
6 Comments
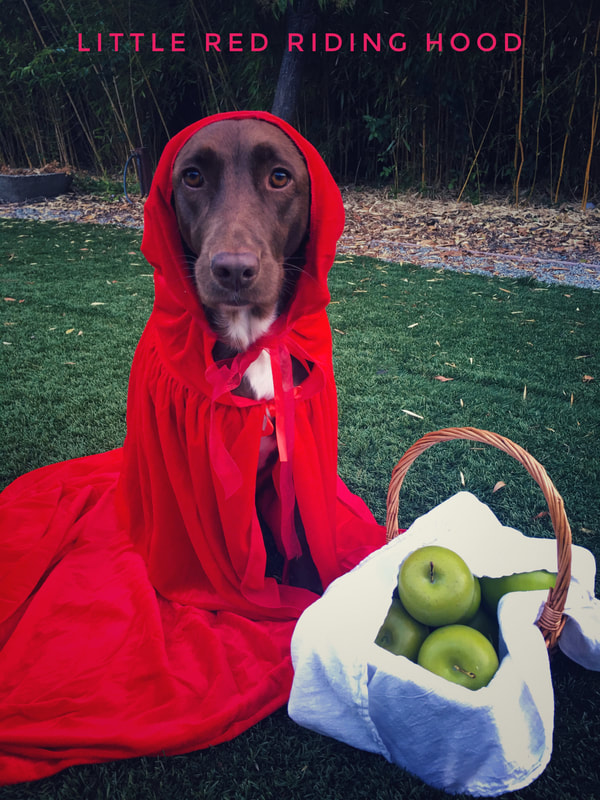
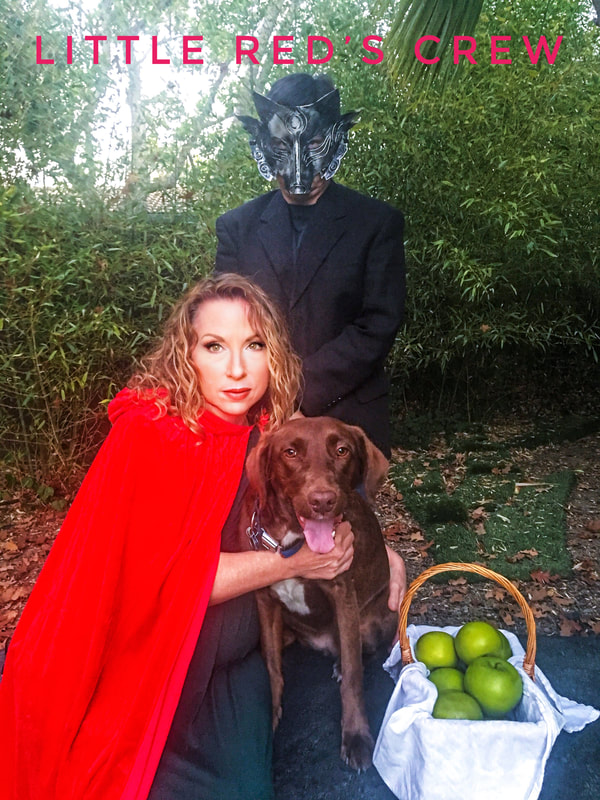
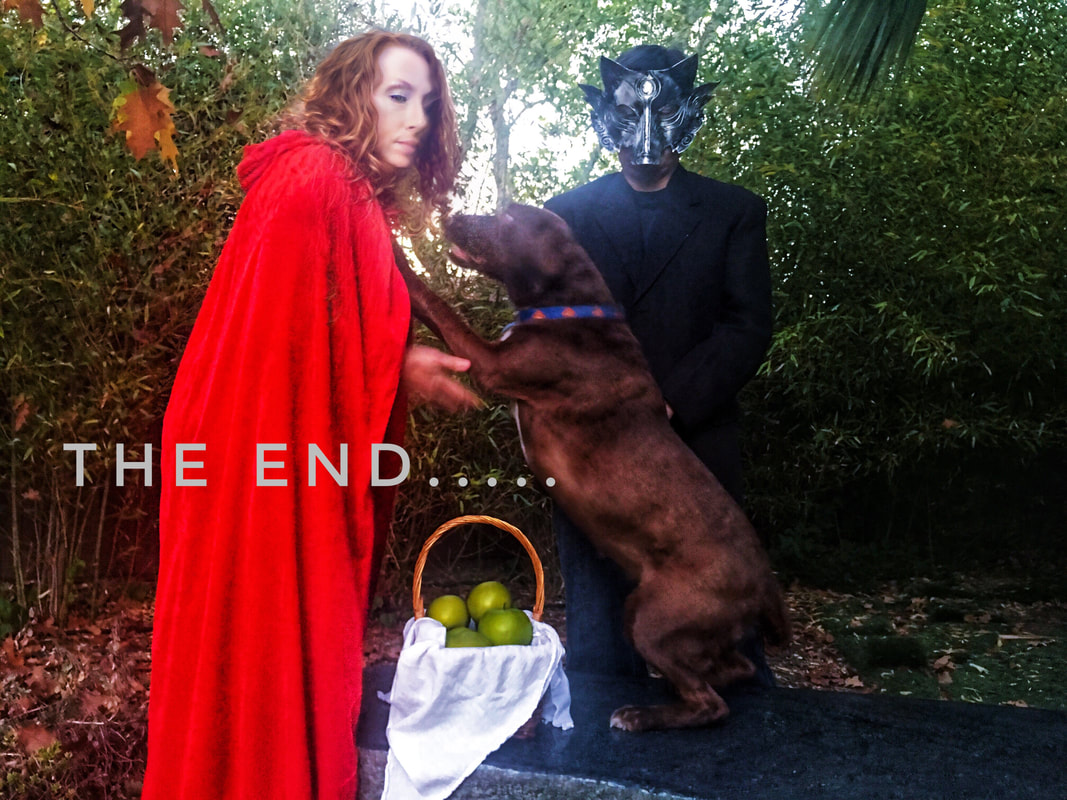
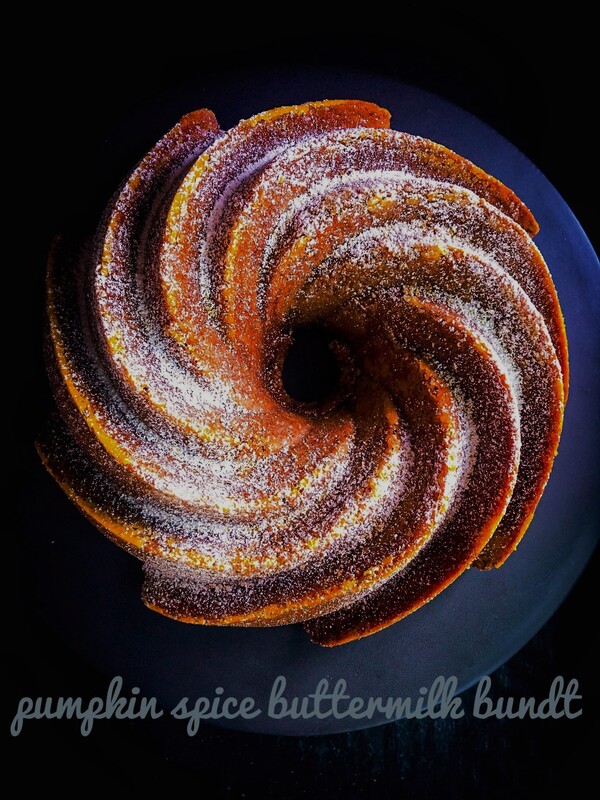 [Ed. note: Once again, since it's Halloween, our four-pawed special-guest blogger returns.] Okay. Hello. Marlowe here. Mom and Dad say it okay to write because I has a did last Halloween (www.moveablefeast.me/blog/mini-butterscotch-apples) and then also as well again repeated here (www.moveablefeast.me/blog/sauteed-white-beans-with-kale). Dad better give me raise of more treats or I bite him. [Ed. note: We'll talk.] Mom say Halloween one of her favorites times of year, which I no understand because weird little people ring doorbell all night and everybody tell me to stop barking. But I guess okay since little people very nice to me and give me lots of pets and scritches. Howevers nobody let me have any of small packages that they put in their bags, maybe I need to talk to union repersentartive. Since it Halloween, Mom and Dad dress me up. You may remember I was UPS driver last year. This year I something called Little Red Riding Hood, and also a lumberjack. Mom like Riding Hood since good story, Dad like lumberjack because he keeps singing some silly song and I no know what a Monty Python is. Also not want speculate what Dad do in spare time. [Ed. note: More treats, yes! I think we can work something out.] Mom says to tell you this cake like "little bite of autumn on your plate," which strange since though I a dog even I know you no can put a season on dinnerware. Duh. Oh, she also say this no need frosting and what the fresh hell who are you Mom?  Besides weird little people ringing doorbell, Mom and Dad like to put on even weirder movies like Hocus Pocus, The Blair Witch Project, Shaun Of The Dead, and The Shining. Me no like when that guy puts face through the door. Mom and Dad say wish you all Happy Halloween, and Dad say please click ads on right-hand side because that give me more minty treats that good for teeth. Thank you for reading and hope you like bundt cake! PS: Last year Mom also went crazy with pumpkin motif and this quote-unquote epic pumpkin bread (www.moveablefeast.me/blog/epic-pumpkin-bread). PPS: We no just stuffing ourselves with pumpkin stuff and candy, also try be healthy with this butternut squash chickpea stew, which Dad should have more of because he taking shape of school bus I always afraid of (www.moveablefeast.me/blog/butternut-squash-chickpea-moroccan-stew). Me also not know what up with "Amok Amok Amok."  I wish I were a kitteh, just like my dear Papa! Adapted from: Cozy Cakes Cottage Number of servings: 10-12 Ingredients
Directions
So this week marked the official return to school and, sniff, a signal that summer is coughing up its last gasp.
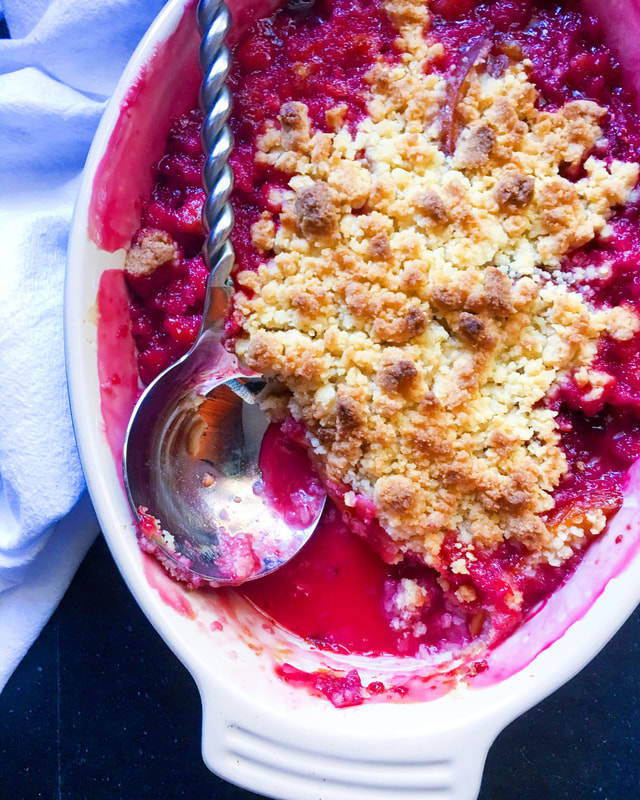
Time for dessert! This sweet-tart, vibrantly colored crumble was a last-minute request for a recent dinner party. Pressed to come up with something quickly, I tried to steer away from more complicated desserts (i.e., no pie crusts to roll out, chill, crimp, blind bake, etc.), or even complicated fruits to steam, peel, or pit (cherries would have made this arduous). The nectarine, plum and raspberry triumvirate immensely simplified the process. No food processor or pastry cutter required. Prior to baking, it literally took ten minutes to prepare. [Ed. note: Damn, woman.] 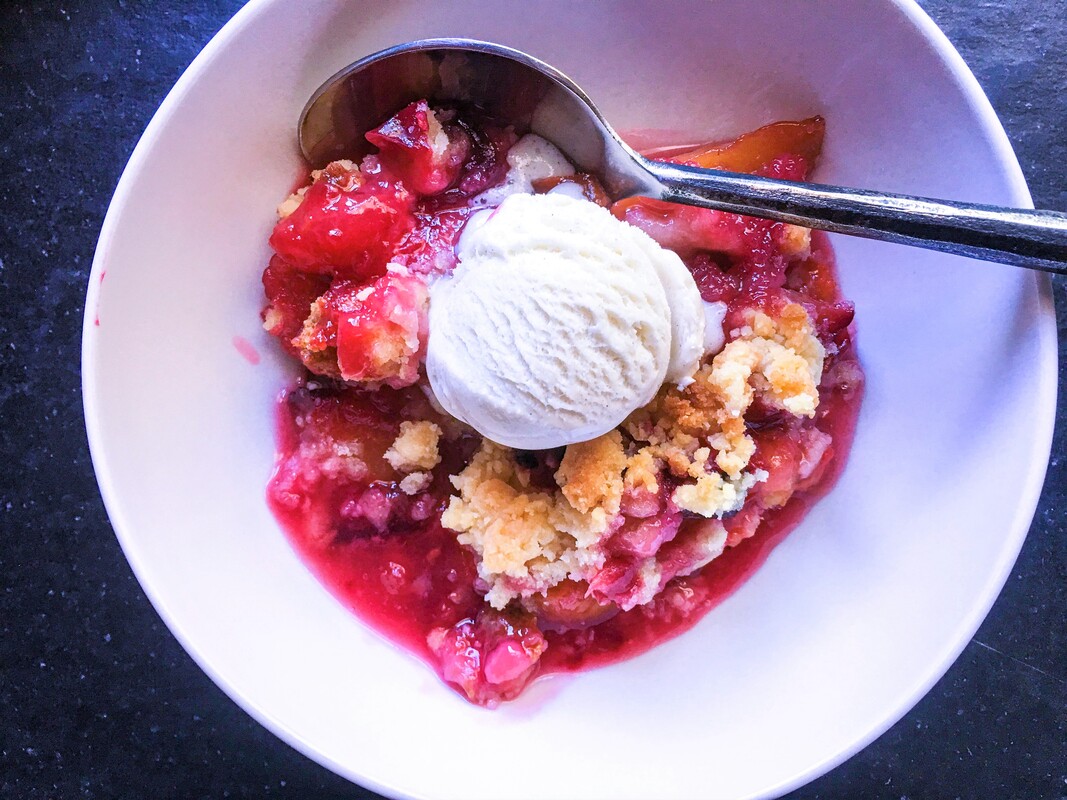
I decided on a crumble as opposed to a streusel topping [Ed. note: Am so triggered by this I do not know what I should be triggered by], because I felt this particular fruit combo would have been overpowered by a spicy oatmeal and nut topping. Love streusel for apples, pears, blackberries and even blueberries, but this fruit combo needed something simpler, more delicate.
What is the difference between a crumble, crisp and cobbler? A crumble has a shortbread cookie-like topping. A crisp's topping is streusel based, typically made with spiced oatmeal and nuts, and a cobbler has biscuit dough dolloped on top. Don't get me started on the Betty, pandowdy, or buckles, grunts and slumps! PS: A year ago we broke out the Spiralizer for some healthy chicken parmesan with veggie noodles (www.moveablefeast.me/blog/healthy-chicken-parmesan-with-veggie-noodles). PPS: Channeling the late Anthony Bourdain, things got a little NSFW with this sinful mac and cheese (www.moveablefeast.me/blog/anthony-bourdains-macaroni-and-cheese). 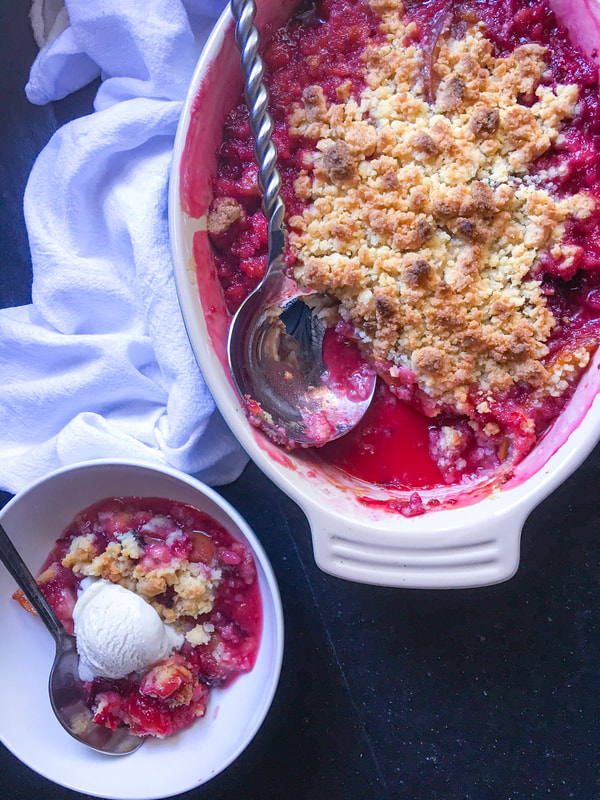
Crumble topping inspired by Smitten Kitchen
Number of servings: 6-8 Ingredients Fruit Filling
Directions Crumble Topping
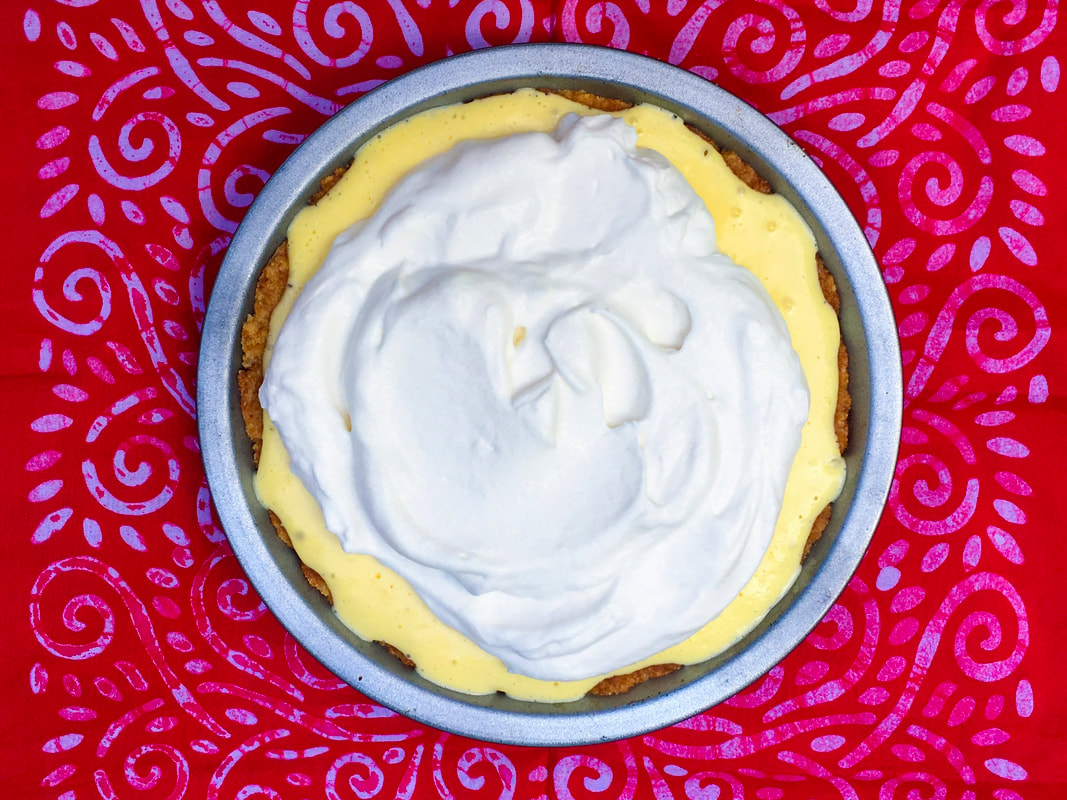
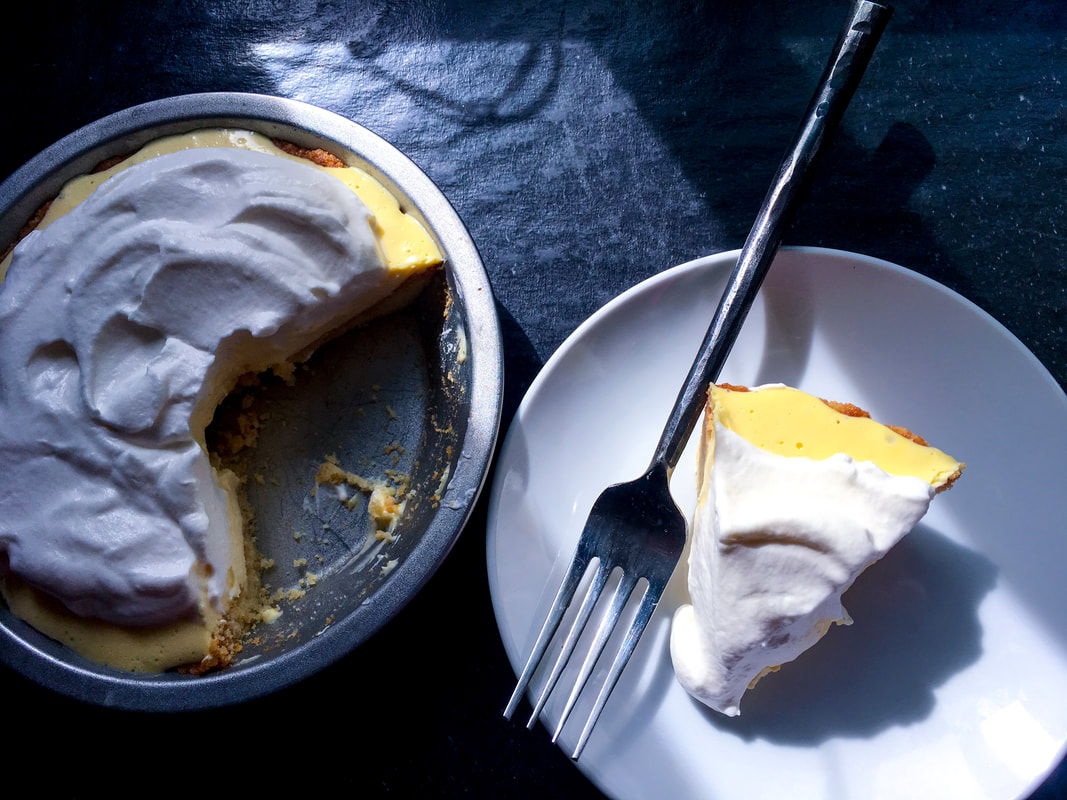
If you've been reading this blog for any length of time, you know the BF lusts for all things lemon. [Ed. note: LEMONS] Turns out this is genetic, as his Mom was a huge fan of the sour cream lemon pie from Marie Callender's. [Ed. note: Can confirm.] And my Mom loved lemon meringue pie, dare I say almost to the point of being on equal footing with chocolate.
Well this pie isn't just lemony, tart and creamy, it's low carb, as well as sugar, gluten, nut and grain FREE. A perennial favorite, and #GuiltFree. Broke this out for a client's Fourth-of-July BBQ, along with several other desserts like s'mores bars, ice cream sandwiches, blueberry hand pies, a flag cake and raspberry-nectarine plum cobbler. The pie was swiftly, voraciously decimated down to the last crumb, and most guests were unaware of the ingredients. Tasted like the real deal. Try it out! Fool your friends! And hope you are all enjoying a wonderful summer. NOTES:
In other news, a Marlowe update: our beautiful chocolate lab mix is recuperating from a recent surgery to remove a malignant mast cell tumor. So it's a bit like a slumber party in our living room, as we don't want her popping a stitch trying to hop on our rather tall bed. She's doing well and we're counting the days until those stitches are removed, then she can resume chasing squirrels, barking at the UPS guy, jumping on her favorite people, and going on her favorite long walks.
[Ed. note: We thank our family and friends for the kind words and well wishes. Please feel free to click an ad link so we can pay this vet bill! ᕕ( ᐛ )ᕗ ] 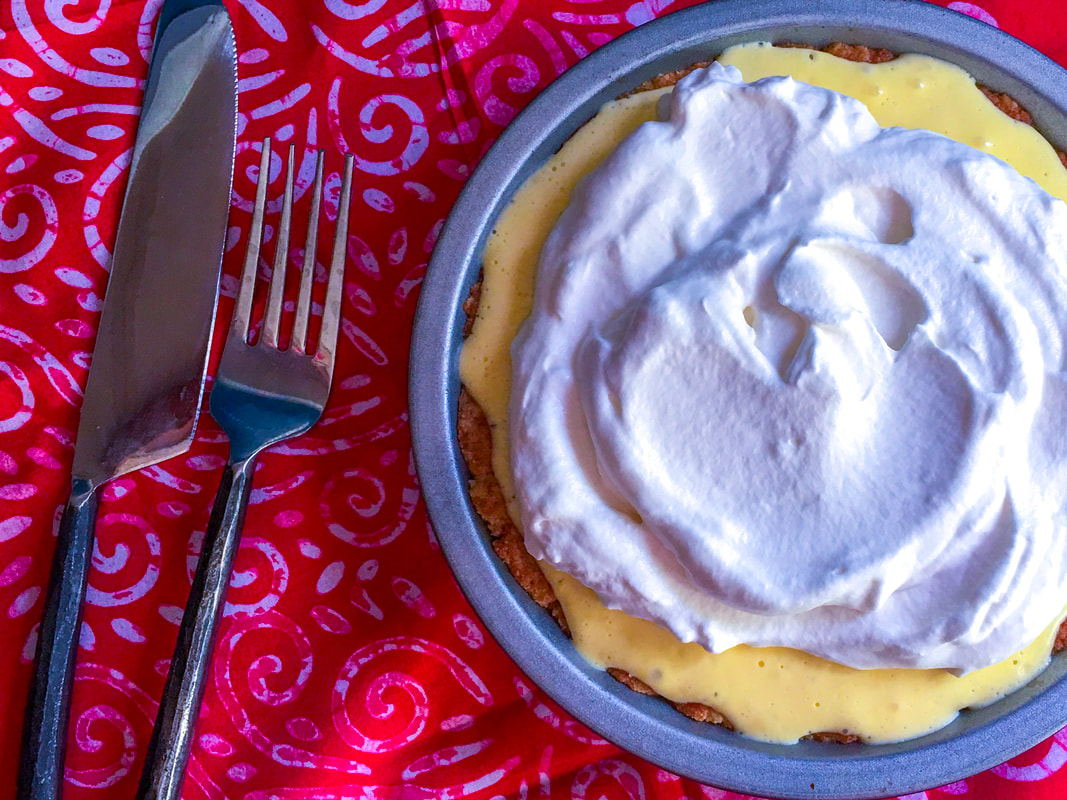
Adapted from: All Day I Dream About Food
Number of servings: 10 Ingredients Low Carb Almond Flour Crust
Directions Low Carb Almond Flour Crust

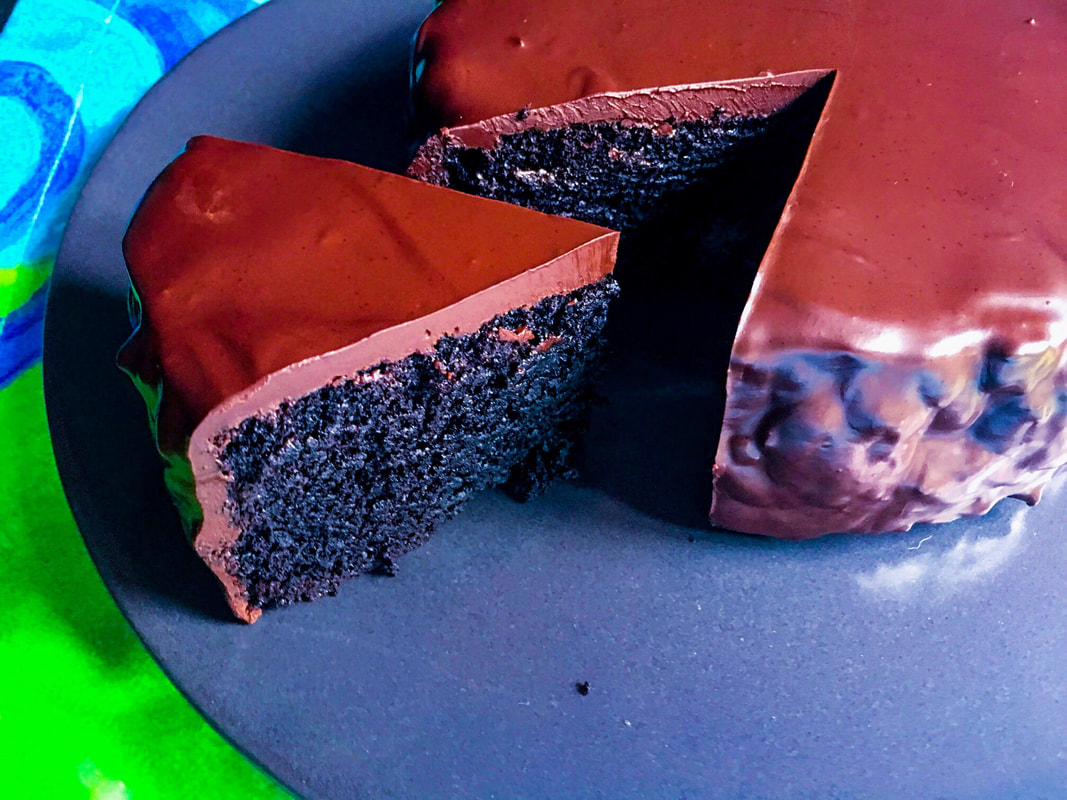
Set out to make a cake made with olive oil to see what it would taste like. One bowl. No eggs. No dairy. Vegan. [Ed. note: Vegan? Chocolate cake? Is this allowed?] Why yes! Yes it is. In fact, because of the olive oil it's so incredibly moist, with a deep dark-chocolate flavor, it made me swoon. [Ed. note: Taking notes.]
This has been called a Wacky cake or Depression Cake (en.wikipedia.org/wiki/Depression_cake), as during those years milk, sugar, butter and eggs were either expensive or scarce. Now my love of cake-making with oil instead of butter runs deep. I have baked many a cake with grapeseed or canola oils (both flavorless), but this was my first foray into using olive oil. The result is a far more moist dessert that keeps exceptionally well. Deb of Smitten Kitchen says, "On day four in the fridge, ours was as moist as day one, basically a miracle." Using olive oil, for some strange reason, just never seemed right. I think of olive oil as being savory, but I was wrong. It truly works here. NOTES:
Adapted from: Smitten Kitchen Number of Servings; 8-12 Ingredients Cake
Directions Cake
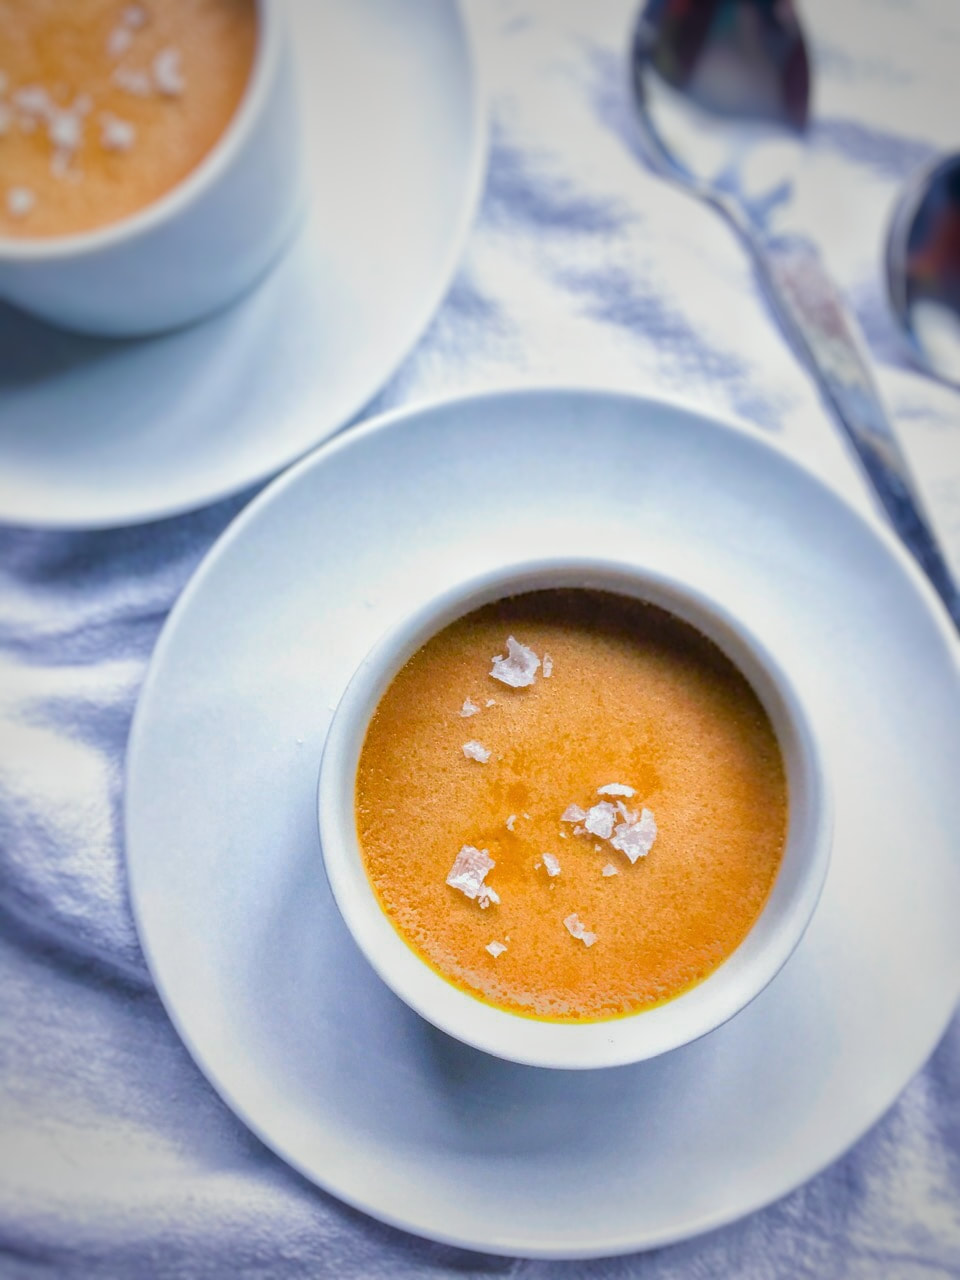
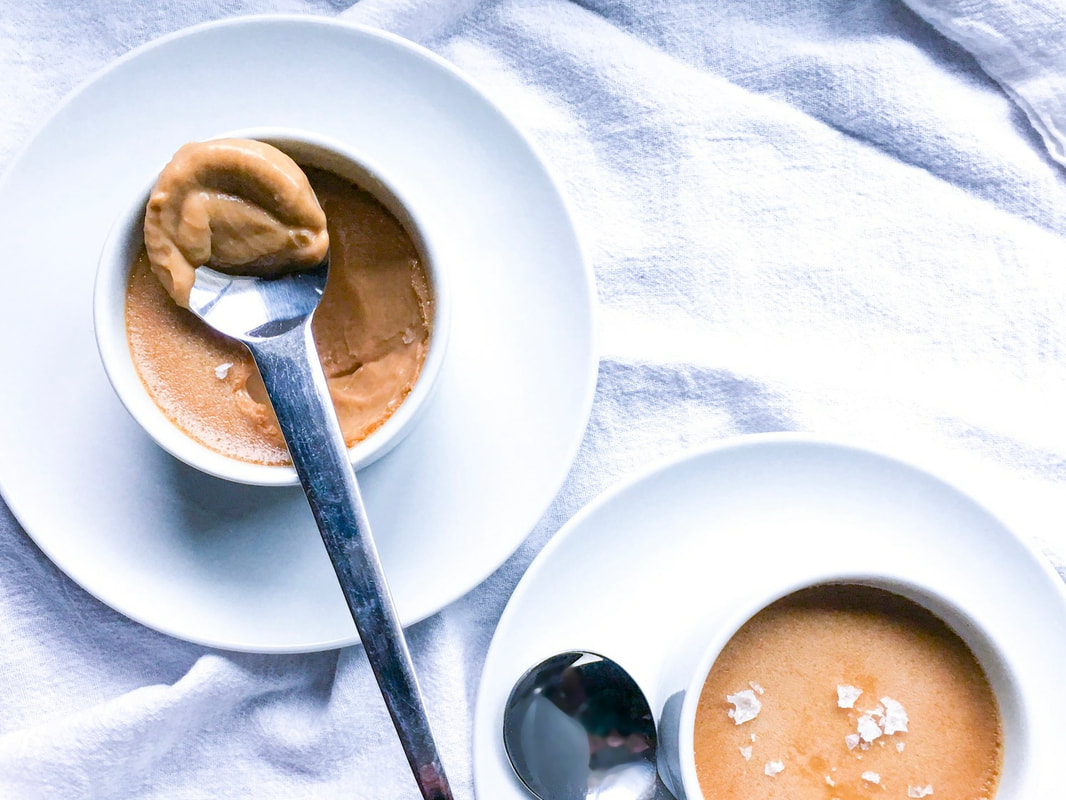
So, Valentine's Day is this week, and at some point I usually make a dinner the BF really loves. [Ed. note: Hey we're going out too! Cripes, now we'll get letters.] The main course is a no-brainer: prime ribeye. [Ed. note: Changing reservation to a more expensive place.] For dessert, want to make a treat that we both swoon over. Well aware that chocolate and Valentine's Day are synonymous, it's just not always the case in our house. Now, the BF likes chocolate but, unlike me, he really has to be in the mood for something super-rich chocolatey. He actually can say no to chocolate—I know, gasp! [Ed. note: Watches hate mail pile up.]
This pot de crème is like a turbo-charged version of butterscotch pudding. A decadent custard that's silky, butterscotchy, caramelly, salty-sweet, with deep notes of brown sugar. Squarely in the BF's wheelhouse, and I definitely don't feel like we have to have chocolate every night. Got to spice things up sometimes, right? Truthfully, this is a solid go-to dessert for guests as it takes no time at all to prep (talking about ten minutes) and looks-tastes pedantically fancy. As easy and straightforward as the directions are, the only vexing part is dirtying two pots and two mixing bowls. It's worth it. An added bonus, can halve the recipe so it just makes two small ramekins. 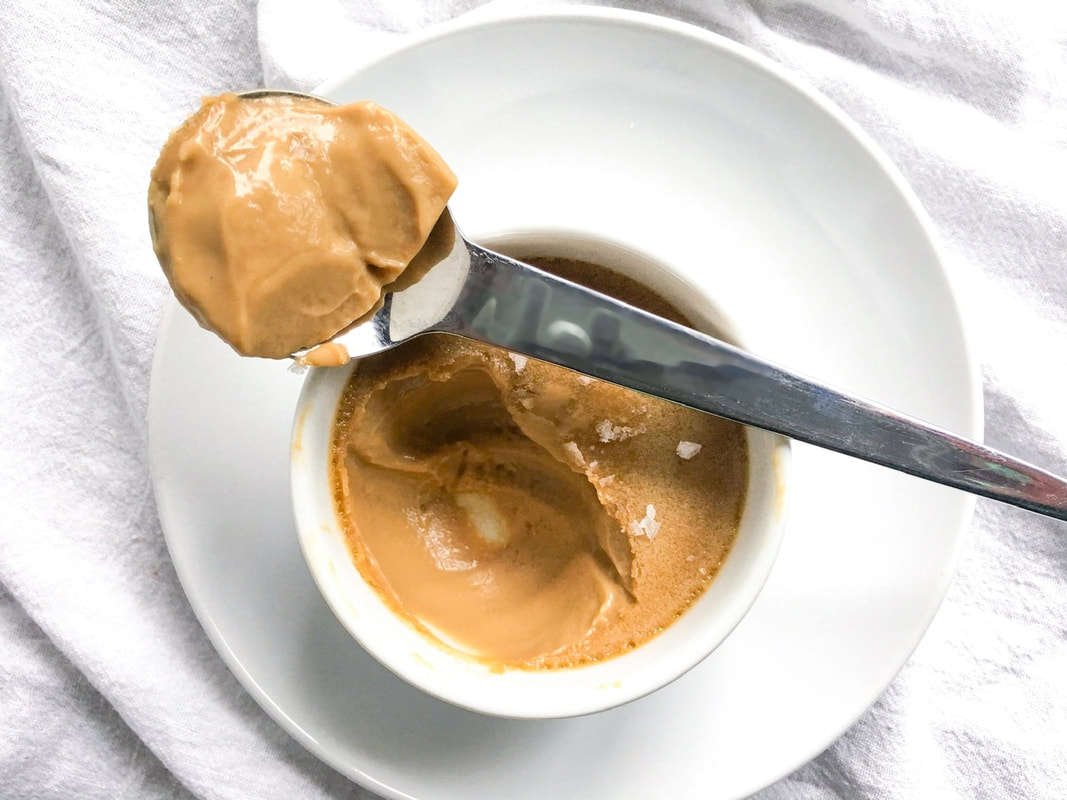
This recipe is adapted from Molly of Orangette, who describes these pots de crème as "Cold and rich and almost hyperbolically creamy, the custard yields under the spoon the way a good down pillow does under your head: with a welcoming, slippery whoosh. The gates to heaven have never opened so easily."
She is not lying. NOTES:
Adapted from: Orangette
Number of servings: 4 Ingredients
Directions
PS: A year ago I broke out the Paderno Brand 3-Blade Spiralizer for some kohlrabi "noodles" with bacon, carmelized onion and shaved parmesan (www.moveablefeast.me/blog/kohlrabi-noodles-bacon-caramelized-onion-shaved-parmesan). PPS: For those of you muttering to yourselves through clenched teeth, "Fake vegetable noodles? Forget that and this butterscotch deal, I want chocolate," let's revisit this chocolate oblivion truffle torte (www.moveablefeast.me/blog/chocolate-oblivion-truffle-torte). 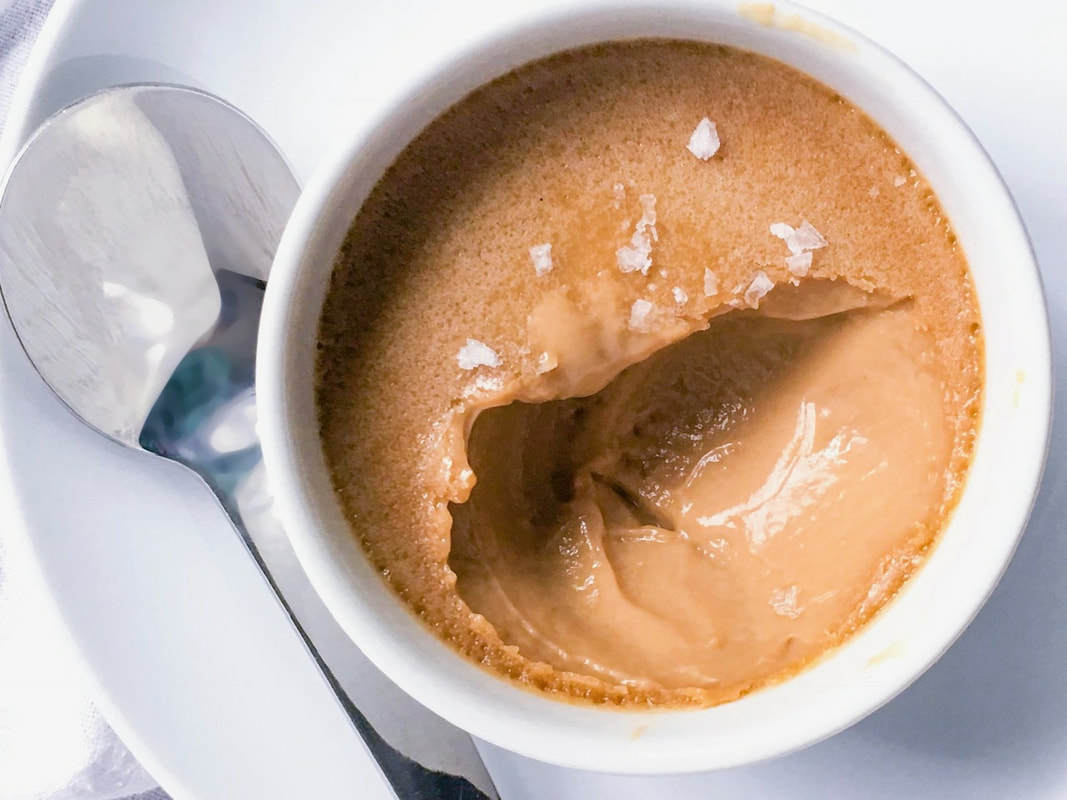
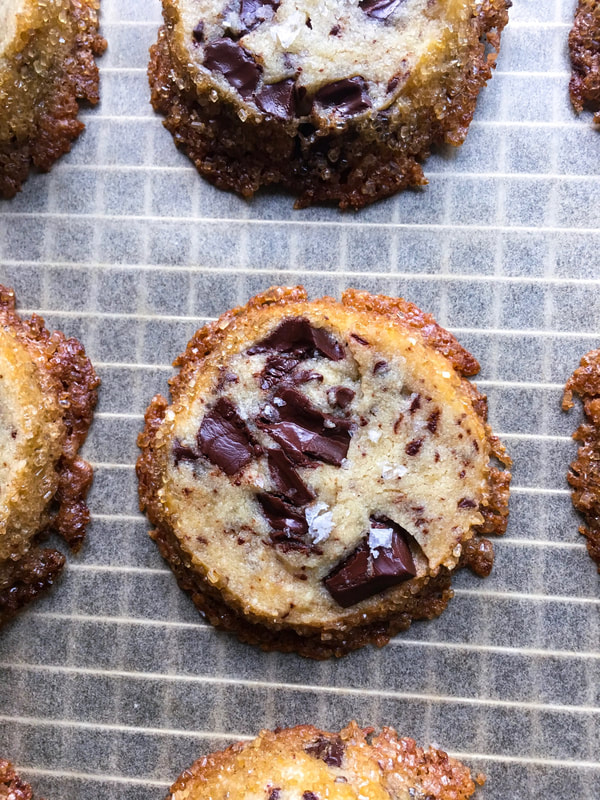
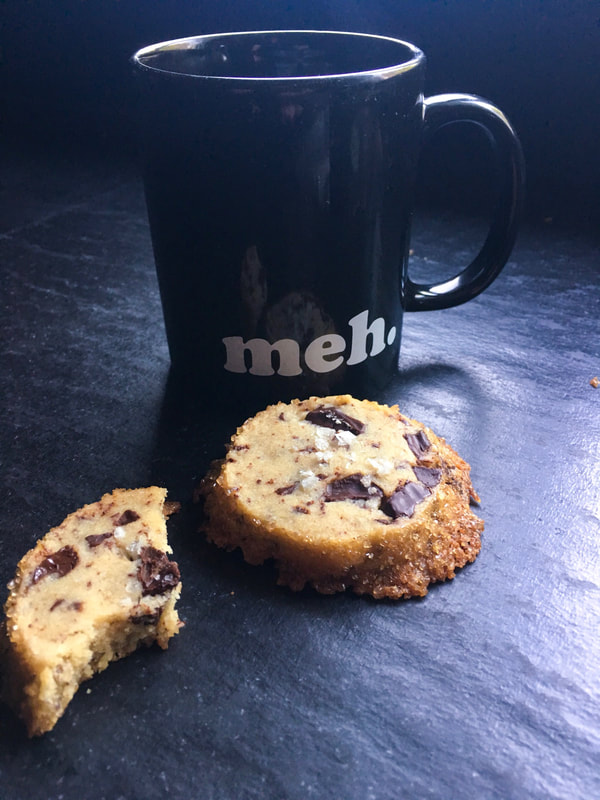
This cookie went viral in autumn of 2017. [Ed. note: At our current pace, that is roughly 27,538 news cycles, since then. Give or take.] At the time, it didn't really look like much of a cookie to me, but I probably should have believed the hype. Have lost count how many times I've made these.
The recipe comes from Alison Roman's cookbook Dining In. In New York magazine’s Grub Street Diet blog, Roman mentioned that she has but one cookie recipe in her book, and it’s for these cookies. She said that it is, “in [her] opinion, way better than a chocolate-chip cookie.” Not sure about that, but I'll tell you that when I make them the BF and I can't stop eating them. [Ed. note: Sweet.] A few notes that will perfect your cookies:
PS: A year ago we summoned our Whole30 aspirations with this roasted potatoes and coconut turmeric sauce (www.moveablefeast.me/blog/roasted-potatoes-coconut-turmeric-sauce), then uh well yeah like threw that into the proverbial circular file with some Super Bowl-food Mississippi roast mini cheesesteaks ( www.moveablefeast.me/blog/mississippi-roast-mini-cheesesteaks). [Ed. note: It should be noted that because the game-time food was cheesesteaks that this had everything to do with the Philadelphia Eagles winning said Super Bowl.] 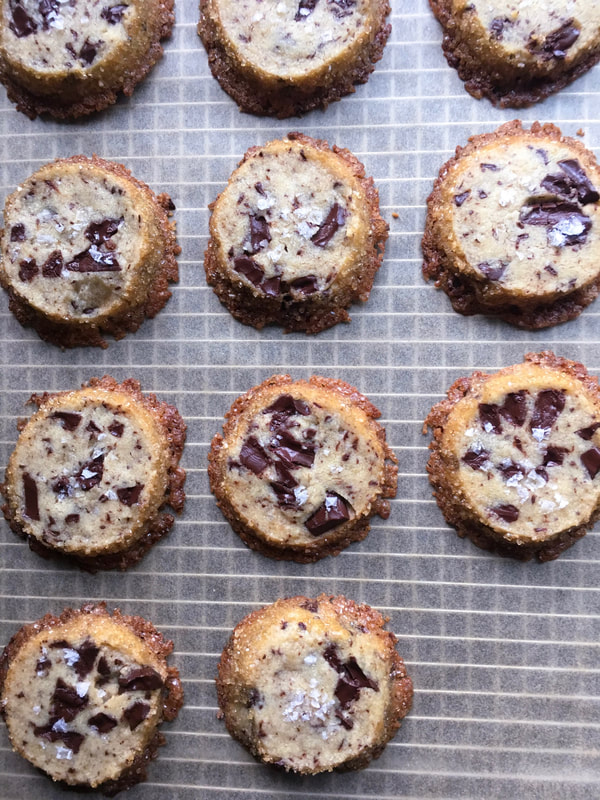
Adapted from: Alison Roman, Dining In and Smitten Kitchen
Number of Servings: 24 cookies Ingredients
Directions
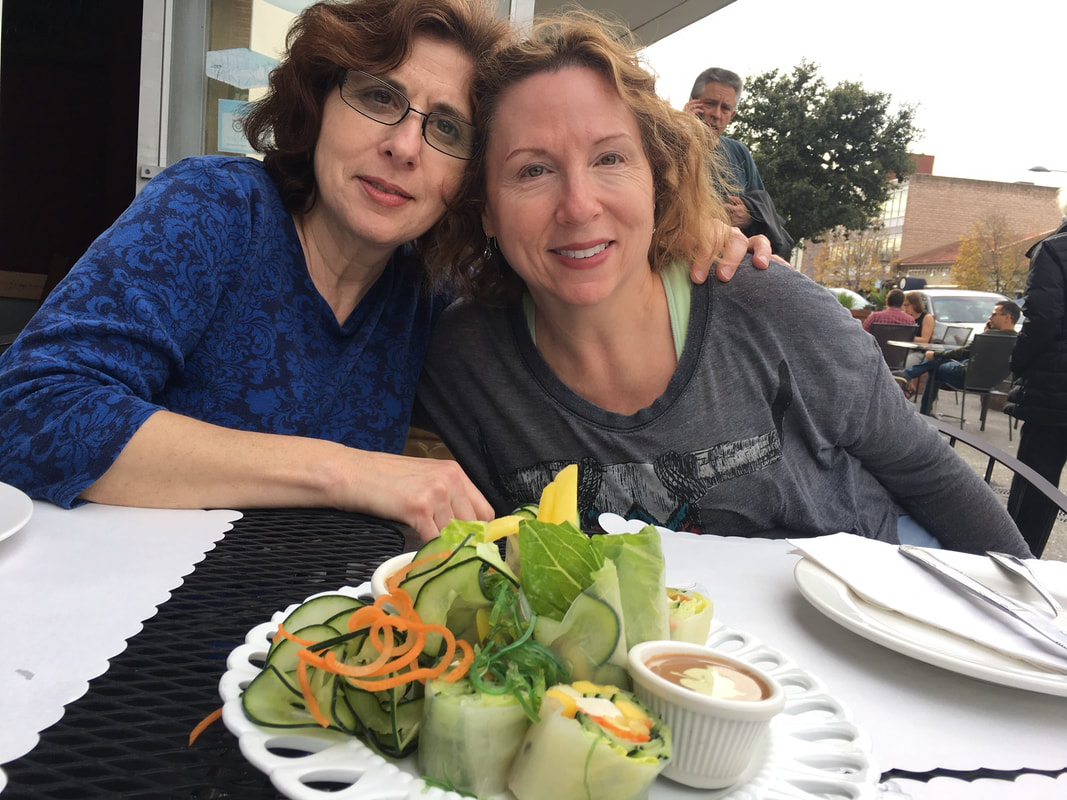
'Tis the season for good food and great company. My wonderful cousin and younger sister, traveling from Oregon, paid the BF and I a visit, and we showed them a few of our favorite local spots. Even though I had to work for clients while they were here, we managed to squeeze in much fun.
One day, we visited the Cantor Museum and Rodin Exhibit on the Stanford University campus. On another, we walked up and down Palo Alto's University Avenue and had dinner at a delicious Menlo Park Turkish restaurant. The last day, we took our choco-lab Marlowe and walked around Bol Park, aka "Donkey Park" (Perry was the model for "Donkey," voiced by Eddie Murphy, in the film Shrek), and ate lunch at Thai Bistro on California Avenue. In the evening we made gingerbread cake topped with eggnog whipped cream along with spiralized celeriac latkes [Ed. note: I don't think we ate it in that order?], and watched a superb documentary called Shanghai Ghetto. When they left, while cousin and sister went up the long escalator at a local Bart station, Marlowe let out the most woeful cries as they slowly disappeared from view. [Ed. note: We'll forward the therapy bills.] 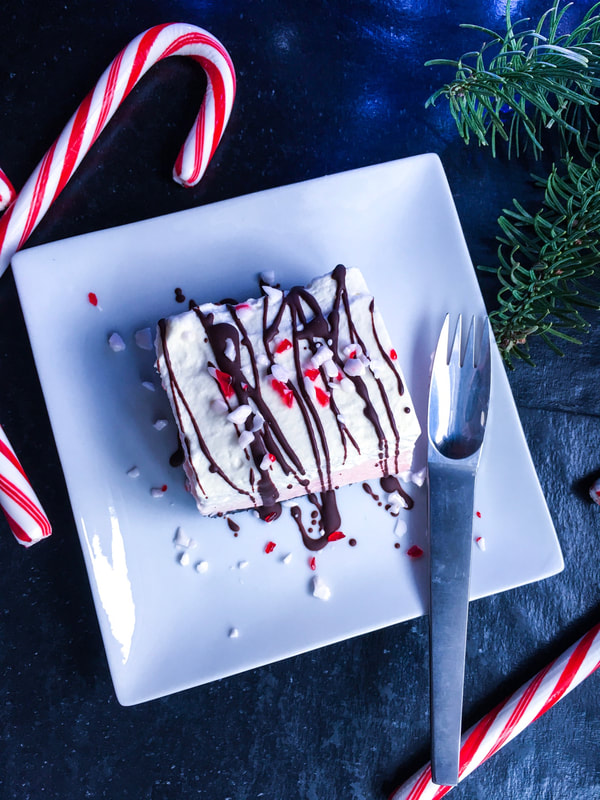
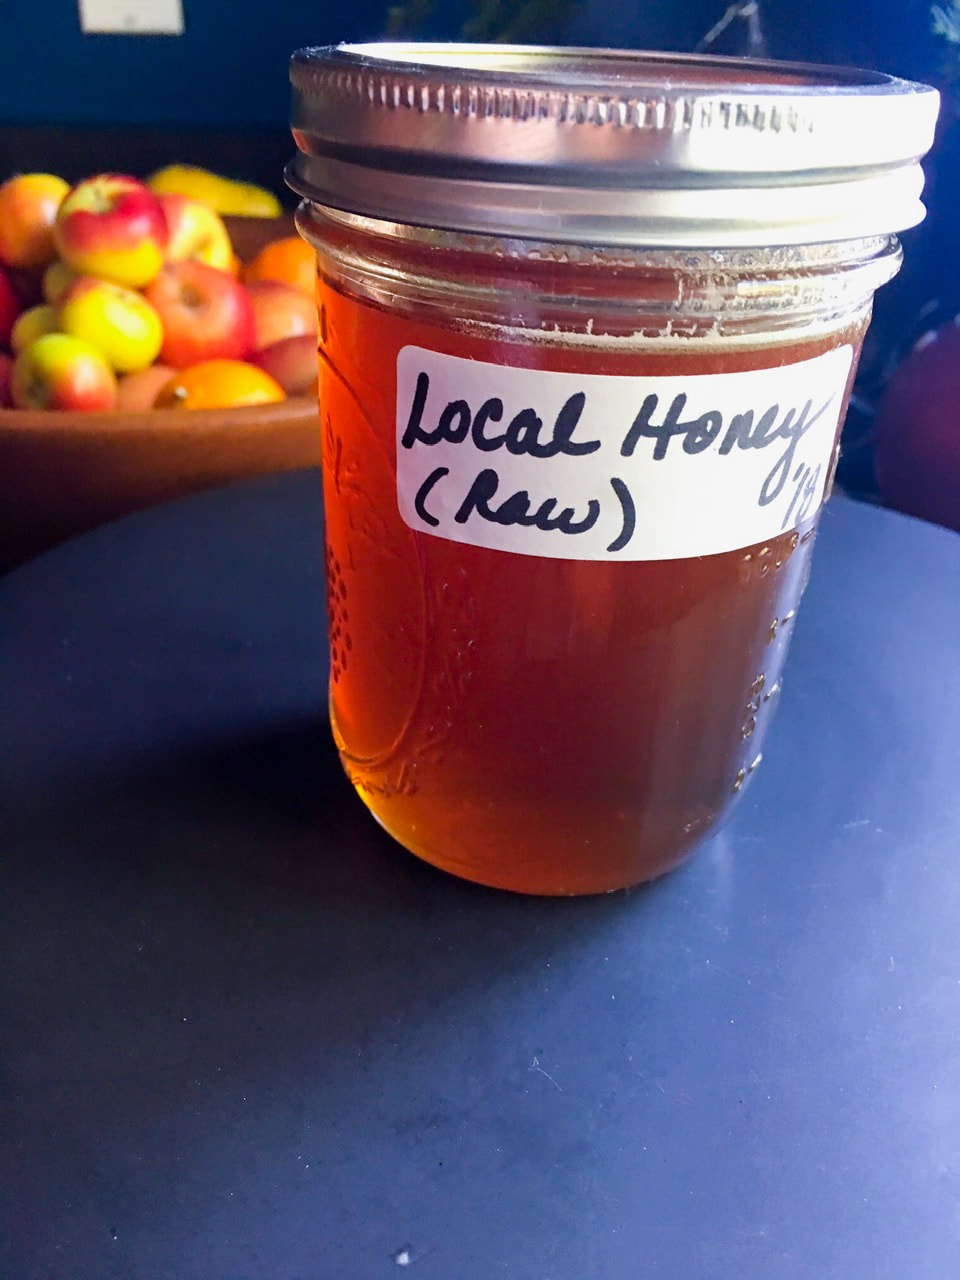
My cousin is an expert beekeeper and gifted us with the most amazing raw honey, which we can't stop dipping into. She also gave us homemade lemongrass soap and lip balm, as well as some sinfully good Burnside Distillery small-batch bourbon, which kept everybody warm! [Ed. note: Can confirm.]
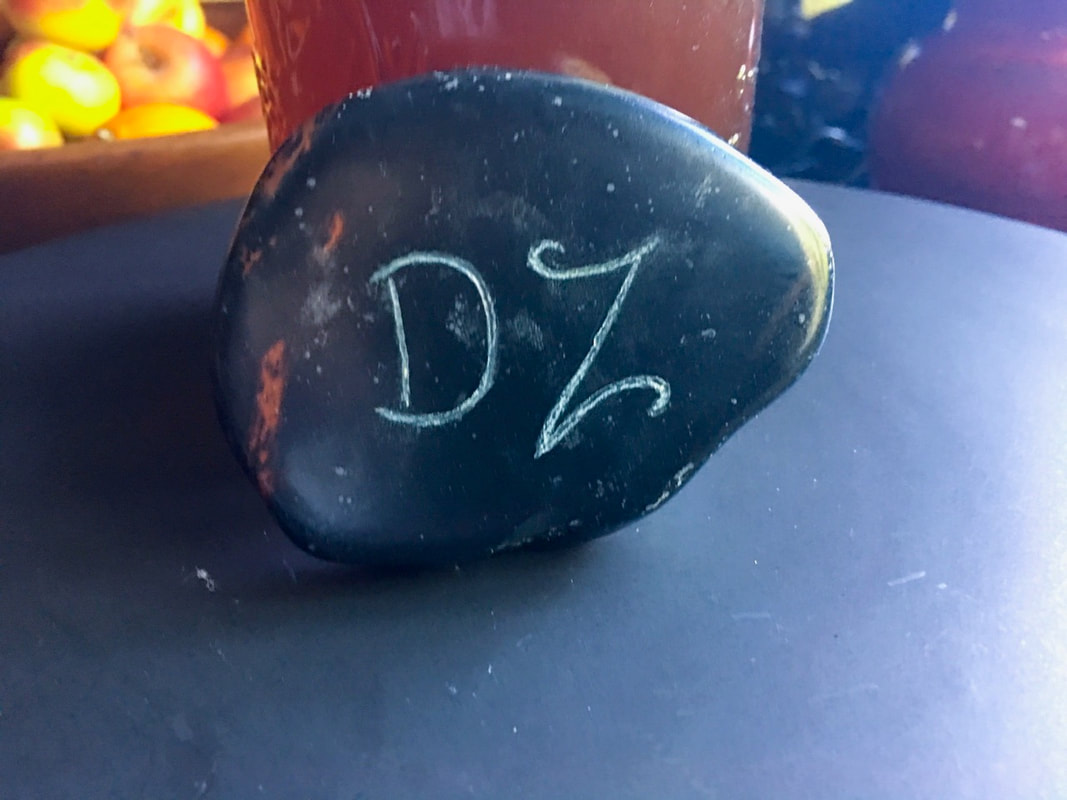
My sister is very knowledgeable and talented with rocks, stones and gems. She gave us beautiful hand-engraved stones that say "Shalom" and "DZ," which now rest proudly on the kitchen window sill that I work in front of every day. More significantly, she also gave me custody of our mom's engagement ring (we trade off every year), which was was so brilliantly polished and shiny it practically glittered. She is also adept in the landscaping arts, and got to work in the backyard well before unpacking. (She makes up for my black thumb.) Marlowe is always a happier camper when she has a "pack," and as usual the did the nighttime "rounds," visiting the visitors as they slept. Life is good when these girls are with us. 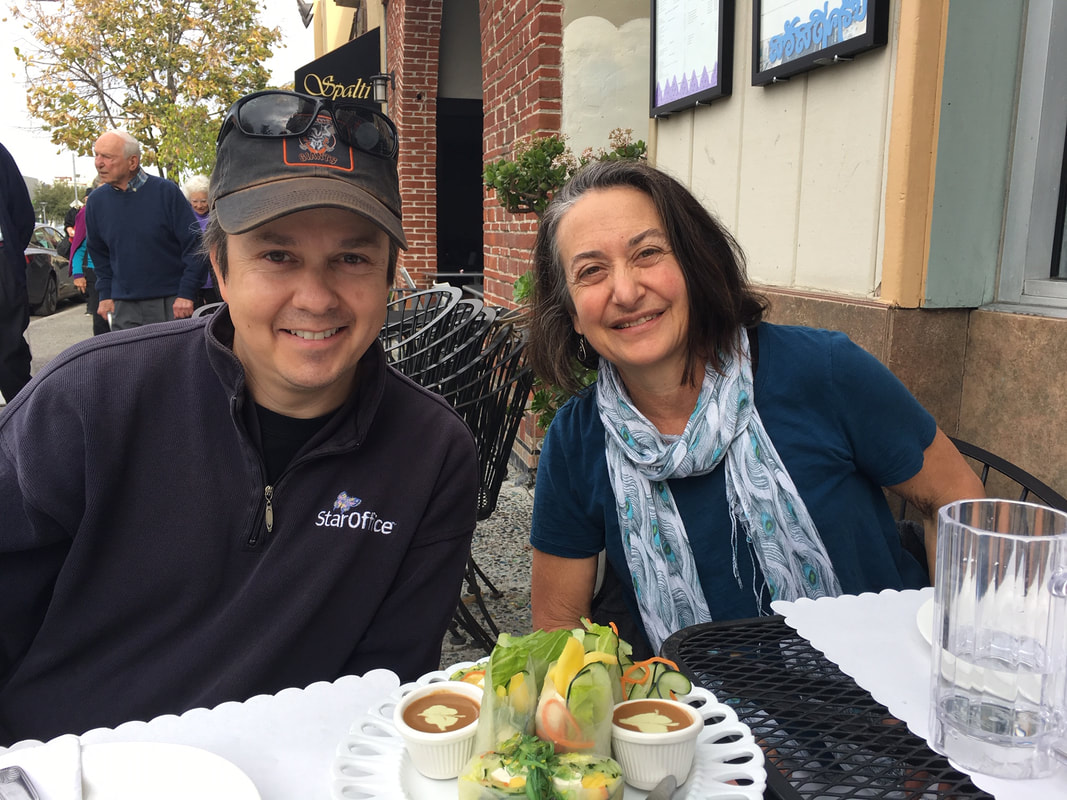
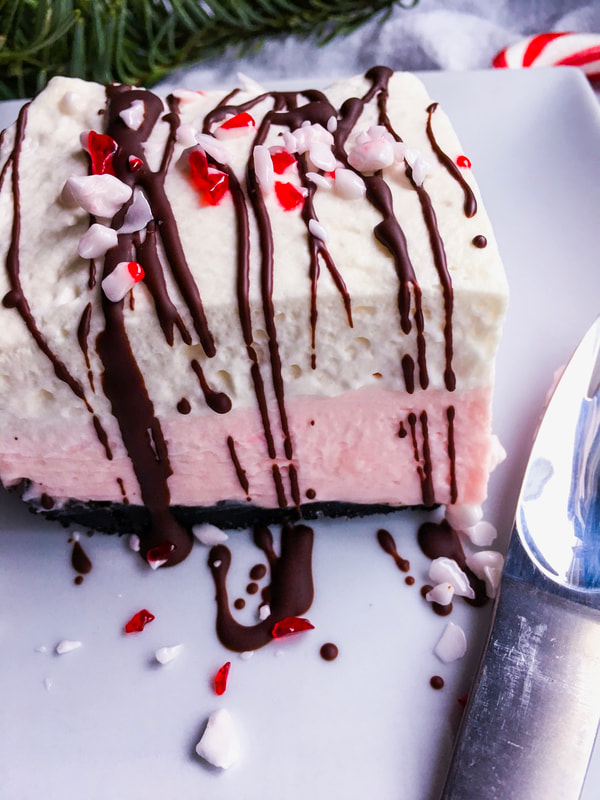
And it wouldn't be a family gathering without dessert, so for December: peppermint! It just says winter to me.
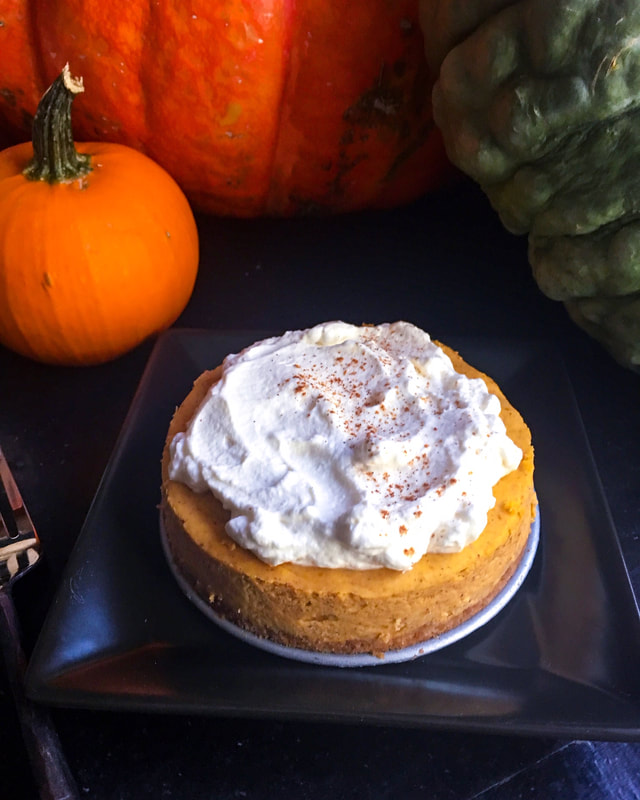
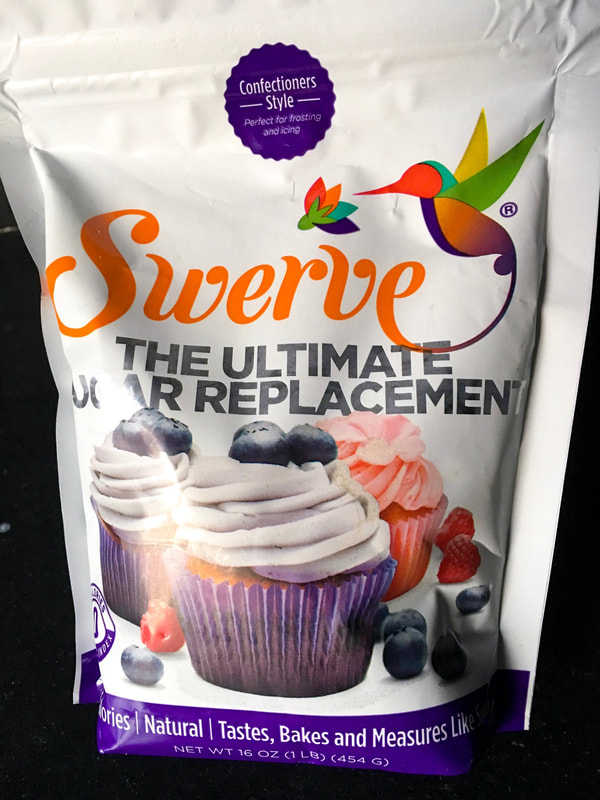
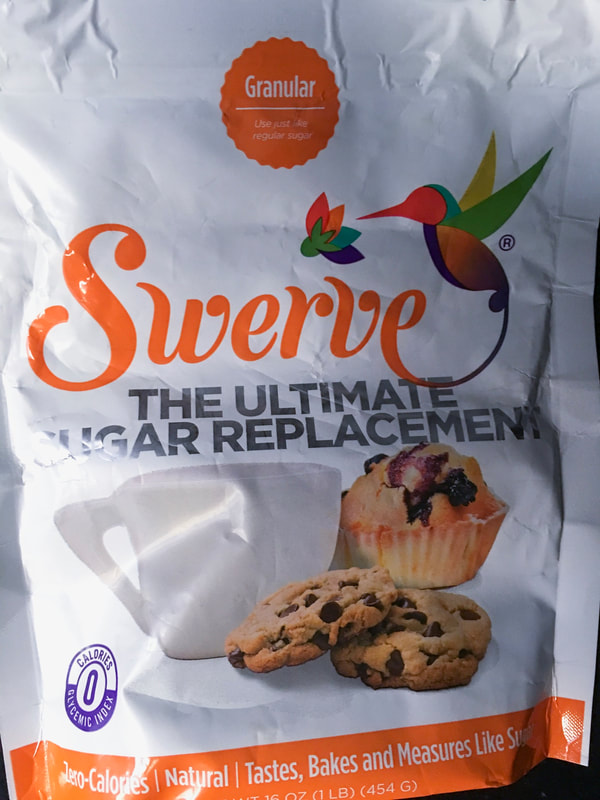
This cheesecake is almost too easy. No baking, no sugar, low carb and comes together in about 15 minutes. With a crust that tastes like Oreo cookies, it was the most popular dessert of the visit, even though we had plenty of other desserts with real sugar. There's only a slight change to the original recipe (upped the whipping cream from 2 tablespoons to 4), as I like a fluffier mousse-like cheesecake. Also added a pinch of salt to the crust. Should also note that I used my favorite brand of sugar substitute called Swerve, but you can use whatever you like.
Adapted from: All Day I Dream About Food
Number of servings: 16 Ingredients Crust
Directions Crust
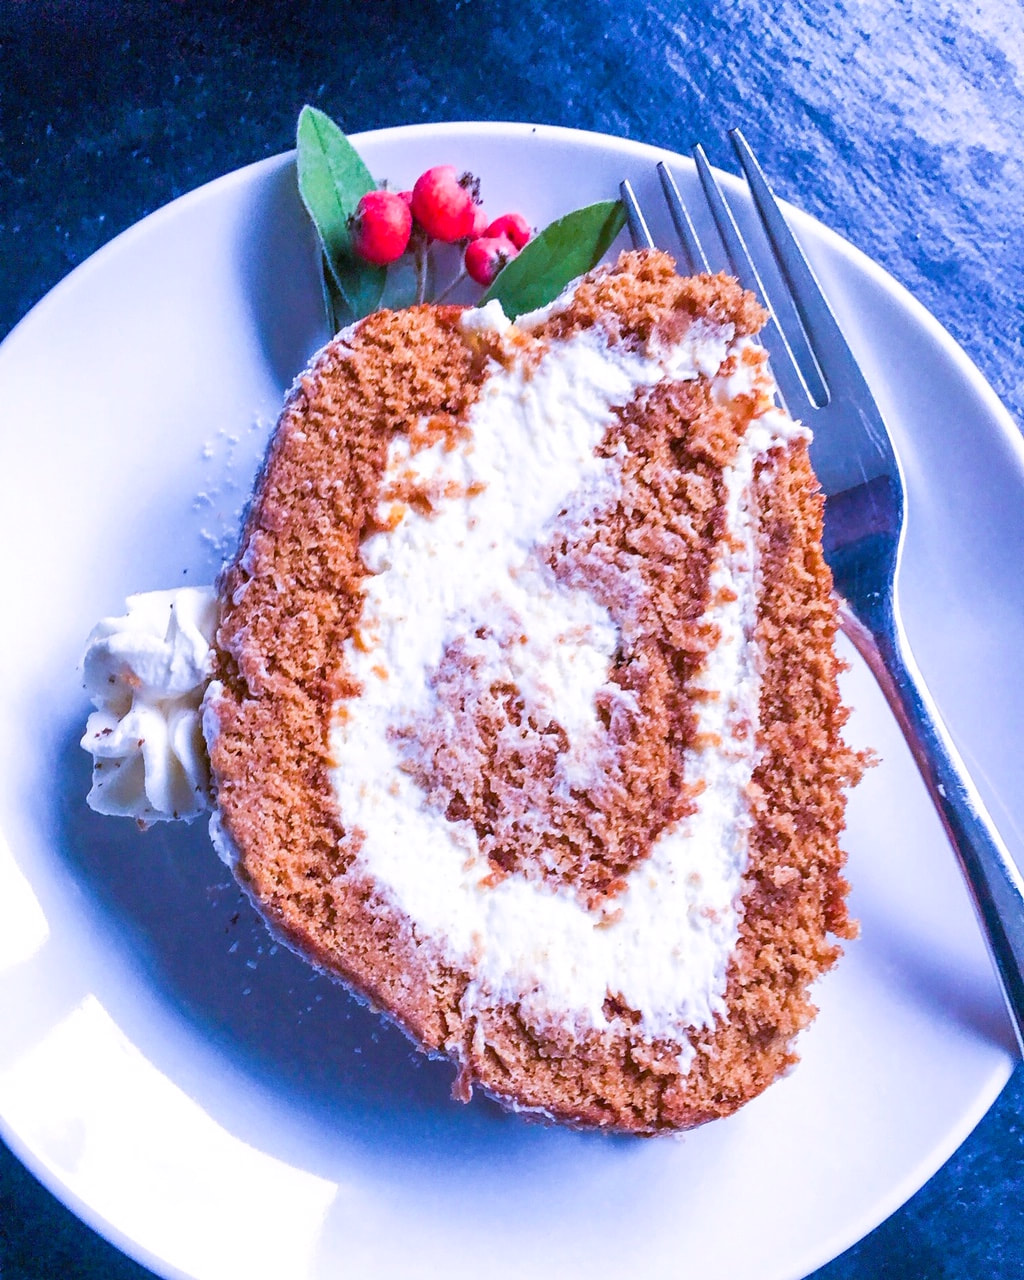
The Holiday season is here, with Hanukkah coming up next week and Christmas soon following. Here we're breaking out a theme most revelers get behind: gingerbread. This looks like a gigantic Hostess Ho Ho [Ed. note: DID SOMEONE SAY HOSTESS HO HO], and may initially appear imposing, but it's actually very light and fluffy, with a beautiful hint of gingerbread spice.
Now it has come to my attention from certain people [Ed. note: umm <whistling>] that some of you might want to make this more of an "adult" dessert and put a dash of bourbon or rum into the eggnog filling. Honestly, I would advise against putting more liquid into the filling; the main reason I added mascarpone cheese was to make the filling more stable. Adding more liquid could make this a bit of a messier proposition. Of course, if you want to have a drink (like a bourbon or hot toddy) with the cake, by all means do. [Ed. note: Don't call this a "log" for cheap comedic effect don't call this a "log" for cheap comedic effect don't call this a "log"...] Happy Holidays! More confections to come! 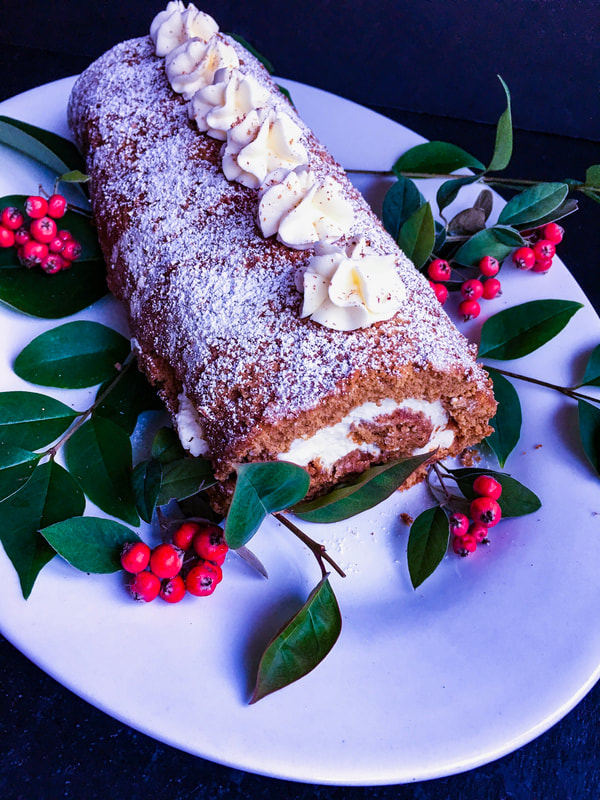
Adapted from: Crazy for Crust
Number of servings: 8-10 Ingredients Cake
Directions
The BF and I recently had a wonderful dinner at a neighbor's house. Husband and wife (turns out she and the BF went to the same university and graduated a year apart) and their two adorable children. The wife made a special request for something sugar-free and low carb, something I always try to pull out of the proverbial hat over the holidays.
So besides the normal sugar-full monstrosity that sent the kids (and BF) spinning [Ed. note: GERPH SNORG FLEEGLE NOP], I presented a version of this pumpkin cheesecake to the wife. "Honey, you have to try this," she gasped at her husband. Soon, everybody was taking a small forkful. The husband and my BF, bless them, went from sumptuous satisfied grins to quizzical bewilderment. The husband cocked his head, "This is...sugar...free?" No wonder, it really did taste like a decadent cheesecake. The BF likes to say these are "weapons." [Ed. note: As in, people, including or especially kids, will not question whether or not the dish has a particular ingredient until you tell them.] When time allows, I experiment and make us sugar-free-grain-free-low-carb desserts (or similarly constructed main dishes) and the BF will say, "It's okay, but it tastes healthy." Kiss of death. So when something gets the "weapon" seal of approval, it must be shared. The pumpkin cheesecake will definitely make an appearance on this year's Thanksgiving dessert table. Many have even asked me to post more sugar-free, low carb desserts, so rest assured, there will be more to come. A big reason why this cheesecake and other such desserts can now be made: sugar substitutes have come a long way in the last 30 years. Had never found one that I liked for baking, until stumbling on a product called Swerve (swervesweet.com/products), which comes in granulated, powdered-confectioners, or brown form. This is not a sponsored post, simply have made countless desserts with it and the performance screams "real thing." Will bet you can't tell the difference. You can purchase Swerve online, or I have been lucky enough to find in my local grocery store. Am sure you could try a different brand, but I highly recommend this one and can't vouch for other brands in the final outcome of this particular dessert. The original recipe for this mini cheesecake says it serves two, but for the aforementioned dinner it was cut into four small pieces and was a perfect ending to the meal. Made a few tweaks to the original recipe from the blog All Day I Dream About Food: upped the cream cheese filling just a bit and doubled the whipped cream topping. For people who count their Net Carbs, half of this cheesecake is only 3 Net Carbs. 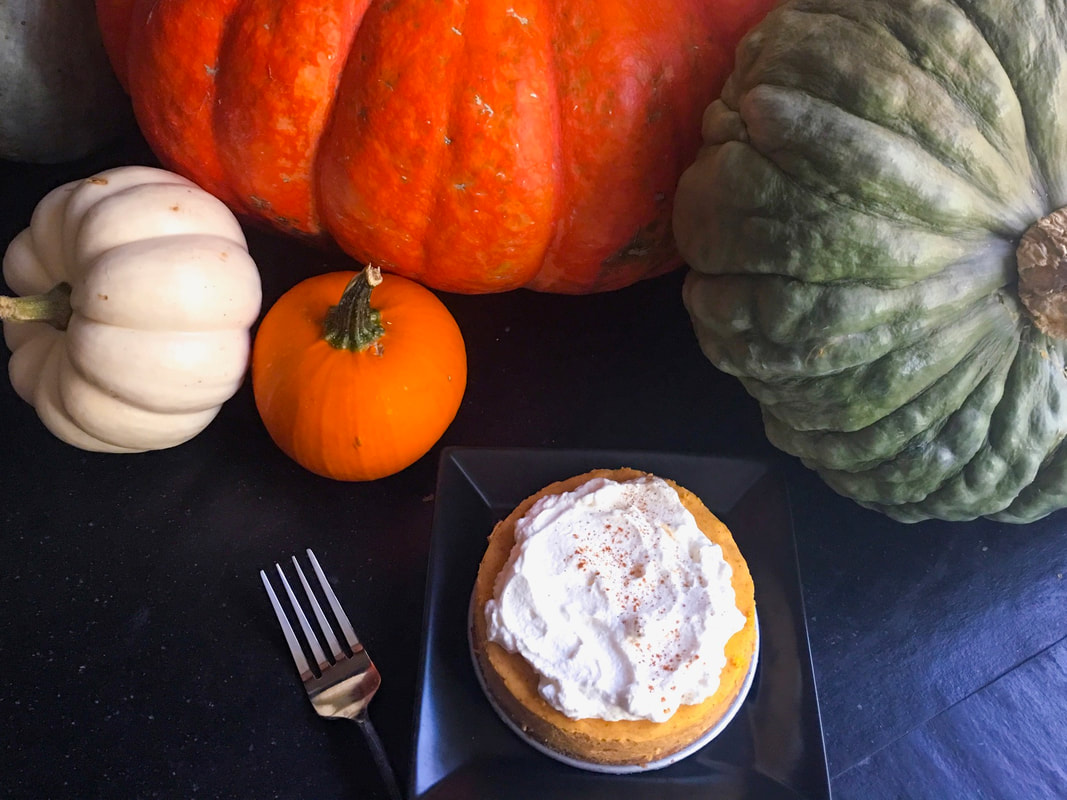
Number of servings: 2 large or 4 small
Adapted from: All Day I Dream About Food for Swerve, The Ultimate Sugar Replacement (swervesweet.com/products) Ingredients Crust
Directions Crust
|
AuthorI'm Jacquie, personal chef & recipe developer in the beautiful Pacific Northwest. Lover of books, bourbon, chocolate and movies. Archives
May 2020
Categories
All
|


 RSS Feed
