Moveable Feast
  • home
  • services
  • bio
  • blog
  • contact
  • PHOTOS (summer)
  • photos (winter)
  • PRESS
  • faq

Feast Mode

a moveable feast blog

Classic Tortilla Soup

2/28/2018

3 Comments

 
Picture
We're a ways from the Spring Equinox, and here in the bay area (California) it's getting all the way down into the 50s. [Ed. note: Can you smell the sarcasm?] Seriously, we know it's still extremely chilly in other areas of the country, and thought it might be nice to throw a sumptuous soup into the mix.

Rick Bayless says, "There are thick, pureed soups, soups that are like a winter blanket—you just want to wrap yourself in them when it starts snowing outside."

And then there is tortilla soup, sopa Azteca, if you want to be authentic about it. A beautiful broth enriched with chiles, poured over chicken, topped with crunchy tortilla strips and finished with crema. It's not a "winter blanket" soup, it’s more like a light jacket. Still, it'll warm you up.

Not only that, it's very versatile. You can add any combination of ingredients and toppings you prefer. I recently made this for a client's luncheon and prepared all the ingredients and toppings as a "soup bar." 

NOTES: If you are unable to find dried pasilla ancho or negro chiles, you can use powdered pasilla or  ancho chile, and add ½-1 tablespoon to the pan about halfway through the cooking of the onion. If you're serving vegetarians, have cooked chicken on the side that can be voluntarily added. Black beans and corn are a nice vegetarian substitution.

Adapted from: Laura Davidson, A Beautiful Plate and Rick Bayless, Frontera Grill/Topolobampo
Servings: 4


Ingredients
  • 2 large dried pasilla ancho chiles (see notes above)
  • 1 (15-ounce) can of fire-roasted tomatoes (Muir Glen brand was used here)
  • 2 tablespoons extra virgin olive oil
  • 1 medium onion, diced
  • 4 garlic cloves, roughly chopped
  • 8 cups low-sodium chicken broth or stock
  • kosher sea salt
  • freshly ground black pepper
  • 1 ½ lb chicken breast, cut into ½" chunks or 2 cups cooked rotisserie chicken, shredded
  • juice from half a lime
Toppings
  • fresh lime wedges
  • corn tortilla chips
  • grated sharp cheddar cheese
  • 1-2 avocados, pit removed and diced
  • scallions, chopped
  • Mexican crema, sour cream or creme fraiche for garnish
  • fresh cilantro leaves

Directions
  1. Using metal tongs, toast chiles carefully over an open flame (using gas burner, or alternatively, in a dry skillet over medium heat) until they are soft and fragrant. Set aside on a cutting board to cool, before discarding the seeds and stems. Cut the chile roughly and place in a blender, along with the fire roasted tomatoes in their juices. Set aside.
  2. Heat the oil in a large soup pot over medium-low heat. Add the chopped onion and garlic and, stirring frequently, cook until soft and translucent–roughly 5-6 minutes. Remove from heat.
  3. Using a slotted spoon, transfer cooked onion and garlic to the blender with the tomatoes and chiles. Puree all ingredients together until very smooth.
  4. Return the soup pot to high heat. Once very hot, add pureed tomato chile mixture all at once–it should sizzle immediately. Continue to cook over high heat, stirring constantly, until the mixture thickens substantially–for about 5-6 minutes. Once it is ready, it should resemble the thickness of a loose tomato paste.
  5. Add chicken broth to the pot and combine thoroughly using a spoon or whisk. Reduce the heat and allow broth to simmer for 15-20 minutes. Season generously with salt and pepper to taste.
  6. Over low heat, add raw chicken or rotisserie chicken. Stir occasionally until chicken is just cooked through (this should only take 2-3 minutes). Add lime juice.
  7. Serve hot with toppings, or alternatively, place toppings in empty bowls and pour soup directly over them.   
Picture
Billie-First day at home.
3 Comments

Café au lait Pudding

2/20/2018

0 Comments

 
Picture
Every night before I fall asleep, I mumble to the BF, "I can't wait until coffee tomorrow morning." [Ed. note: *insert snoring rumblings equivalent to a small earthquake*] That wasn't always the case. The BF and I didn't start regularly drinking coffee until we were in our 40s (that's right, four decades of coffee-free living). The main reason for me: I loved the smell, but hated the taste. Wasn't even a fan of anything mocha flavor.

How things have changed. Late bloomer that I am, I don't even need much creamer or milk. Will take it almost black.
Picture
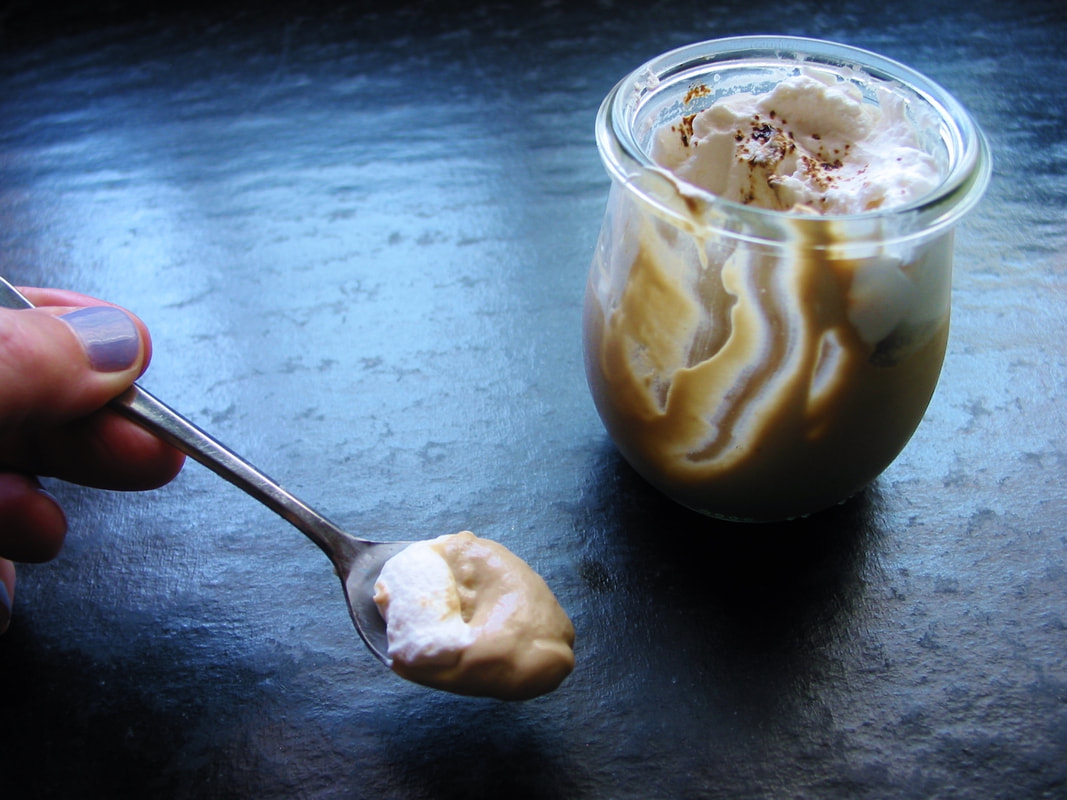
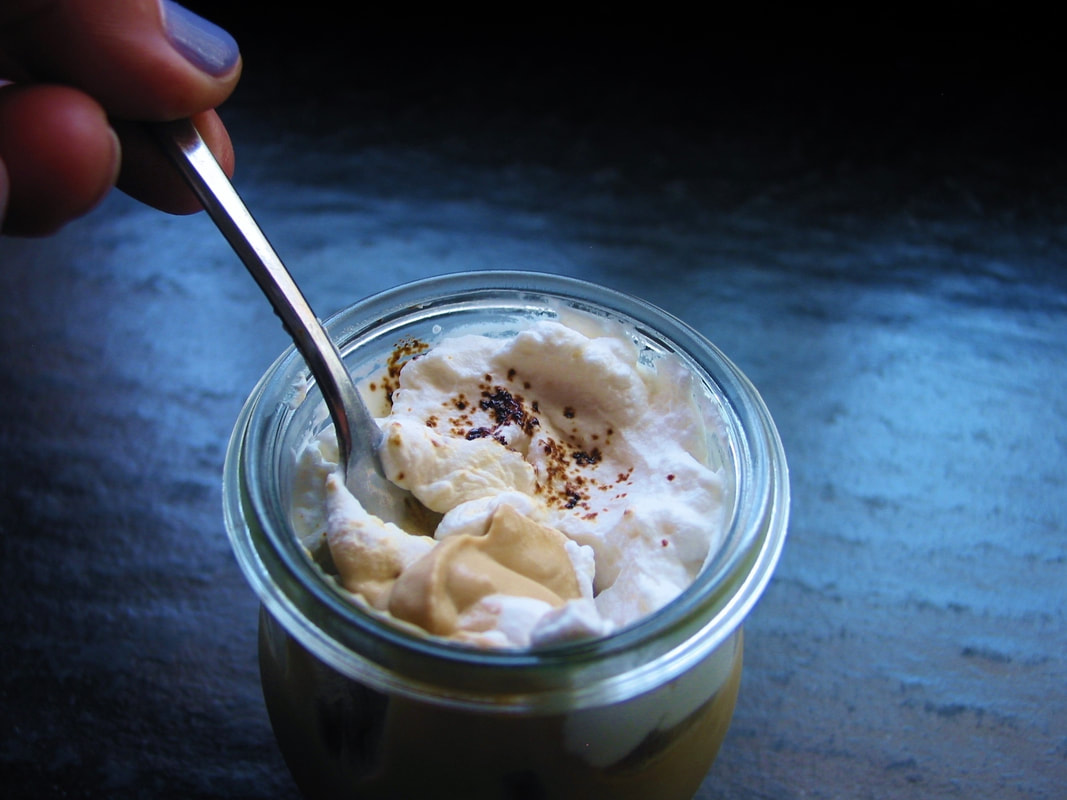
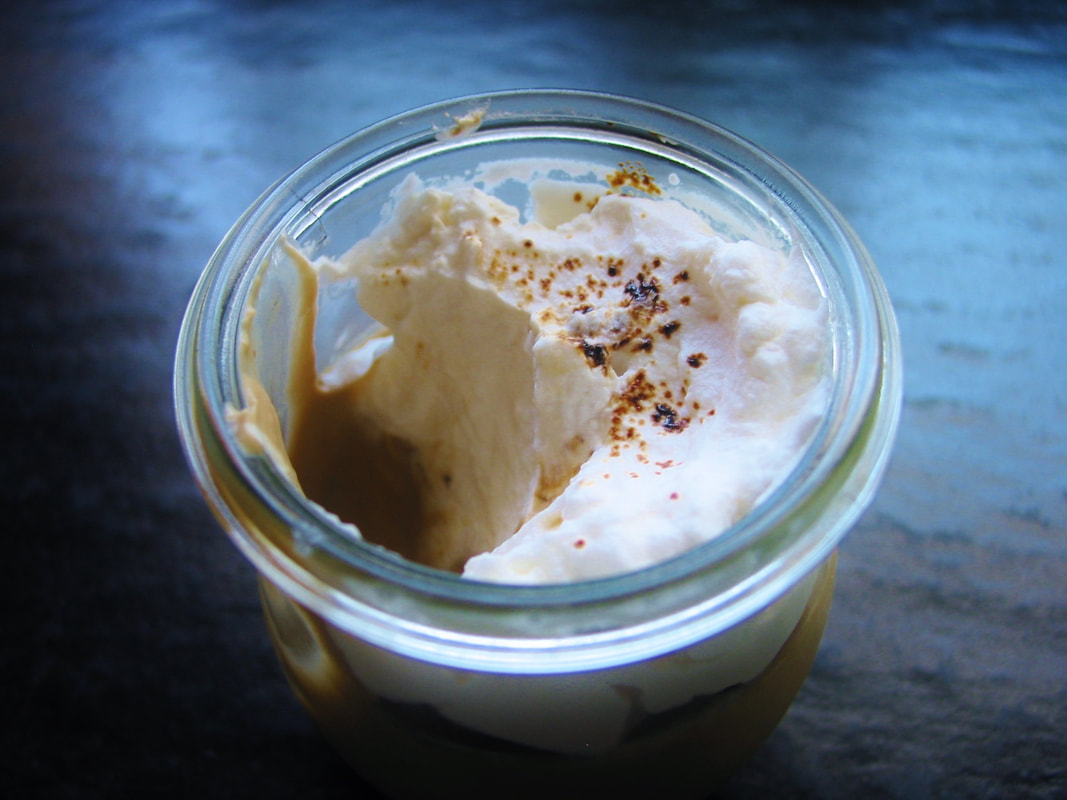
Now our household has graduated to full-on coffee desserts like this delectable 4-ingredient café au lait pudding adapted from Ashley Rodriguez's Date Night In. It's perfect for the two of us because the recipe is for two individual servings, but you can easily double the quantities if you need to make four.
Picture
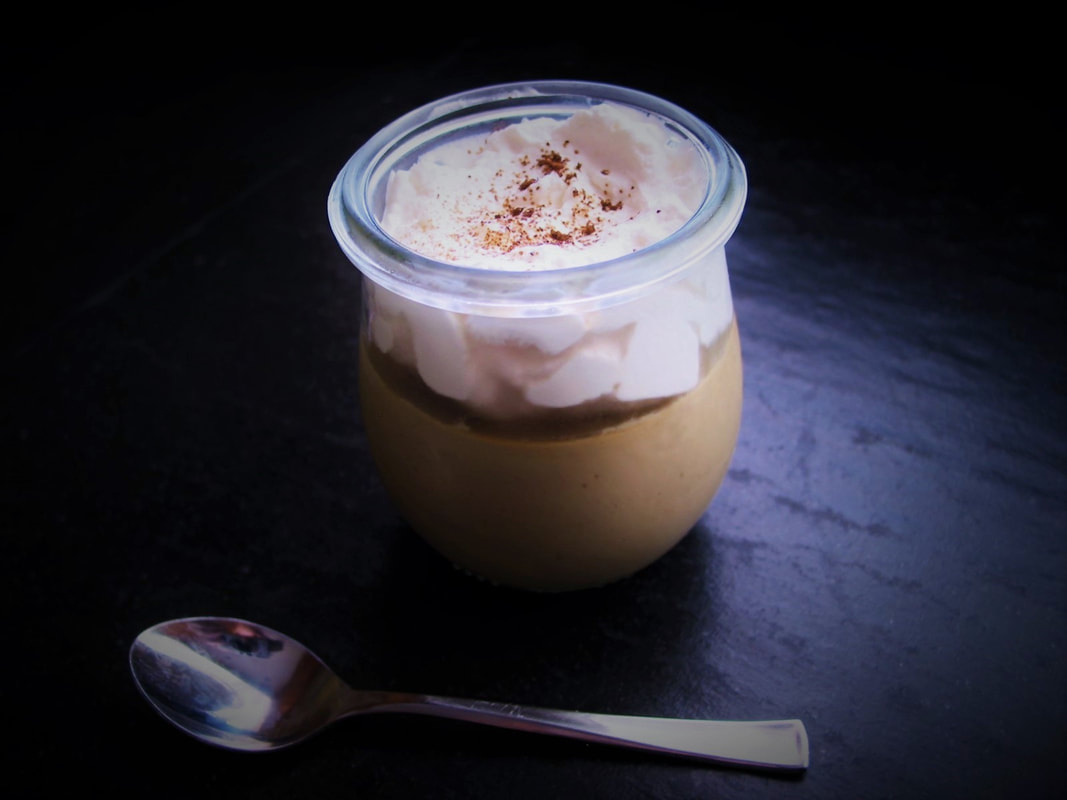
​One of my followers commented that she doesn't eat dessert very often, but is regularly asked to bring dessert to various functions throughout the year. This works perfectly because not only is it easy and fast to make, it's super portable, with tightly closing lids for individual servings. You may have your own preferred vessel, but Weck Tulip Jelly Jars were used here. They aren't a sponsor in any way, I just love them to death and use them for everything. www.amazon.com/Weck-762-Tulip-Jelly-Jar/dp/B00F739OFC

​The only thing better than coffee in the morning is this café au lait pudding for two after dinner. And if you're not already a coffee aficionado, this could very well be your gateway drug.

NOTES: Be sure to use strong coffee or espresso. It's optional, but I added an extra teaspoon of espresso to the pudding for extra zing.

Adapted from: Date Night In, Ashley Rodriguez
Servings: 2

Ingredients
  • ¾ cup / 180 ml heavy whipping cream
  • ¼ cup / 60 ml espresso or stong-brewed coffee
  • 1 teaspoon instant espresso (optional)
  • 2 ½ tablespoons / 30 g dark brown sugar
  • 1 tablespoon cornstarch
  • Pinch of kosher salt
  • Whipped cream, for serving
  • Top with cocoa nibs or Florentine cookie (optional)

Directions
  1. Place cream, espresso and instant espresso (if using) in a small saucepan over medium heat.
  2. In a small bowl, combine brown sugar and cornstarch and stir until there are no lumps. Add sugar mixture to cream mixture and stir to combine. Bring to a boil, boil for 1 minute, stir in salt.
  3. Divide pudding between two bowls/jars and cover the surface with plastic wrap to prevent a skin from forming.
  4. Refrigerate until cold. Pudding can be made up to two days in advance.
  5. Top with whipped cream, instant espresso and/or cocoa nibs (optional).
  6. Serve with Florentine cookies (optional).
Picture
0 Comments

Kung Pao Mushrooms (Vegan)

2/14/2018

6 Comments

 
Picture
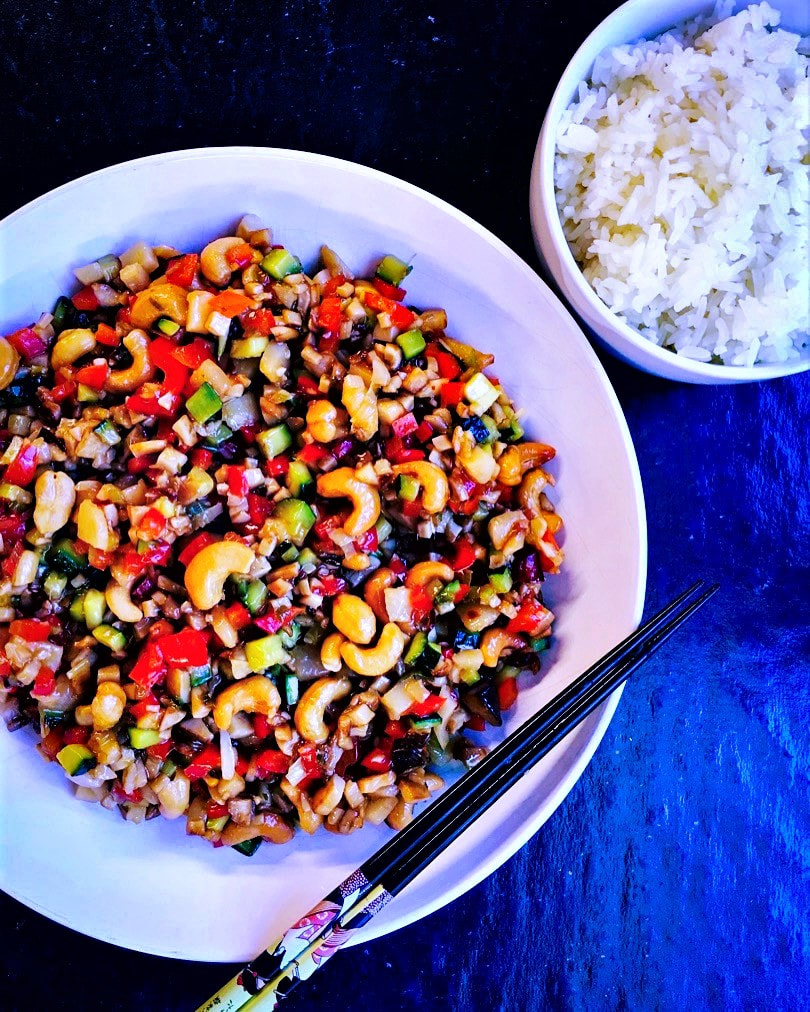
​Since it's Chinese New Year this Friday, February 16th (Year of the Dog), here's a take on a popular Chinese recipe that can be made in your own kitchen in under 30 minutes.

The BF and I love take-out Chinese, but I don't like the abundance of added thickeners, i.e., flour, cornstarch, etc. So I frequently make our own Chinese food at home where quantites can be better controlled. (Side note: BF also loves sushi and poke bowls that you can easily make at home, and you can see a poke bowl option here www.moveablefeast.me/blog/ahi-poke-bowl-with-kohlrabi-rice.)

My parents instilled my love of Asian food at an early age, as my dad lived in Shanghai for 10 years, so mom lovingly and expertly prepared Japanese and Chinese food for the five of us (two brothers, two sisters) when she could.

​Until I turned 10 years old, we went to one of our two favorite restaurants (Pagoda and Forbidden City) in Portland every Saturday night. The owners knew us by name and watched us grow up. They laughed as my mom dipped pacifers in sweet and sour sauce to quiet the infants. 

Every Saturday morning, we shopped at the local Japanese Grocery store called Anzen (100 year old store, now closed). I remember the scent and otherwordly yellow glow of the pickled daikon radish, gallon jug of sweet soy sauce, burlap bag of rice. And I remember the rice-paper-wrapped candy that my dad would give us if we behaved while waiting for them in the car.

This terrific recipe was adapted from The Woks of Life. A word about king trumpet mushrooms (smokefree.typepad.com/photos/uncategorized/2008/07/14/king10001_2.jpg) from Judy Leung, "King mushrooms seem to be named as such because of their massive stems. These are substantial and very versatile mushrooms–you can pan-fry them, stir-fry them, braise them, steam them, or grill them...it's a great candidate to serve as a meat substitute."

Specifically, I added a few ingredients that I like in Kung Pao Chicken–water chestnuts, zucchini and shitakes. I also substituted cashews over peanuts as that's my personal preference, but feel free to use peanuts if you like. 

NOTES: It's important to dice the vegetables according to the directions below. Everything will cook faster and evenly if you do. King trumpet mushrooms should be in the produce section of your local grocer (they're at my Safeway, Whole Foods, and Costco).

Adapted from: The Woks of Life
Number of servings: 4

Ingredients
  • ¾ cup whole cashews or dry roasted peanuts
  • 1 tablespoon light soy sauce
  • 1 teaspoon sugar 
  • 1 tablespoon rice vinegar
  • ¼ cup water
  • 1 teaspoon cornstarch
  • 2 tablespoons vegetable oil (divided)
  • 3 large king trumpet mushrooms (about 1 pound), diced into small pieces (if you can't find trumpet mushrooms, substitute with a combination of cremini, shitake, and portobello; remove gills)
  • 6 ounces shitake mushrooms, small dice
  • 2 slices ginger, minced
  • 3 cloves garlic, minced
  • 6 scallions, white parts only, diced
  • 1 teaspoon Sichuan peppercorns (leave out if you can't find it. Do NOT substitute with black peppercorns, they're not the same)
  • 2-3 dried chili peppers, de-seeded and cut into segments (if you can't find dried chili peppers, sub with 1 teaspoon crushed red pepper or 1-2 deseeded, minced serrano pepper)
  • 1 cup diced red bell pepper
  • 1 zucchini, small dice
  • 1 can water chestnuts, small dice
  • ½ teaspoon sesame oil

Directions
  1. Prepare the sauce by mixing together the light soy sauce, sugar, rice vinegar, ¼ cup water, and cornstarch.
  2. Heat 1 tablespoon of oil in a wok or saute pan over medium heat. Add the king mushrooms and shitakes, and cook until they're caramelized and any liquid has cooked off. Don’t stir them too much, or the mushrooms won't caramelize! Transfer to a dish and set aside.
  3. Heat another tablespoon of oil in a wok or saute pan over medium heat. Add the ginger, garlic, scallions, Sichuan peppercorns, and dried chilis. Cook for about 1 minute, and take care not to burn the spices.
  4. Now add the red bell peppers, zucchini, water chestnuts and cooked mushrooms. Turn up the heat, and stir to mix everything together. Add the prepared sauce (stir it again before adding it to the wok, as the cornstarch will have settled to the bottom of the bowl).
  5. Stir everything together quickly. Finally, add the roasted peanuts and sesame oil. Mix one more time to make sure everything is coated with sauce, and transfer to a serving dish.
6 Comments

Chocolate Oblivion Truffle Torte

2/11/2018

0 Comments

 
Picture
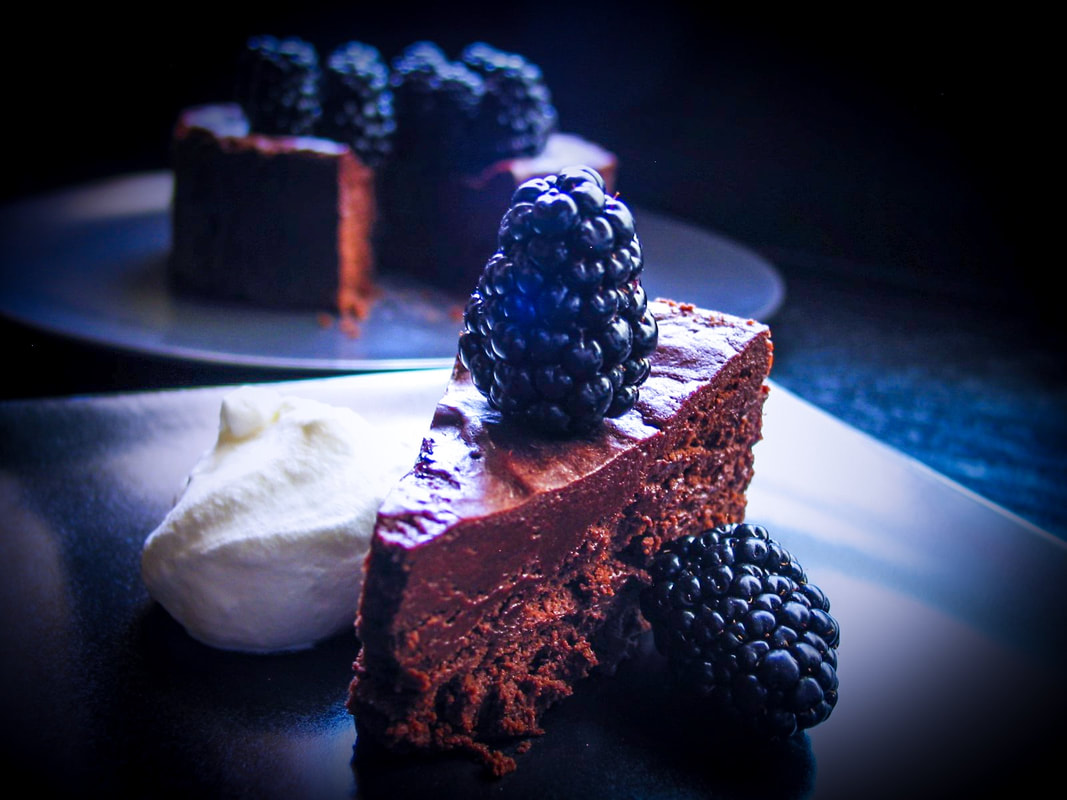
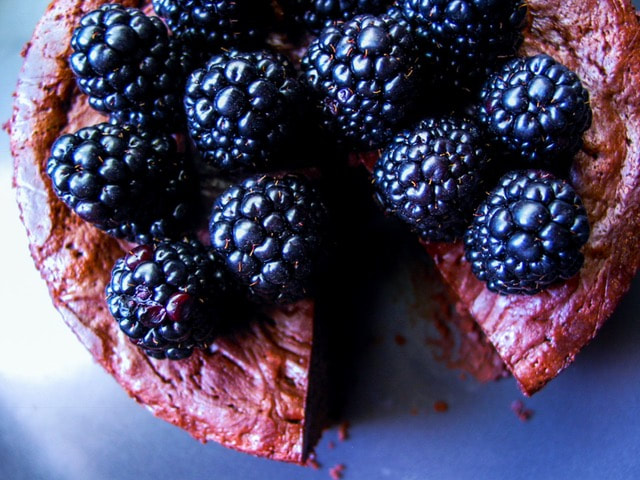
On this Valentine's Day, are you aiming for someone's heart through their stomach? Don't let the ingredients and directions of this recipe scare you, this is actually way less daunting than it appears. [Ed. Note: But you don't have to disclose that information if you're truly looking to impress.]

The key to the torte's simplicity is that it's made from just three ingredients: chocolate, butter, and eggs—and it only bakes for 15 minutes. I made this for the BF, myself and a few friends in a 6-inch springform pan, but am giving the recipe as originally presented (in an 8-inch springform pan) from the brilliant Rose Levy Beranbaum's The Cake Bible. I happen to love flourless tortes and have made so many different kinds, and this is certainly one of my favorites. Not to mention gluten free!

Beranbaum says this is her favorite way to eat chocolate, "It's the purest form of chocolate—when you just have a chocolate bar, you can't taste the chocolate until it starts melting in your mouth. But this is just the right texture so that the minute you put it in your mouth, the flavors start exploding. It's like the creamiest truffle wedded to the purest chocolate mousse. It's the right consistency and there's nothing to interfere. There's no flour. Egg gives it texture, but it also enriches it further—it gives it a fuller flavor. And then of course butter doesn't do any harm either!"
(Source: food52.com/blog/15895-the-magic-of-the-3-ingredient-chocolate-oblivion-truffle-torte-as-told-by-rose-levy-beranbaum)

It's creamy. moussey, and sinfully decadent. And seriously, who cares about clichés, nothing's beating chocolate on Valentine's Day. 
Picture
NOTES: It's very important to have the eggs and butter at room temperature. Since there are only three ingredients, use the best chocolate and butter that you can (Scharffen Berger chocolate and Plugra European butter were used here). Finally, be sure to serve the torte at room temperature, not chilled. Read through the entire recipe before starting; while it is deceptively easy to make, there are lots of side notes that are important to its success.

Adapted from: Rose Levy Beranbaum's The Cake Bible and Food 52
Number of servings: makes one 8-inch torte, serves approx 16 (depending on slice size)

Ingredients
  • 1 pound (454 grams) bittersweet chocolate, no higher than 62% cacao
  • ½ pound (2 sticks, or 227 grams) unsalted butter, room temperature
  • 6 large eggs (300 grams, out of shell), room temperature 
  • Whipped cream for topping (optional)
  • Blackberries or raspberries for topping (optional)
  • Equipment: One 8-inch spring-form pan at least 2 ½ inches high, buttered, and bottom lined with buttered parchment; outside of pan wrapped with a double layer of heavy-duty foil. One 10-inch cake pan or roasting pan to serve as a water bath.
Directions
  1. Heat oven to 425 °F.
  2. In a large heat-proof bowl set over a pan of hot (not simmering) water (do not allow bottom of the bowl to touch the water), place the chocolate and butter and allow it to stand, stirring occasionally, until smooth and melted. (You can also use a microwave on higher power, stirring every 20 seconds.)
  3. In a large mixer bowl, set over a pan of simmering water, heat the eggs, stirring constantly with a wire whisk, until just warm to the touch. Immediately remove the bowl to the stand mixer and with the whisk attachment on high speed, beat about 5 minutes, until triple in volume and the eggs are billowy and lighter in color. (If using a handheld electric mixer, beat the eggs over simmering water until they are hot. Then remove them from the heat and beat for about 5 minutes or until cold.)
  4. Use a large wire whisk or rubber spatula to fold half the eggs into the chocolate mixture until almost evenly incorporated. Fold in remaining eggs until almost no streaks remain. Use rubber spatula to finish folding, scraping up the mixture from the bottom to ensure that all the heavier chocolate mixture gets incorporated.
  5. Scrape the mixture into the prepared pan and set it in the larger pan. Place it in the oven and surround it with 1 inch of hot water. Bake for 5 minutes. Loosely cover with a sheet of buttered foil and bake another 10 minutes. (It will wobble when moved.) Remove the cake pan from the water bath and allow it to cool for about 45 minutes. Cover tightly with plastic wrap and refrigerate it until very firm, at least 3 hours.
  6. Unmold the cake: Have ready a serving plate that has at least an 8-inch flat center portion and an 8-inch or large flat loose bottom of a tart pan or plate, covered with greased plastic wrap.
  7. Use a torch, hair drier, or a hot damp towel to wipe the sides of the pan.
  8. Run a thin metal spatula around the sides of the torte and release the sides of the springform pan. Place the plastic-wrapped plate on top and invert the torte onto it. Heat the bottom of the pan and remove it. Peel off the parchment and reinvert torte onto the serving plate.
  9. Serve: It is most moussey and delicious at room temperature. Cut the torte, using a thin-bladed knife dipped in hot water, between each slice. Accompany with raspberry sauce, fresh raspberries and/or whipped cream if desired.
Picture
0 Comments

Kohlrabi "Noodles," Bacon, Caramelized Onion & Shaved Parmesan

2/7/2018

6 Comments

 
Picture
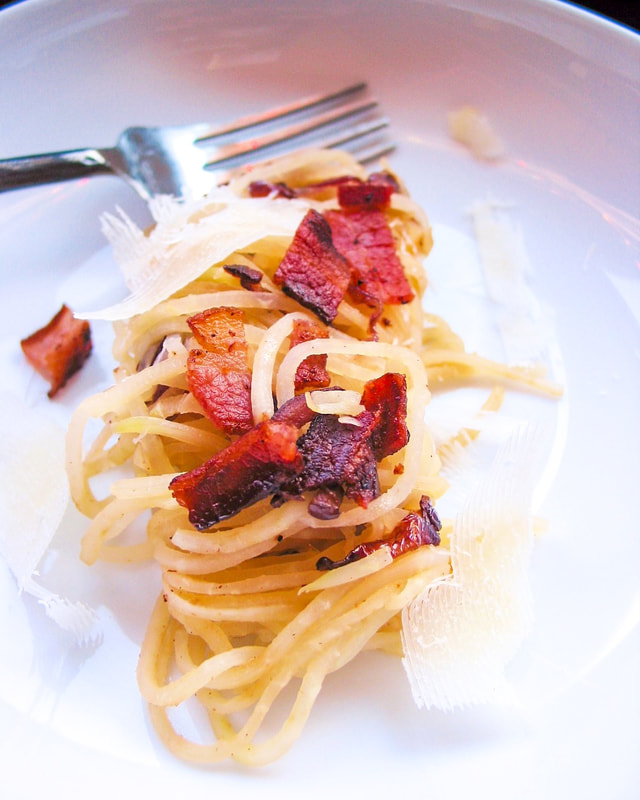
I've mentioned before that I'm not great with gadgets. My BF can attest. Just last week I bought a new monthly vitamin/pill dispenser because I thought the top component of the old one was broken. It was not broken. BF fixed it in 30 seconds. [Ed. Note: *whistles innocently*]

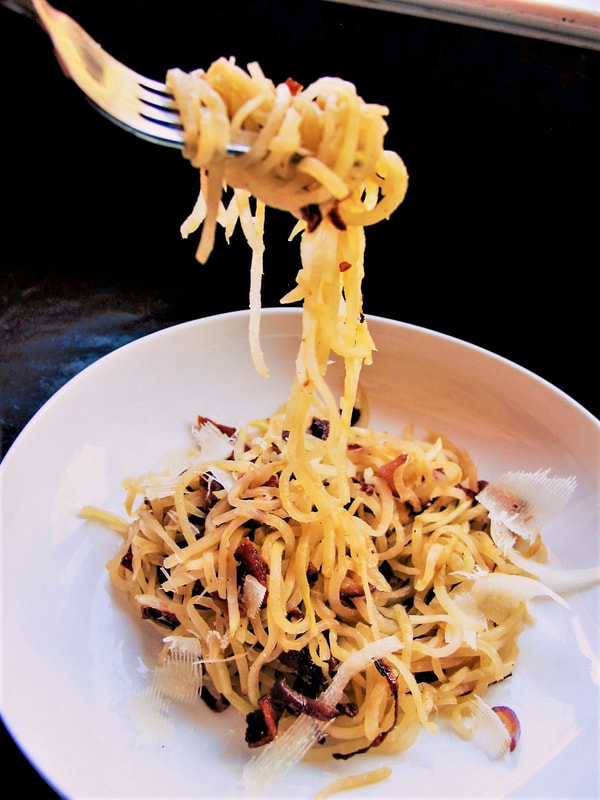
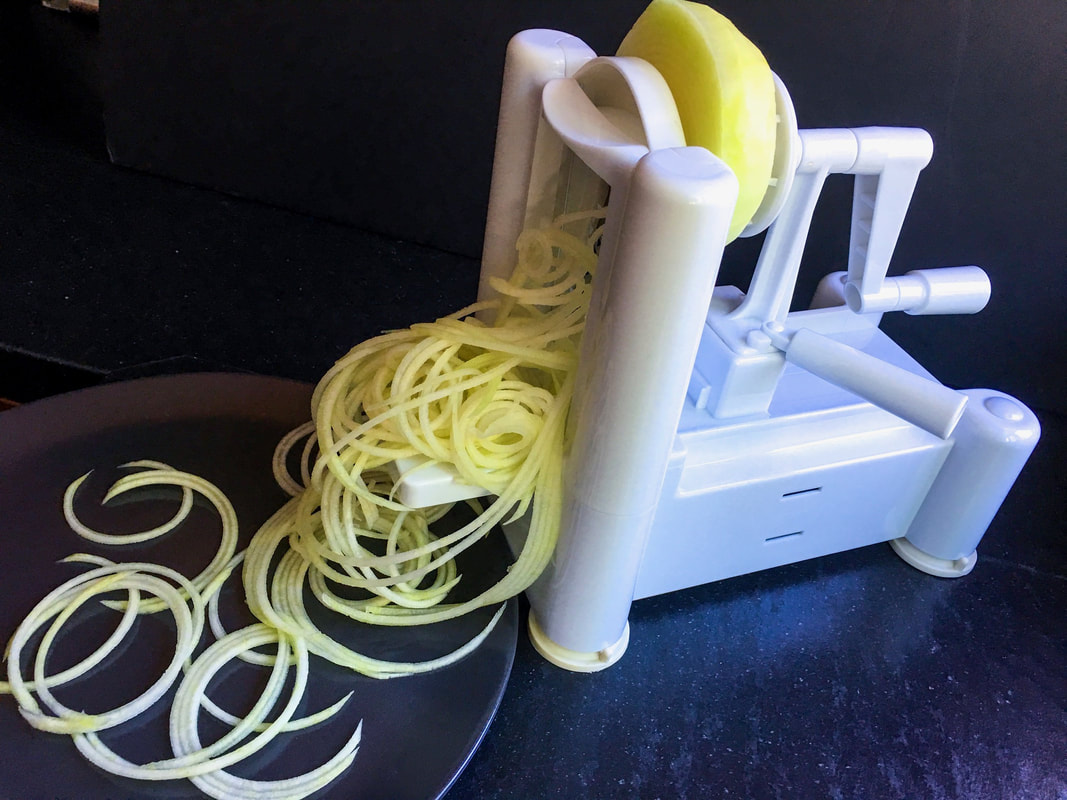
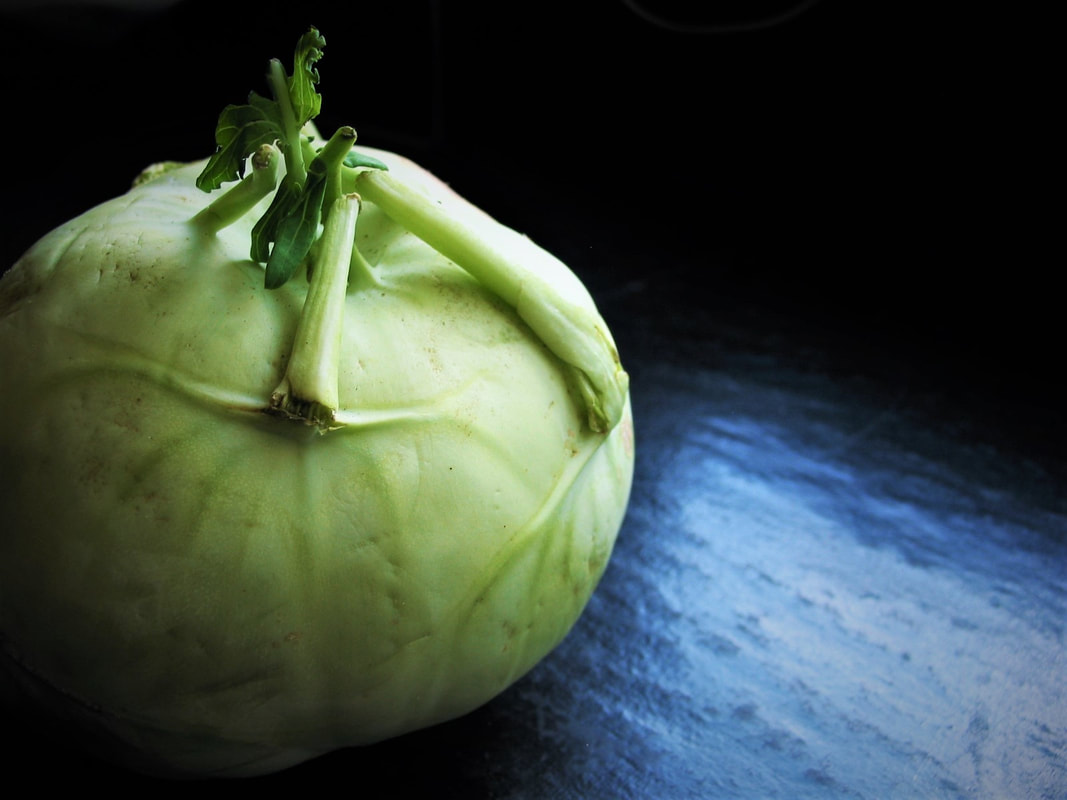
For today's recipe we are going to break out the Paderno Brand 3-Blade Spiralizer www.williams-sonoma.com/products/paderno-sprializer/ (again, this is not a sponsored post, I just really love it),  the same magically user-friendly contraption we used to whip up the Vegetable Noodle Nest with Soft Boiled Egg last September. www.moveablefeast.me/blog/vegetable-noodle-nest-with-soft-boiled-egg  

If any of you want more Spiralized recipes, please let me know. I have oodles of zoodles, swoodles  and faux noodles to share. Check out the photos below showing the Spiralizer in action; on the far right is a kohlrabi (if you've never seen one).

Low carb, healthy, gluten free, grain free, and ready in under 30 minutes. Perfect for a glorious weeknight meal. The recipe has been adapted from Inspiralized (changed some quantities and a bit of the process).

NOTES: If you can't find kohlrabi in your grocery store, I have successfully substituted celery root or parsnip. You can also use pancetta instead of bacon (or it's fine without any meat at all). Pecorino romano cheese can be subbed for parmesan as well.
Adapted from: Inspiralized
Number of servings: 4

Ingredients
  • 6 slices bacon cut into 1-inch pieces
  • 1 large yellow onion, peeled, cut in half and very thinly sliced or spiralized
  • salt and pepper
  • 2 teaspoons extra virgin olive oil and more for drizzle
  • 2 large kohlrabis, peeled and spiralized
  • ½ cup shaved parmesan to garnish

Directions​
  1. Place a large skillet over medium-high heat. Once heated, add the bacon pieces and cook until crispy, about 7-10 minutes. When bacon is done, take a slotted spoon and set aside on a paper-towel-lined plate.
  2. Pour out half of the bacon grease, immediately add onion, and season with salt and pepper. Turn heat down to low. Cook the onions until caramelized, 10-15 minutes. If onions stick to the bottom of the pan, add splashes of chicken broth if needed.
  3. Once onions are done, remove to a plate and set aside. Wipe out skillet with paper towel. Add olive oil and kohlrabi noodles. Season with salt and pepper and cook for 5-7 minutes, or until kohlrabi wilts down and is to your preference. Add onions and bacon and toss well to combine.
  4. Divide pasta into four bowls and garnish with shaved parmesan and an extra drizzle of olive oil, if desired.
Picture
6 Comments

Happy Birthday to ME Chocolate Cake and Chocolate Sour Cream Frosting

2/3/2018

12 Comments

 
Picture
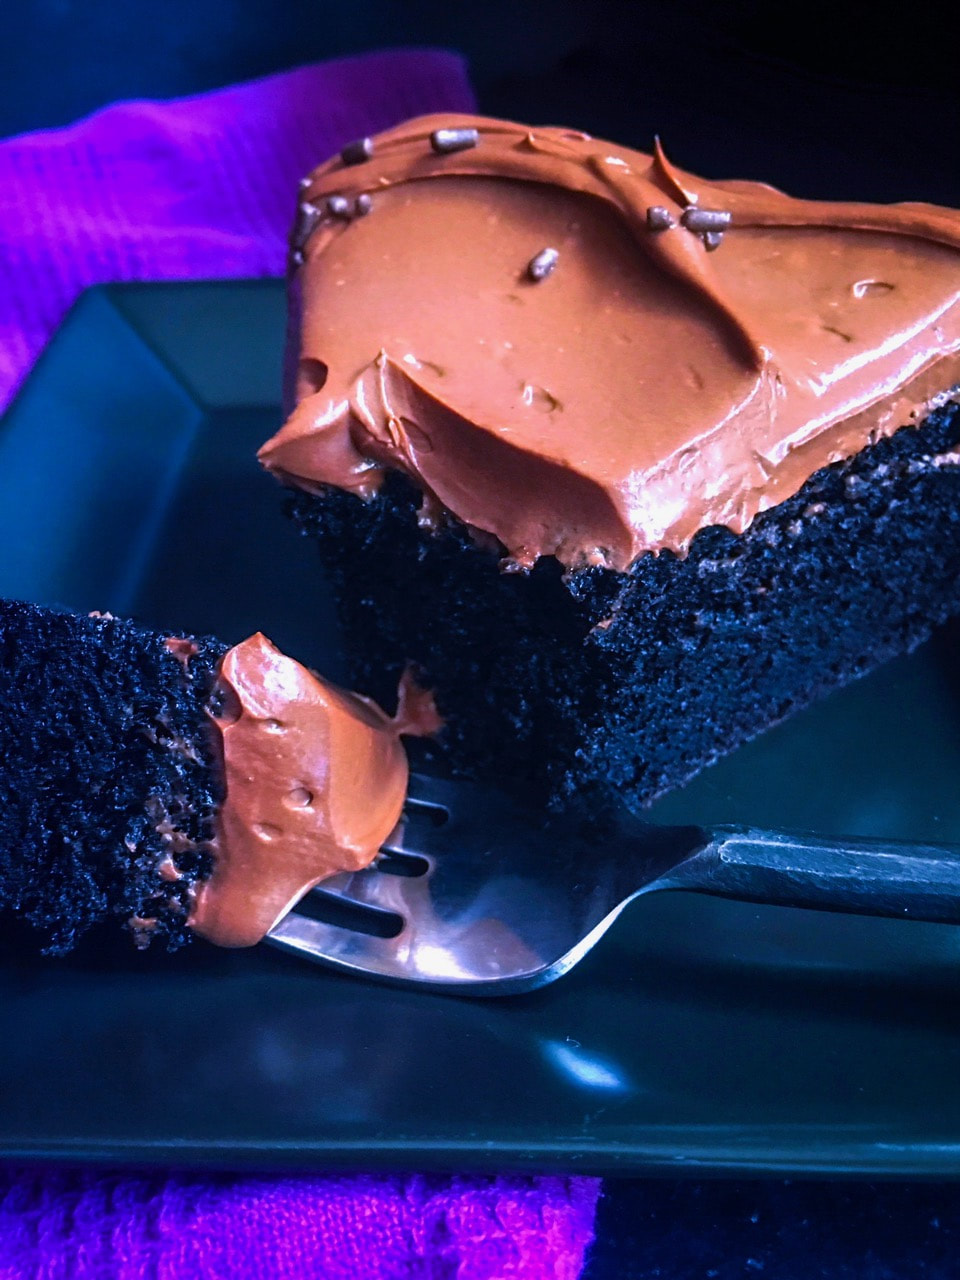
I baked my own birthday cake. 

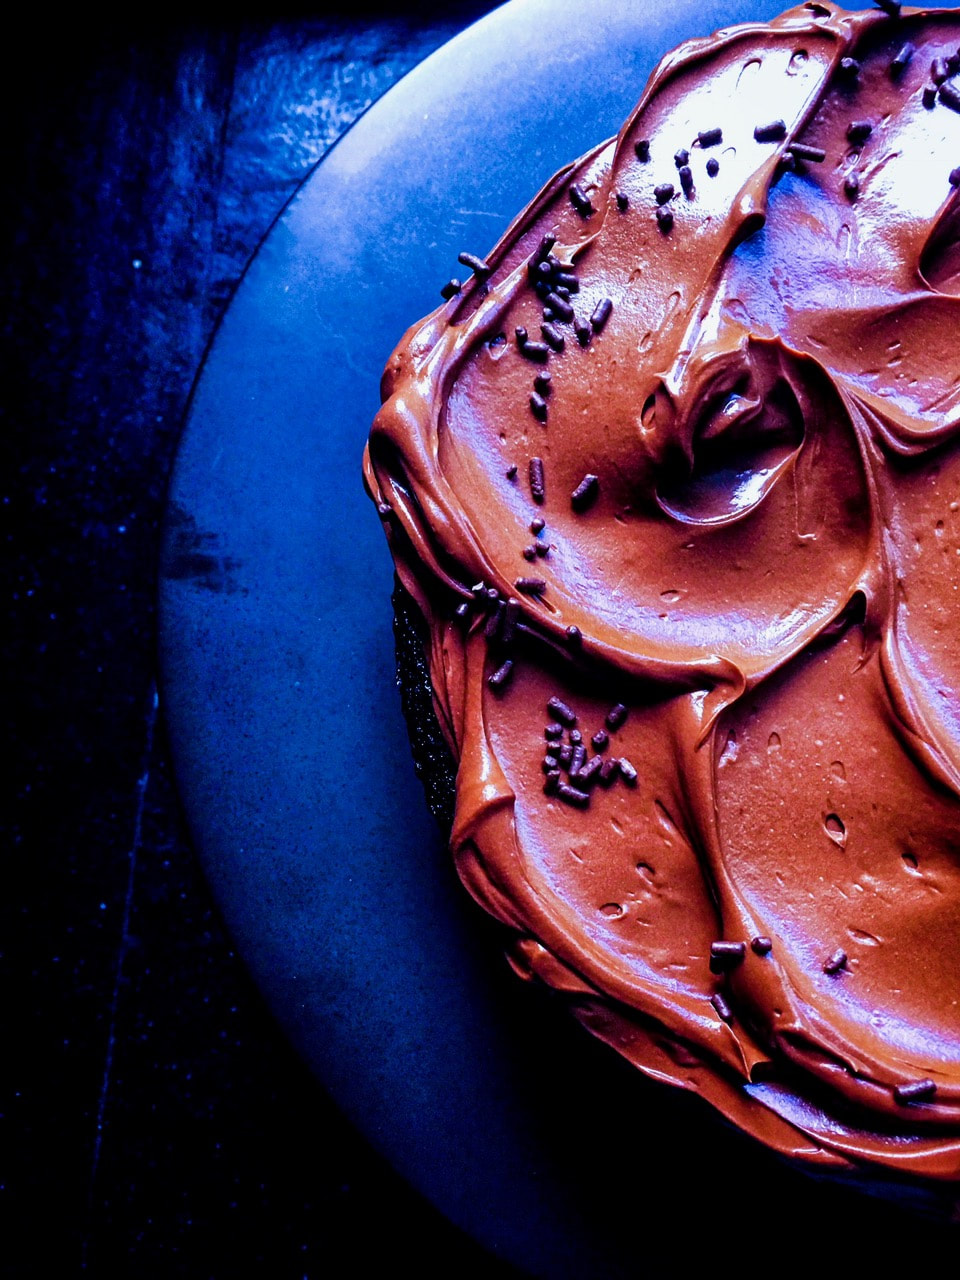
What? You don't do that? It's not that my BF didn't offer to buy me the best dessert in town. [Ed. Note: Save your letters! Jeez.] It's just that I was feeling exceptionally specific, and wanted it to taste deep, dark, intensely chocolatey and extra-extra moist. We don't partake in rich desserts very often, so when we do, it needs to be amazing or it's not worth it. Many times we've found ourselves drooling over beautiful confections, only to be nonplussed by the taste. [Ed. Note: Breathtakingly meh™.]

The reason this cake is my go-to is that it has a creamy chocolate bite, and the sour cream frosting has an impressive tang that really sets it off. Also noteworthy, the frosting has neither butter nor whipped eggs (only a smidge of added sugar), making for easier preparation.

The cake itself is adapted from Ina Garten (the recipe is cut in half), the frosting from Smitten Kitchen. 

Bit of a side note, but I had a perfect birthday yesterday. Our inital dinner plans in San Francisco were thwarted (there's a dog flu ripping through our area, so we couldn't find a proper sitter, and we don't take chances with our Marlowe), but we ended up having an even better day and evening sticking closer to home. The BF took me to the movies (Winchester, not our cup of tea) and then to a terrific local restaurant called Timber & Salt. The meal: an appetizer of crispy brussels sprouts with apple gastrique and whipped goat cheese, cheeseburger with horseradish mayo and bacon jam (oh yes), and a bavette steak over sauteed greens and maitake mushrooms in a red wine reduction sauce.

Once home we chilled to the far superior movie A Futile And Stupid Gesture (about Doug Kenney and the rise and fall of National Lampoon), cracked open a bottle of prosecco we'd been saving, made a cocktail with Aperol (my favorite), and tucked into this cake.

Folks, this is my absolute favorite cake. Excuse me while I have another slice.​
Picture
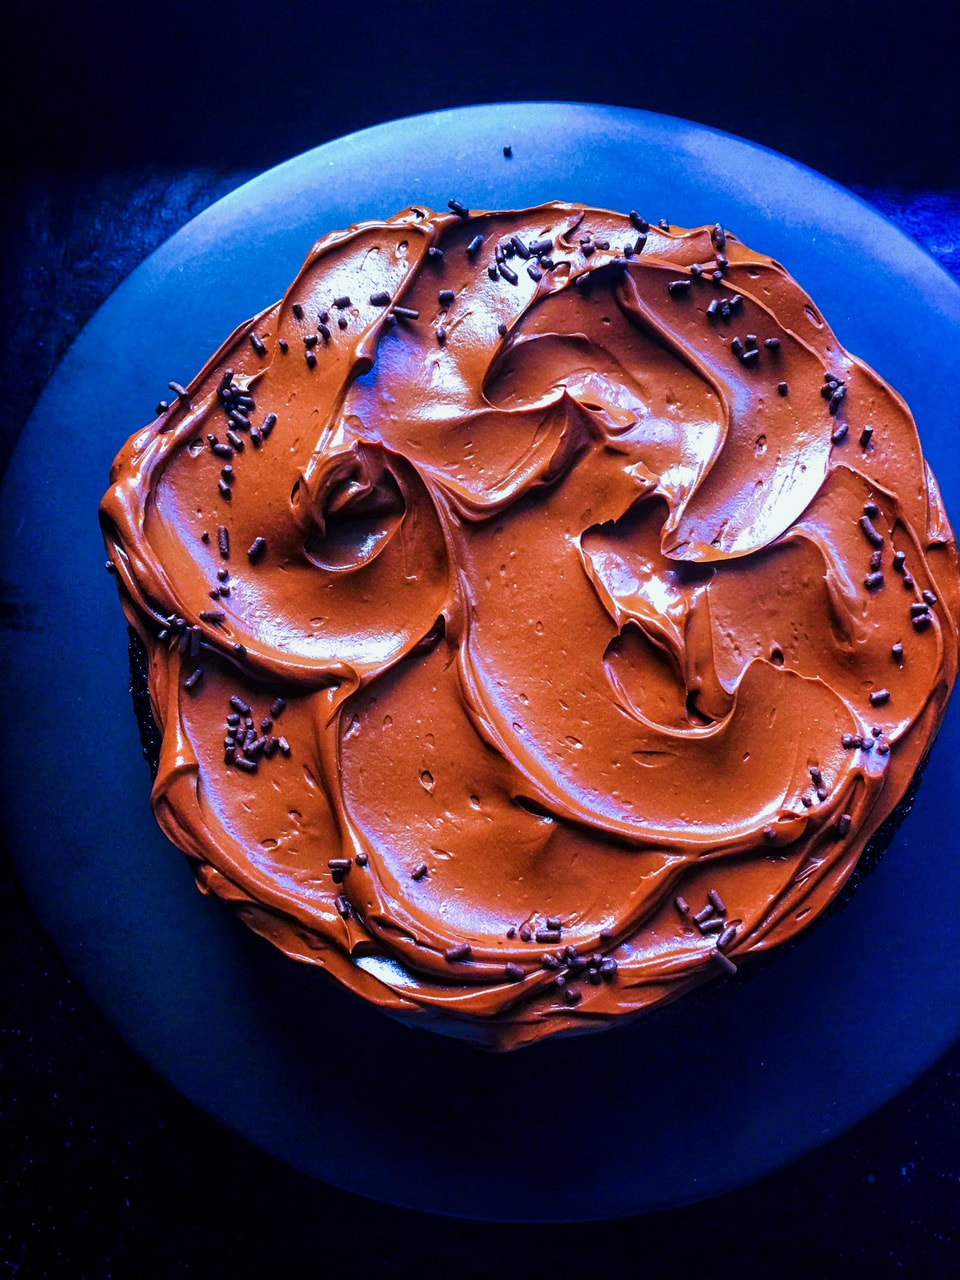
Adapted from: Ina Garten and Smitten Kitchen
Number of Servings: makes a one layer 8-inch cake (round or 8x8 square)

Cake
Ingredients
  • ¾ cup + 2 tablespoons all purpose flour, plus more for dusting
  • 1 cup sugar
  • 6 tablespoons unsweetened cocoa powder 
  • 1 teaspoon baking soda
  • ½ teaspoon baking powder
  • ½ teaspoon kosher salt
  • ½ cup buttermilk
  • ¼ cup vegetable oil
  • 1 large egg
  • ½ teaspoon pure vanilla
  • ½ cup freshly brewed hot coffee

Directions
  1. Preheat oven to 350 °F. Butter one 8 x 2-inch round cake pan or 8 x 8-inch square pan and line with parchment; butter the paper. Dust the pan with flour, tapping out any excess.
  2. In electric mixer bowl fitted with a paddle, mix flour with the sugar, cocoa powder, baking soda, baking powder and salt at low speed. In a seperate bowl, whisk buttermilk with the oil, eggs and vanilla. Slowly beat buttermilk mixture into the dry ingredients until just incorporated, then slowly beat into the hot coffee until fully incorporated.
  3. Pour batter into the prepared pan. Bake for 30-35 minutes, or until a toothpick inserted in the center of each cake comes out clean (do not overbake). Let the cake cool in the pan for 30 minutes, then invert cake onto a rack to cool. Peel off the parchment.

Chocolate Sour Cream Frosting
NOTE: Be sure that your sour cream is at room temperature before you make the frosting. 
Ingredients
  • 7 ½ ounces semisweet or bittersweet chocolate, chopped
  • ½ + ⅛ teaspoons instant espresso (optional) 
  • 1 ⅛ cups sour cream, at room temperature
  • 2-4 tablespoons light corn syrup
  • ½  teaspoon vanilla extract

Directions
  1. Combine chocolate and optional espresso powder (if using), in the top of a double-boiler or in a heatproof bowl over simmering water. Stir until chocolate is melted. (Alternately, you can melt the chocolate in a microwave for 30 seconds, stirring well, and then heating in 15 second increments, until the chocolate is melted.) Remove from heat and let chocolate cool until tepid.
  2. Whisk together the sour cream (I used a hand mixer), 2 tablespoons of corn syrup and vanilla extract until combined. Add the tepid chocolate slowly and stir/beat quickly until mixture is uniform. Taste for sweetness, and if needed, add additional corn syrup in one tablespoon increments until desired level of sweetness is achieved.
  3. Let cool in refrigerator until the frosting is a spreadable consistency. This should not take more than 30 minutes. Should the frosting become too thick or stiff, just leave it out until it softens again.
Picture
12 Comments

    Author

    I'm Jacquie, personal chef & recipe developer in the beautiful Pacific Northwest. ​Living life with my wildly funny boyfriend and dog Marlowe. Lover of books, bourbon, chocolate and movies.​

    Archives

    May 2020
    February 2020
    January 2020
    November 2019
    October 2019
    September 2019
    August 2019
    July 2019
    May 2019
    April 2019
    March 2019
    February 2019
    January 2019
    December 2018
    November 2018
    October 2018
    September 2018
    August 2018
    July 2018
    June 2018
    May 2018
    April 2018
    March 2018
    February 2018
    January 2018
    December 2017
    November 2017
    October 2017
    September 2017
    August 2017
    July 2017

    Categories

    All
    Ahi
    Apple
    Apple Pie
    Avocado
    Bars
    BBQ
    Beans
    Beef
    Beets
    Black Bean
    Blackberry
    Blueberries
    Borscht
    Bread
    Brownies
    Brussels Sprouts
    Bundt
    Butter
    Butternut Squash
    Butterscotch
    Cabbage
    Cake
    Caramel
    Carrot
    Challah
    Champagne
    Cheesecake
    Chicken
    Chili
    Chinese
    Chinese New Year
    Chocolate
    Christmas
    Cinco De Mayo
    Citrus
    Cocktail
    Coconut Rice
    Comfort Food
    Cookies
    Corn
    Cranberries
    Crostata
    Crumble
    Cupcakes
    Curry
    Dessert
    Easter
    Egg
    Egg Nog
    Eggplant
    Fish
    Ginger
    Gingerbread
    Gluten Free
    Grain Free
    Green Sauce
    Gumbo
    Halibut
    Halloween
    Hannukah
    Healthy
    Holiday
    Holidays
    Ice Cream
    Indian
    Kale
    Key Lime
    Kohlrabi
    Kosher
    Lamb
    Latkes
    Lemon
    Lentil
    Low Carb
    Mac & Cheese
    Malt
    Mango
    Mango Salsa
    Mardi Gras
    Martini
    Memorial Day
    Mexican
    Miso Chicken
    Moroccan
    Mushrooms
    Naan
    Nectarine
    Noodles
    Olive Oil
    Parsnips
    Passover
    Pasta
    Pavlova
    Peanut Butter
    Penne
    Peppermint
    Pesto
    Pie
    Pizza
    Plums
    Pluot
    Pork
    Potatoes
    Pots De Creme
    Pudding
    Pumpkin
    Pumpkin Cake
    Quinoa
    Rajma
    Raspberries
    Ratatouille
    Risotto
    Root Beer
    Salad
    Salmon
    Salmon Bowl
    Salsa
    Sauce
    Scallops
    Shortbread
    Short Ribs
    Shrimp
    Side Dish
    Soup
    Soy Sauce Eggs
    Spicy
    Spiralized
    Steak
    Strawberries
    Sugar Free
    Summer
    Sweet
    Sweet Potatoes
    Tacos
    Tart
    Thanksgiving
    Tomatoes
    Turkey
    Valentine's Day
    Vegan
    Veganuary
    Vegetable
    Vegetarian
    Veggie Burger
    Whole30
    Whoopie Pies
    Yams
    Yellow Bell Pepper
    Yu Choy

    RSS Feed

Powered by Create your own unique website with customizable templates.
  • home
  • services
  • bio
  • blog
  • contact
  • PHOTOS (summer)
  • photos (winter)
  • PRESS
  • faq